Category Archives: Copics

Seasons Givings 2019

Welcome to Seasons Givings 2019 Blog Hop!  After the hustle and bustle, it’s always nice to relax, reflect and look at pretty inspiration! I’m glad you stopped by to help me ring in the New Year!

Seasons Givings is a way for artist in the papercraft community to spread new year cheer and gifts with all of you! You may have arrived via my dear friend and Splitcoast team member, Lydia Fiedler – she’s so awesome, but the hop starts HERE if you’d like to go back to the beginning!


I do have two fun giveaways after I share  a few fun cards that I finished this fall.

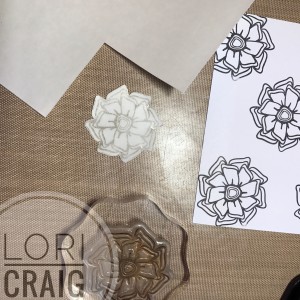
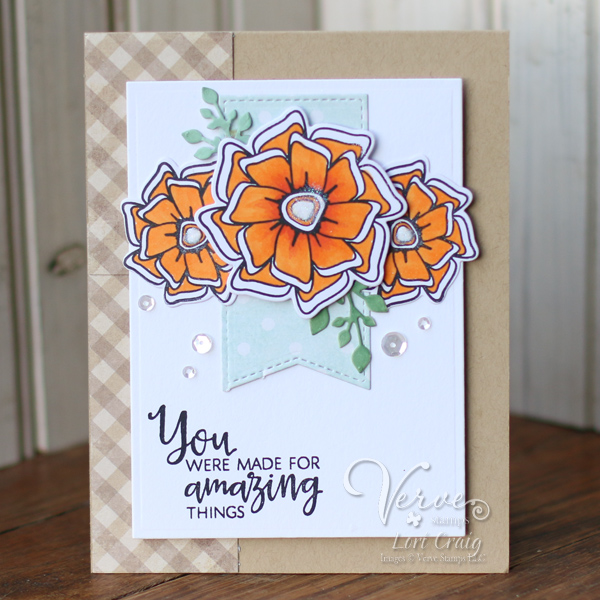
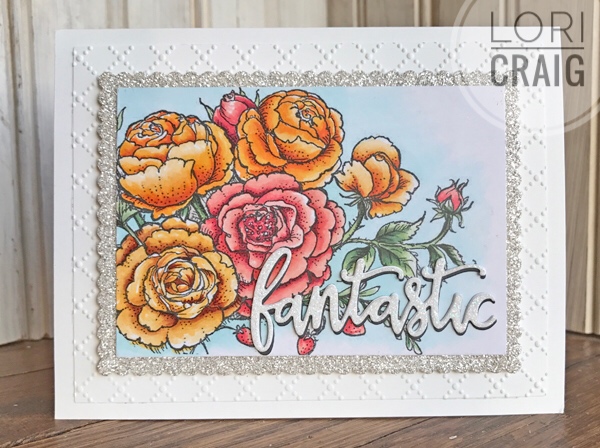
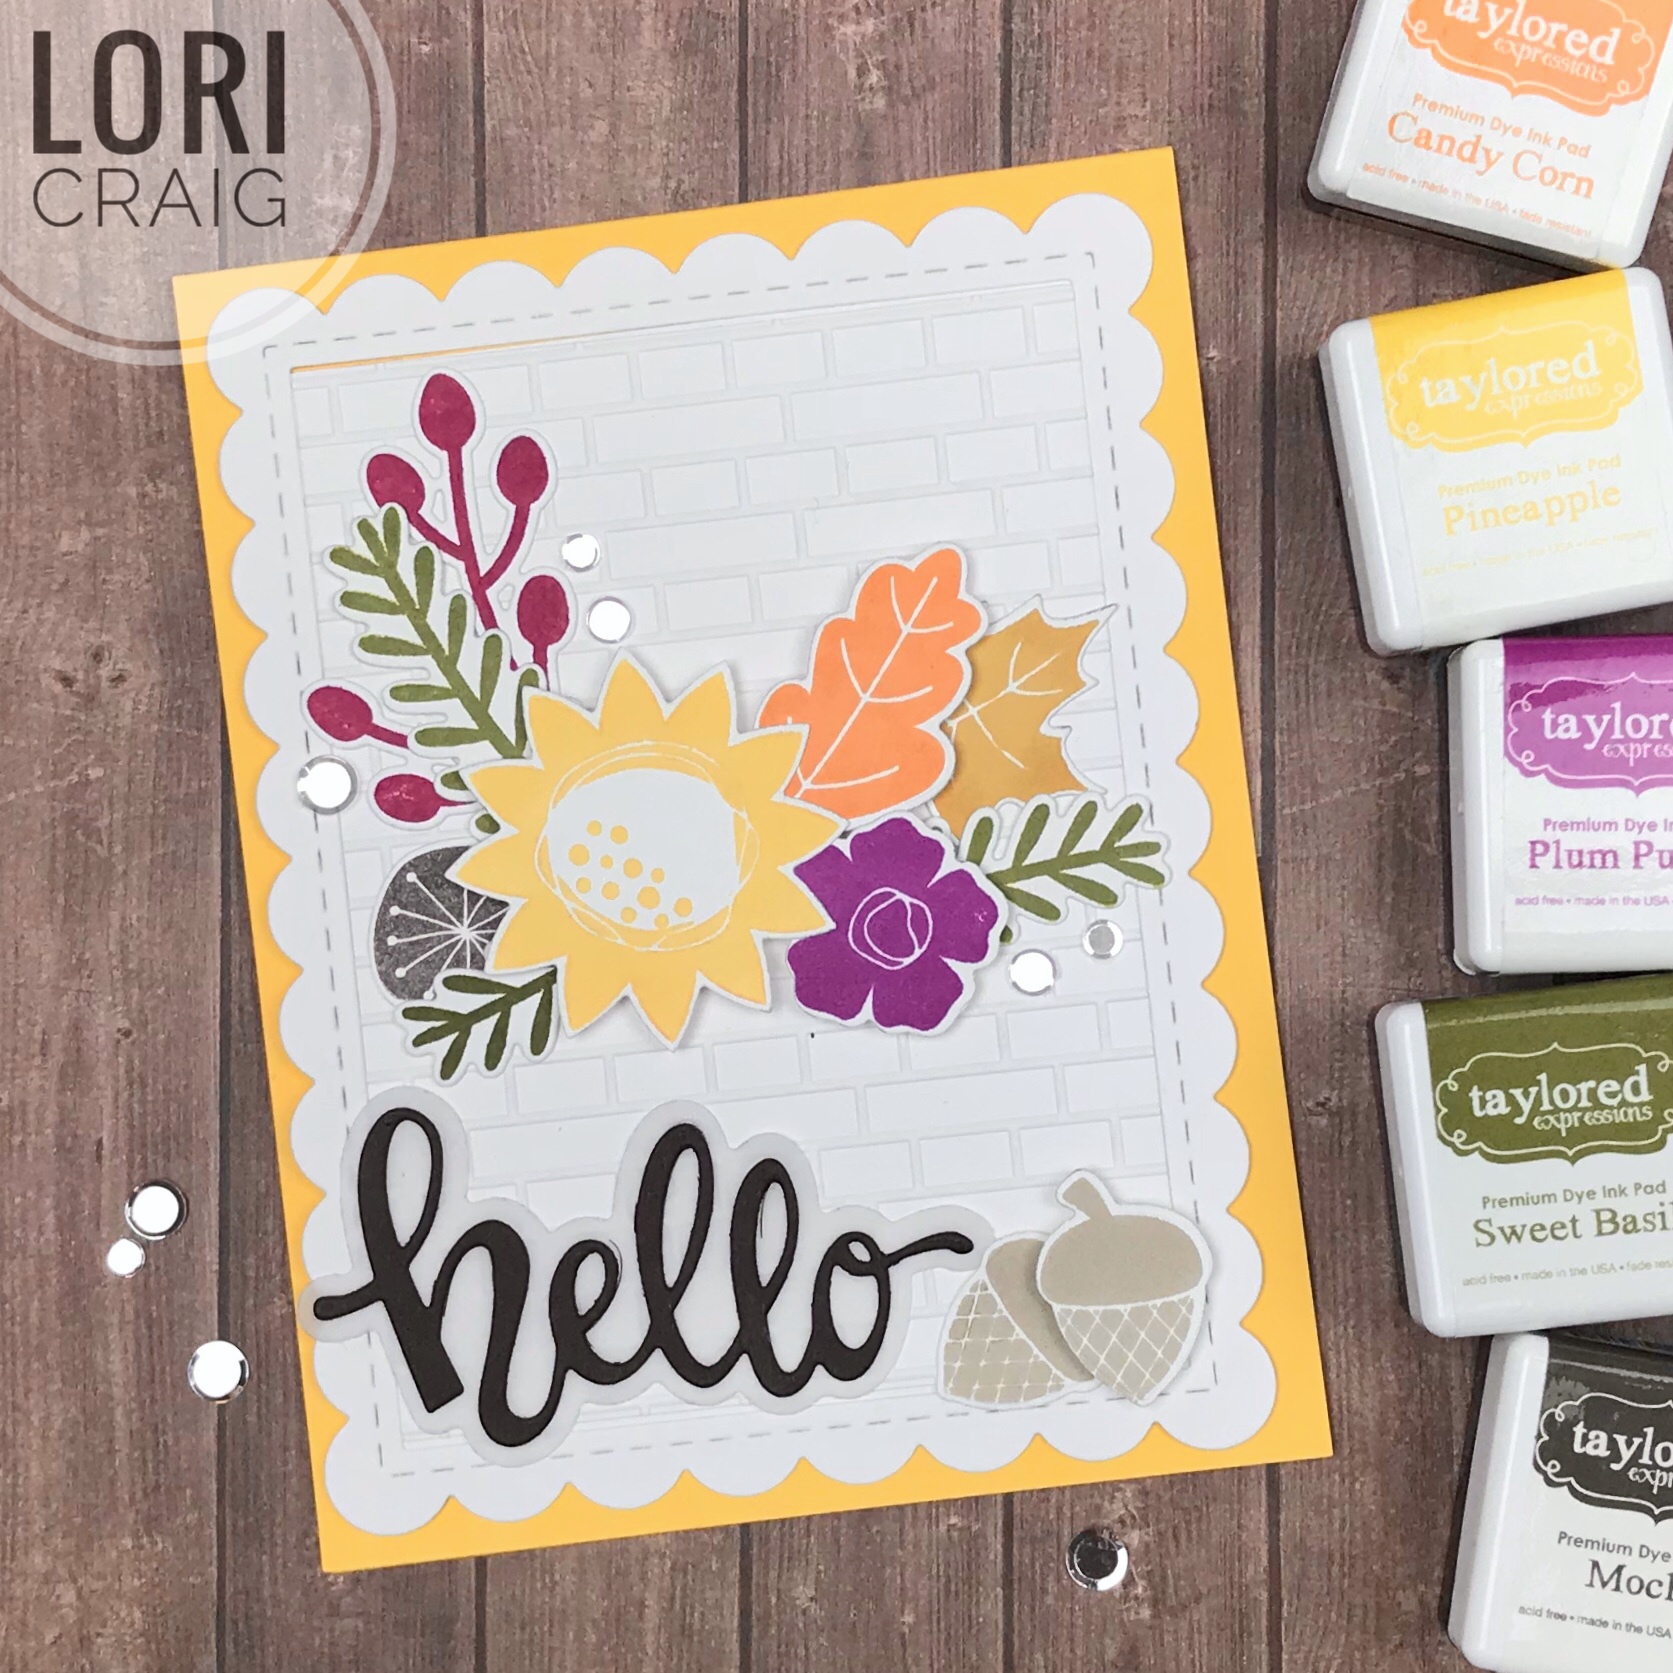
First up is this bright Fall Floral hello made with stamps and dies from Taylored Expressions. I love this Fall Florals set because the colors can be changed making most of the images work for any season, and the solid art makes for quick and easy stamping.

The Hello Script and Hello Script Backer die (cut from vellum!) are universal! Sure to cheer up anyone on your list! I’ve arranged and backed the florals and greetings on the Subway Tile embossed white layer. It’s like beautiful subway graffiti!

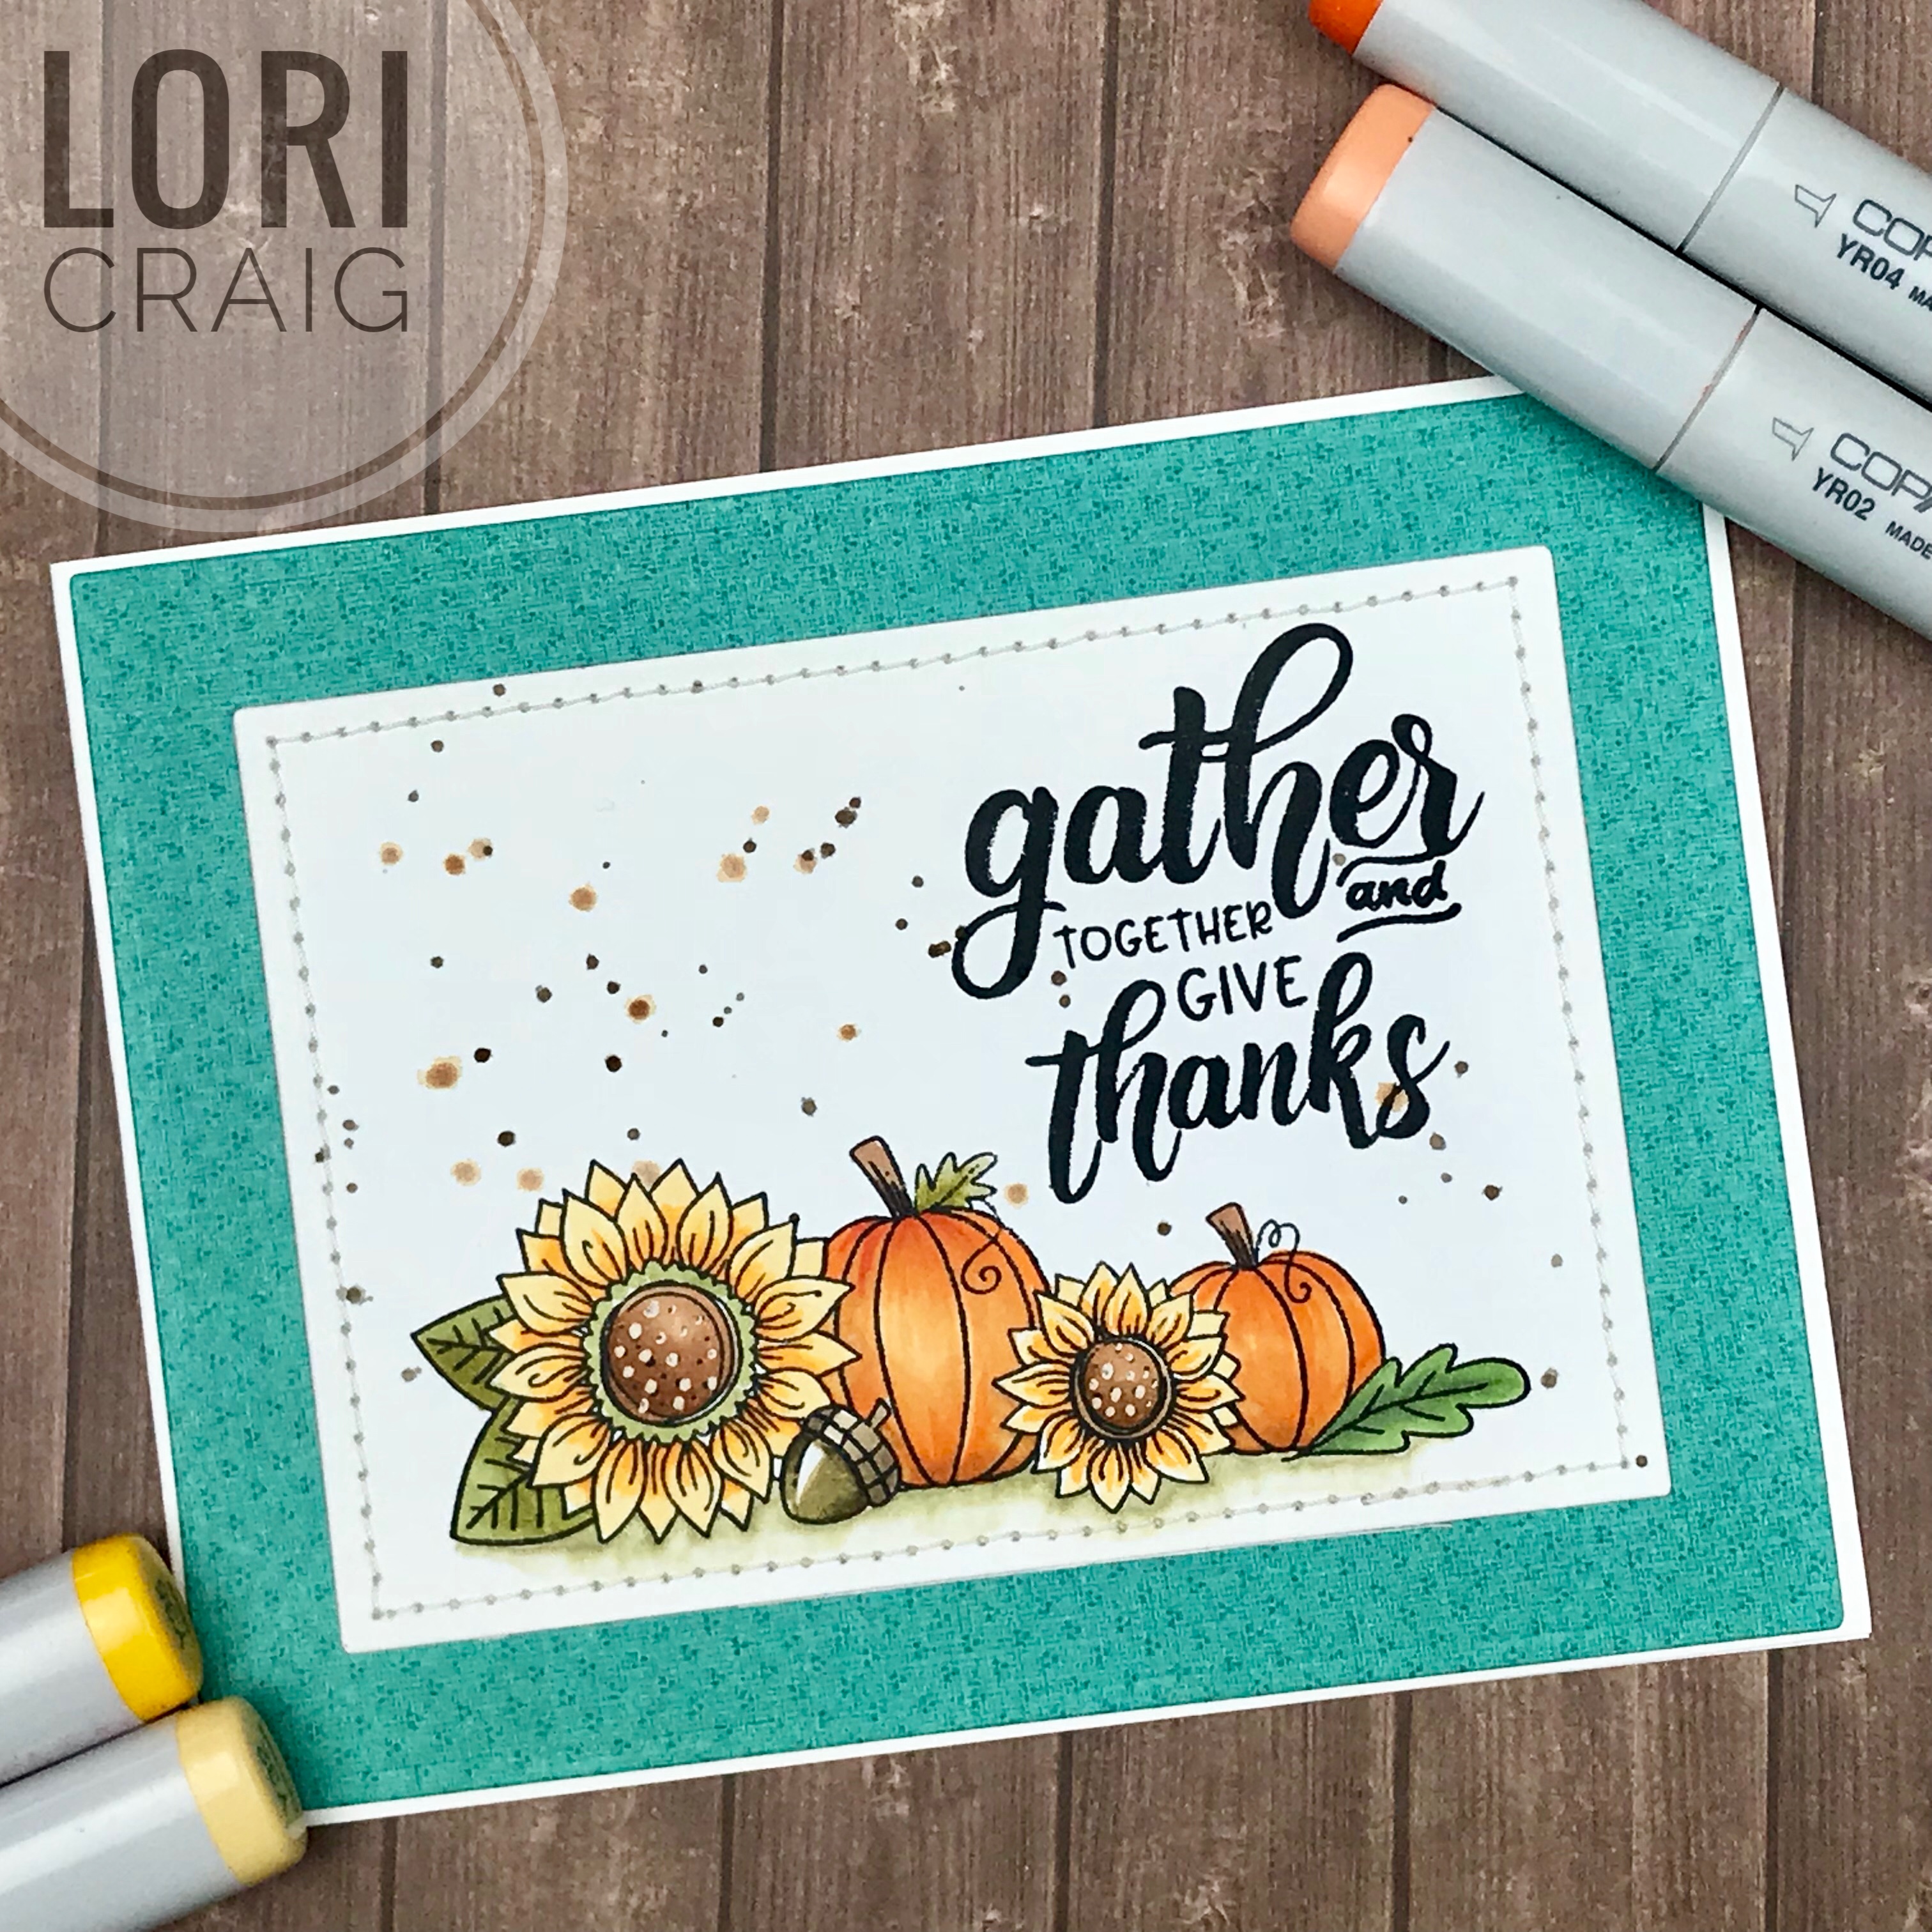
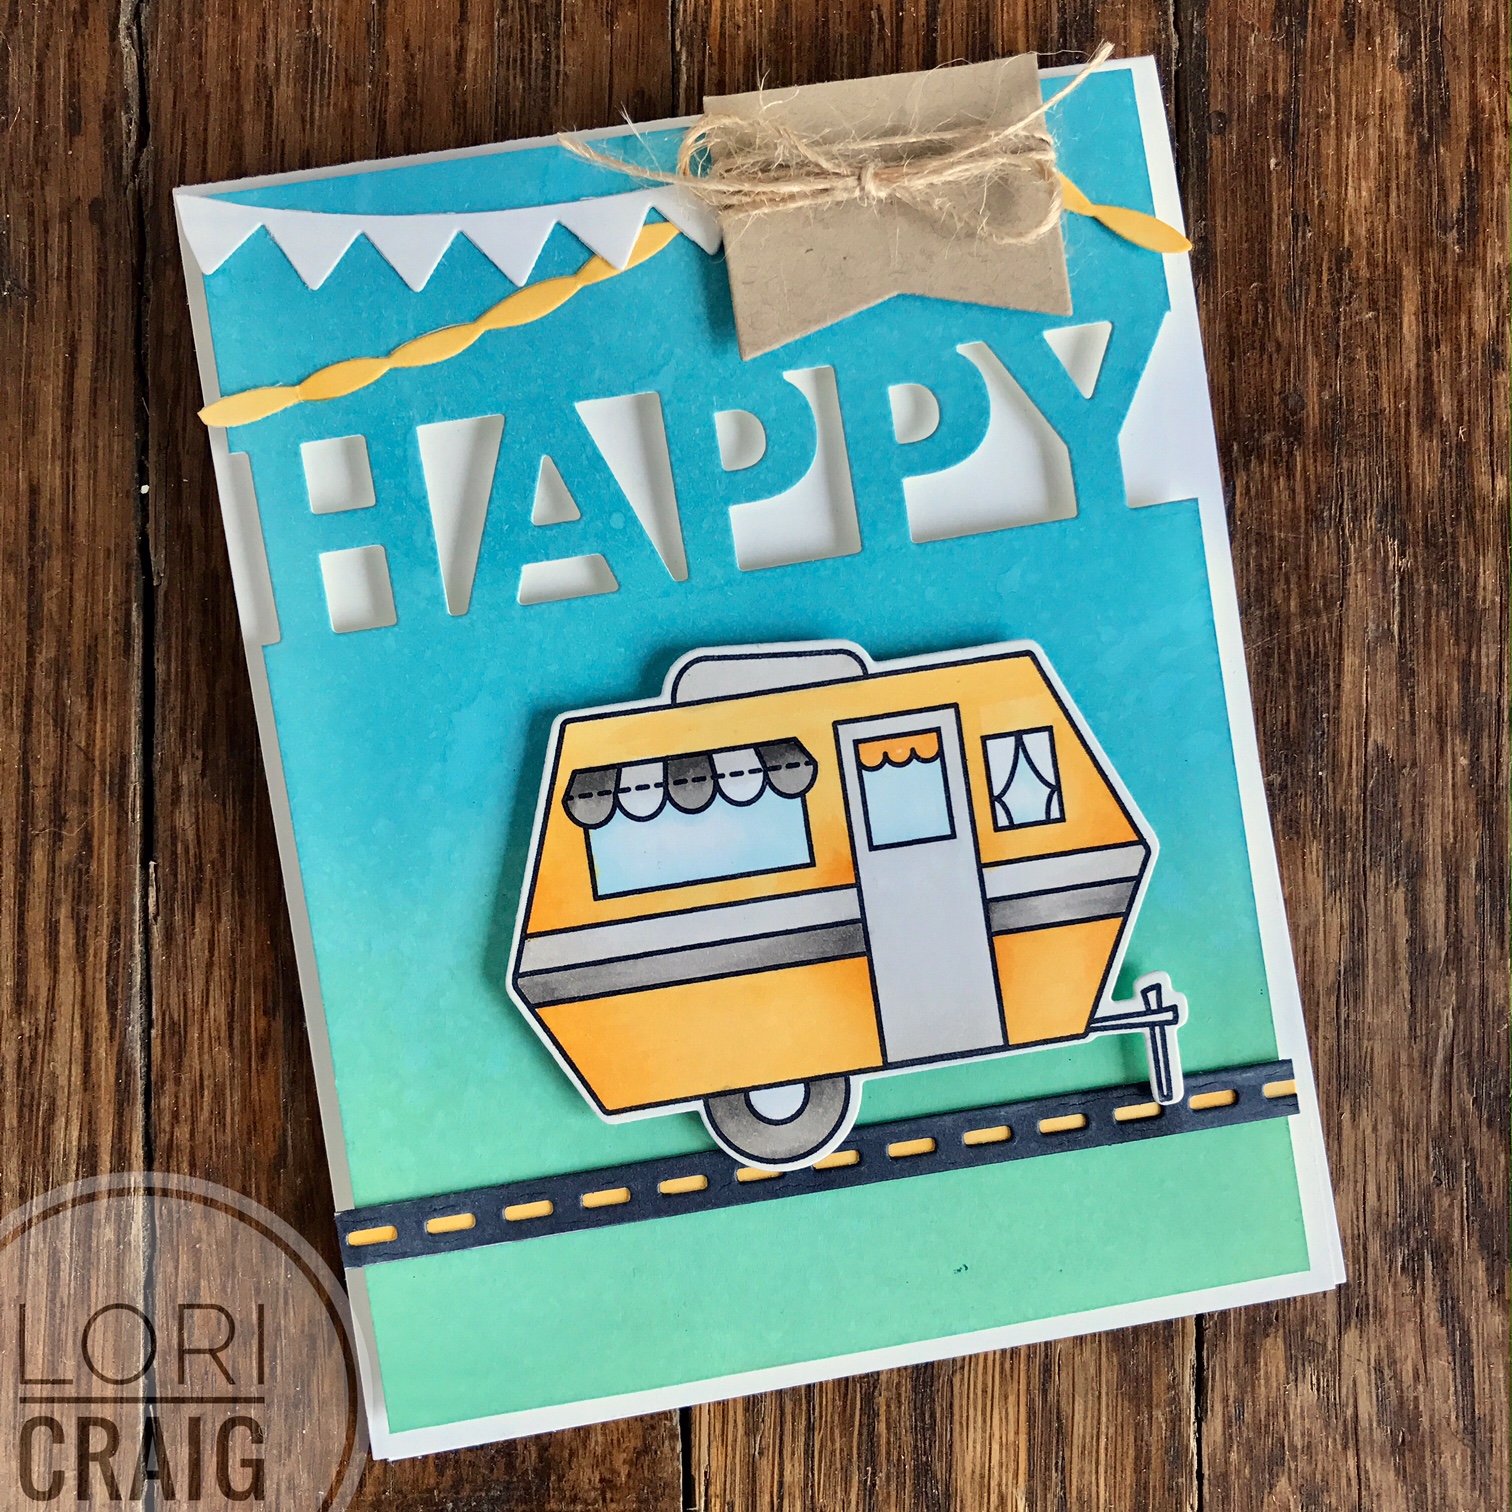
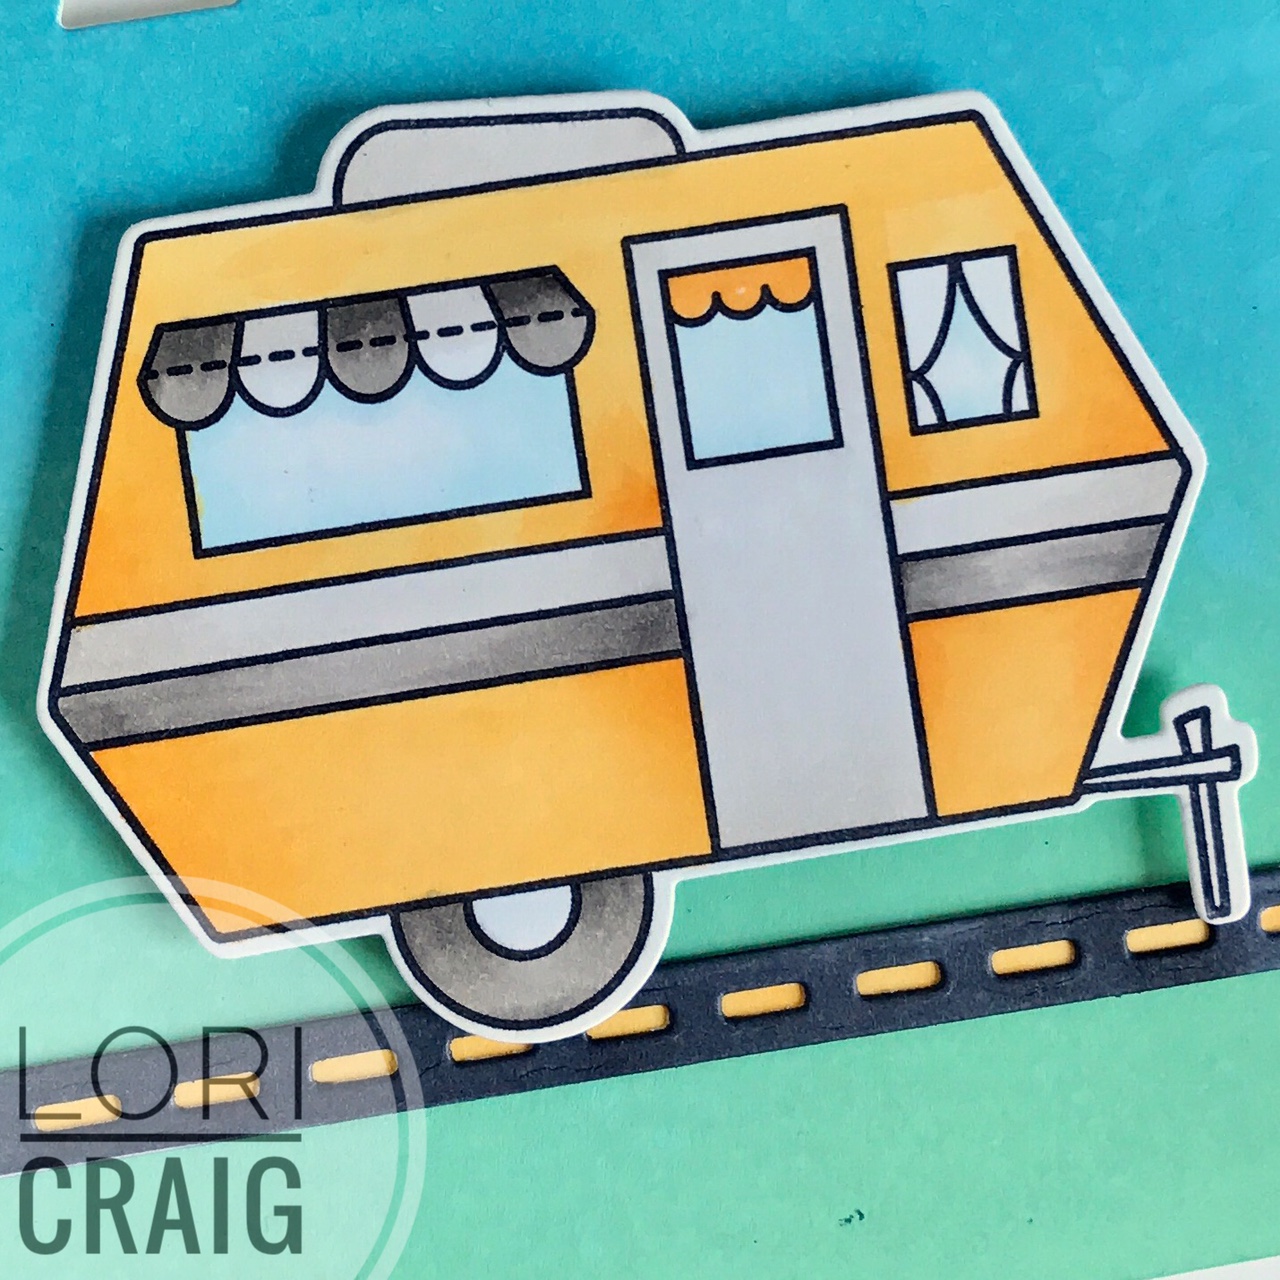
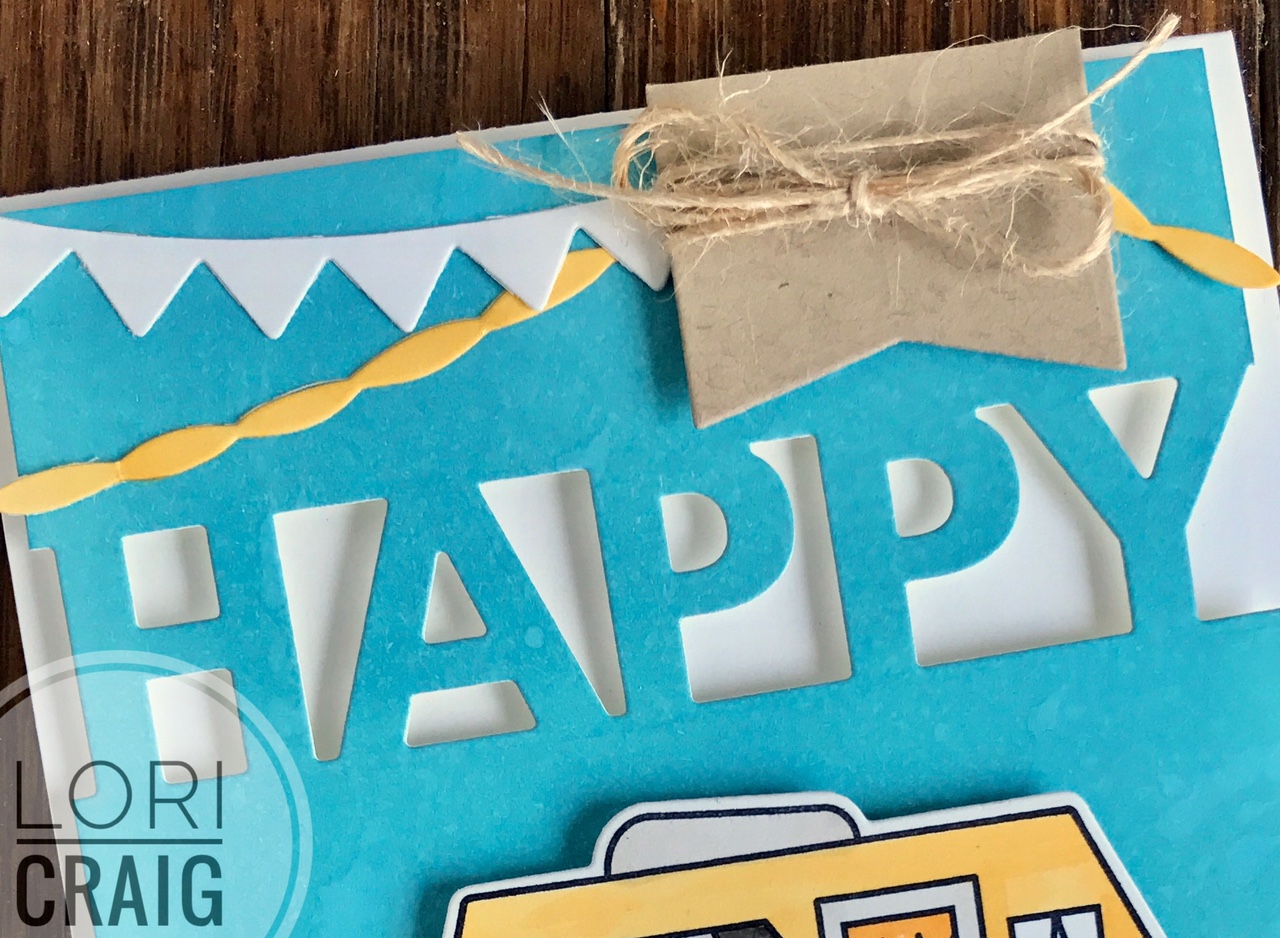
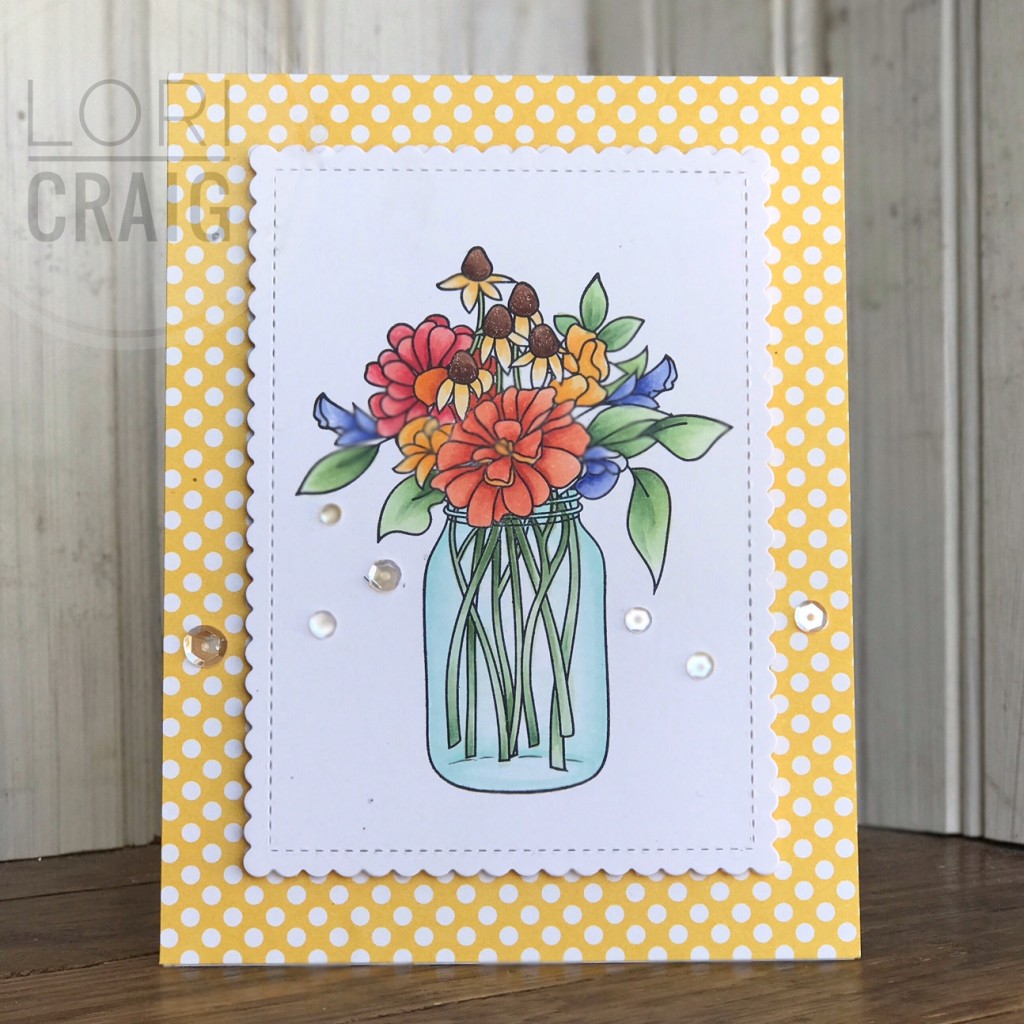
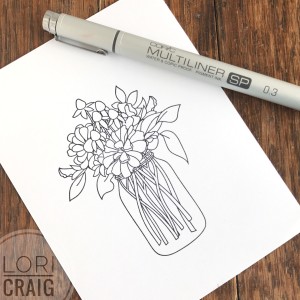
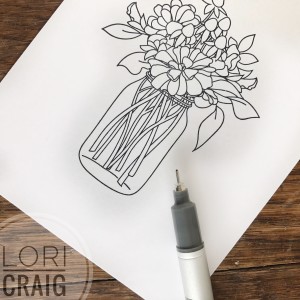
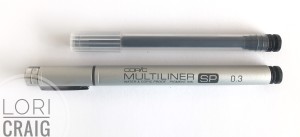
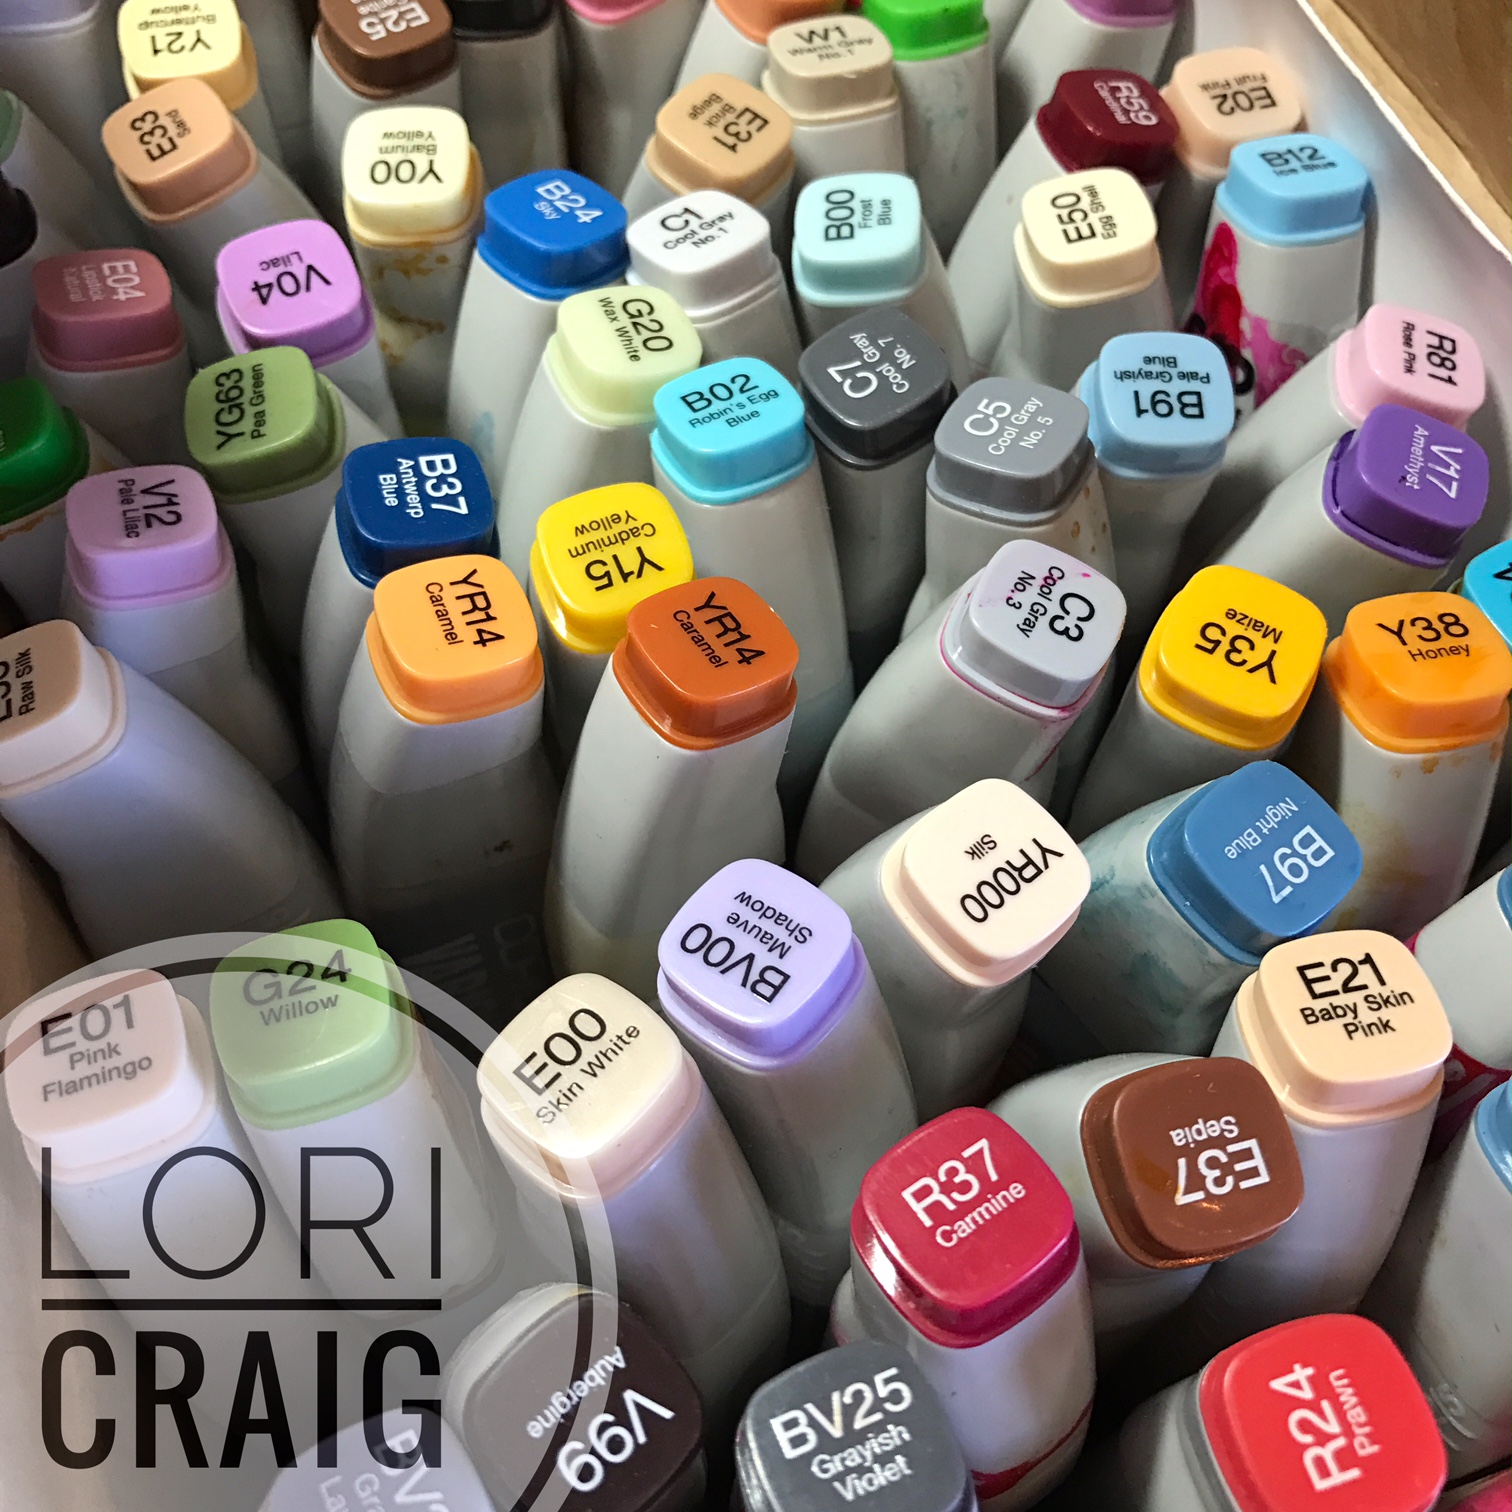
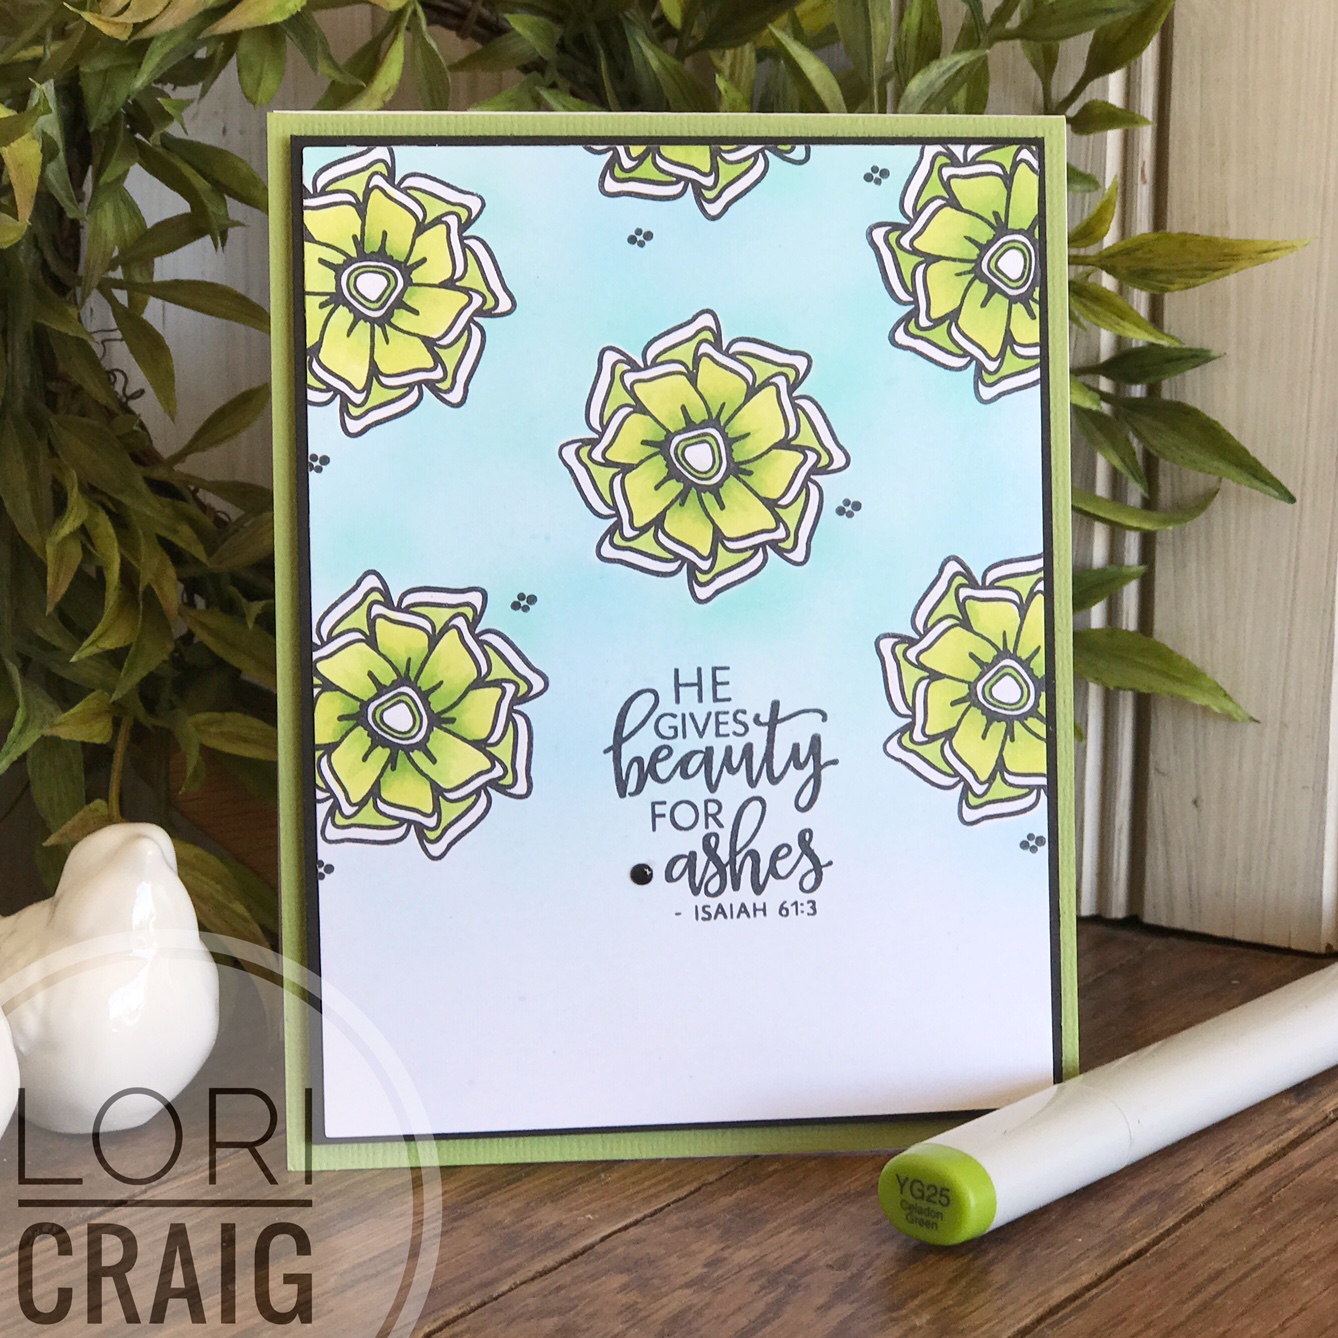
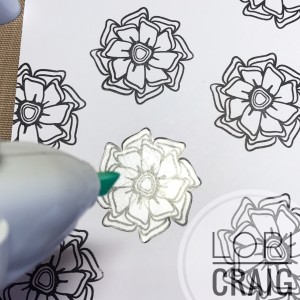
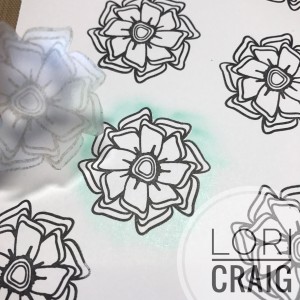
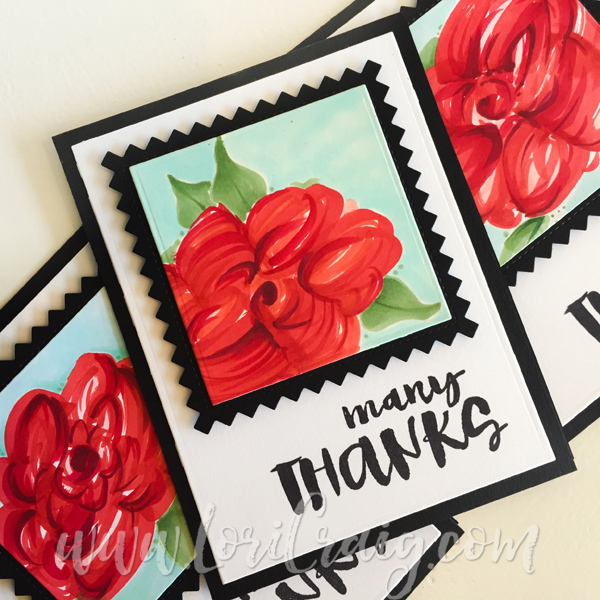
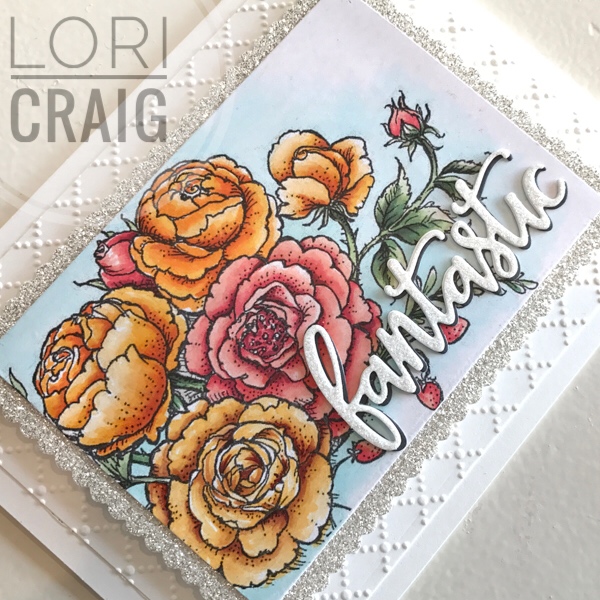
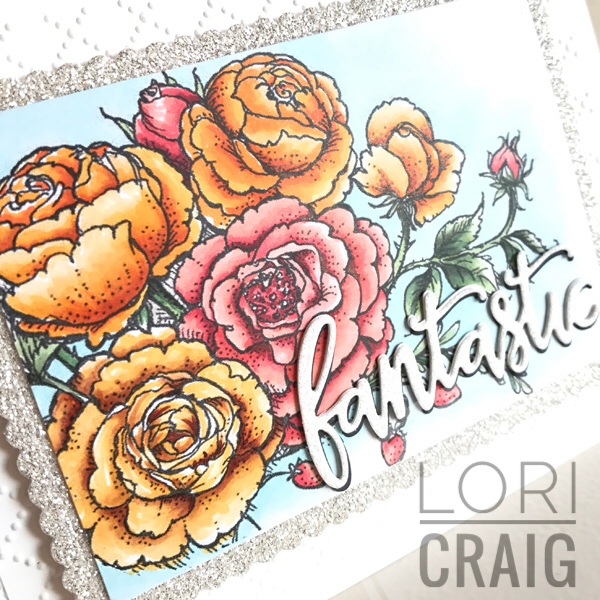
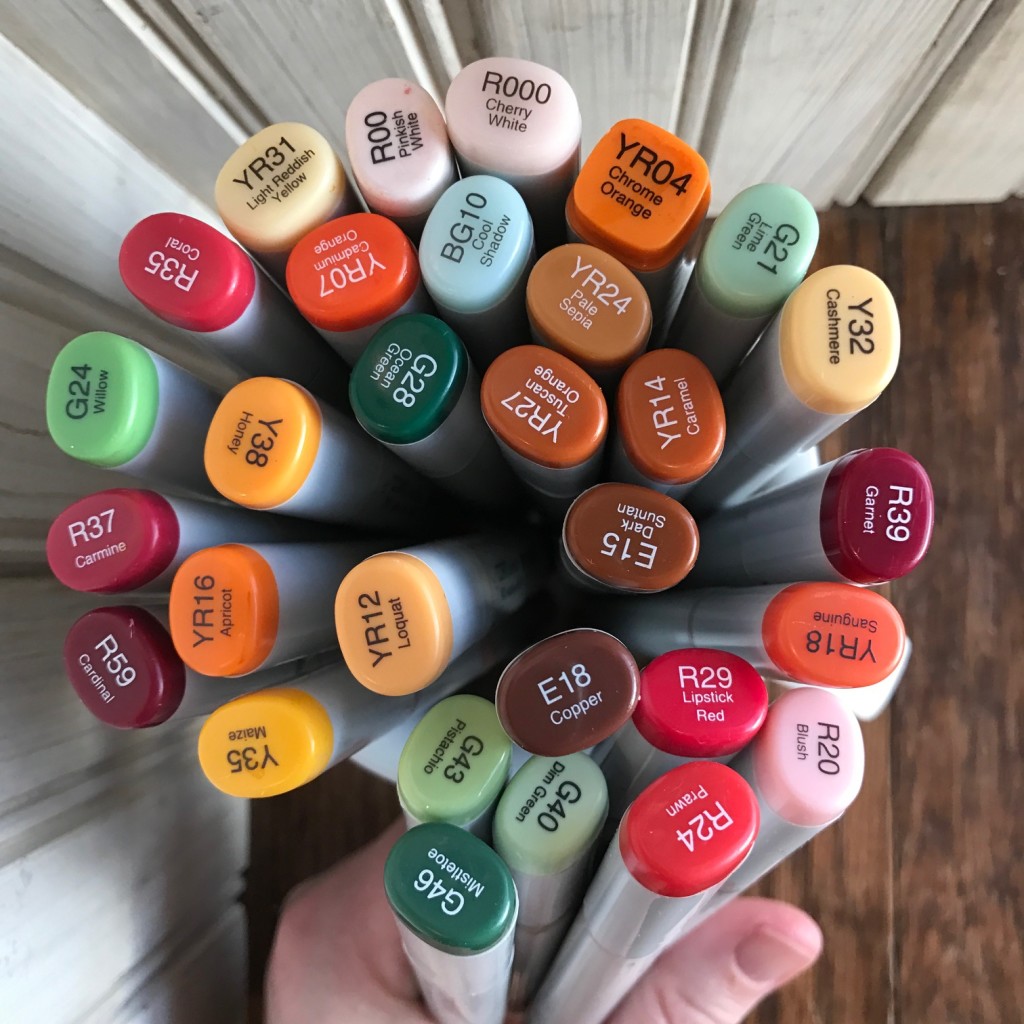
One more fall card from Taylored Expressions – this beauty was fun to color with Copic markers, and splattered with a bit of background texture. The image and sentiment are from Cutting Edge Fall. When I was grabbing links, I realized Taylor is having a Copic sale right now! Copic marker prices are increasing slightly, but Taylor’s are on sale through January 7th.

Copic colors: Y32/Y35/YR02/YR04/YR08/E33/E35/YG93/YG95

NOW HOW ABOUT A GIVE AWAY OR TWO!

I have two stamp/die collections. This first one features the cutest coffee set with dies from Sugar Pea designs, and the second stamp set is the adorable hot air balloon from Casual Fridays!

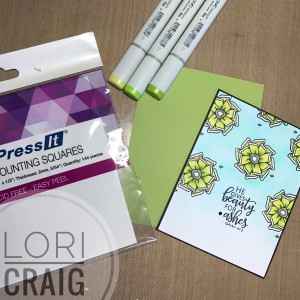
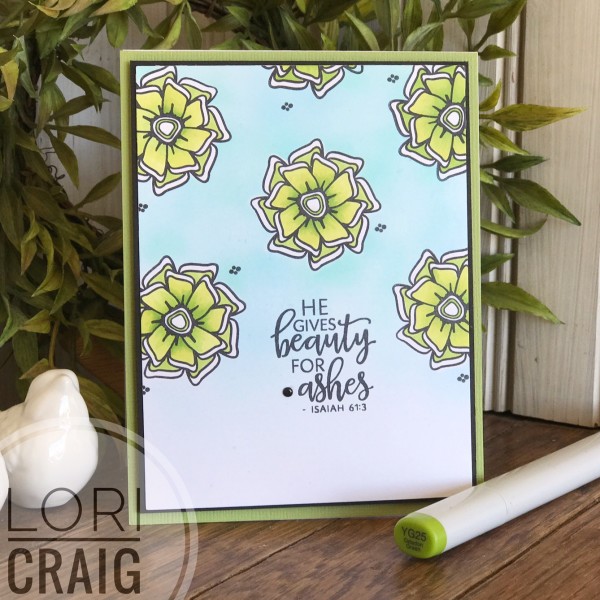
My second bundle includes a cute pumpkin spice stamp and die set from Pink & Main with this gorgeous floral – perfect for Copic Marker or watercolor from The Ton!

TO ENTER MY GIVEAWAY, please leave a comment and let me know what crafty thing you would like to learn or perfect in the new year! I’ll choose two random winners and post on Monday, January 7, 2019! 

Good luck and thanks for stopping by the Season’s Givings Blog hop – your next stop on the hop is my Splitcoaststampers team member and artist extraordinaire, Dina Kowal!

The full long list of awesome hoppers can be found below –

CLICK FOR MORE

Continue reading

A Copic Welcome & Blog Hop Prize

FullSizeRender (1)

Popping in between big projects today with some BIG NEWS

Imagination International  is thrilled to welcome the amazing Jennifer Dove to our Copic certification and workshop teaching team! Many of you are probably familiar with Jennifer’s work and you may have even had an opportunity to take a class or her bootcamp retreat at some point!

I feel fortunate and honored to welcome Jennifer to our team – she is a fabulous Copic artist with years of Copic paper crafting and fine art teaching experience!  Students will love her vast knowledge and her authenticity … She makes learning easy and fun! I can’t wait to sit in on some of her classes myself! <wink>

In honor of our new addition, we are giving away fun, new Copic Sketch pads and a Doodle Pack – I’ve been traveling a LOT lately, and I love tucking these into my computer bag – perfect on-the-go! For a chance to win, visit and comment with each of my fellow Copic team members… be sure to leave Jennifer a great big welcome at the end of the hop! We’ll draw winners on Sunday evening and announce next week! Good luck!

There are still many opportunities for a Copic class in 2017. See our full location and schedule HERE! Mark your calendar and make plans to join us!

We hope to see you soon!

Happy Camper

Happy Camper

Lest anyone think I’ve disappeared over the last few weeks… I’m still here. Happy Camper!

Last weekend I had an opportunity to “retreat” with 17 of my stamping friends at the Whatever Craft House in Newton, KS. I made a lot of cards, including this one! I’m going to send it to my cousin, as we enjoy camping together in the summer! She’s got the cutest little Minnie Winnie travel trailer.

I bought a new-to-me used trailer this winter – one weekend when my husband was out hunting. LOL That’s a fun story! I can’t share most of it in writing. I like being married! But, I will say, you can bet I’ll have a little nook for my markers when we take it out for the first camp of the season this year!

FullSizeRender (3)

At any rate – this card was for my cousin Terri with the Minnie Winnie – I like saying that! LOL

I stamped the Avery Elle Glamper Camper on XPress It Blending Card, colored with my favorite yellow Copic combo (Y32/Y35/Y38) and cut with the coordinating die.

One of the great things about the retreat – the best is the people – but second best is sharing supplies and trying new things! I was able to test drive the Ranger Distress Oxide Inks! The background was blended with Pistachio and Salty Ocean – swirling around – no brush strokes. Love that blended butter-smooth look!

FullSizeRender (2)

After blending the background, I cut the HAPPY from Taylored Expressions HAPPY Block Party – LOVE these dies because you can place them anywhere on your card front! So many words! So fun! I added a few cuts from the Skinny Mini Party Borders, a kraft flag and twine. Called it good and in the mail!

Happy Camper

So, that’s my happy and glad to be sharing for a Tuesday! I’m headed to Vancouver, BC to teach Copic certification this weekend, and I have one more Copic Workshop – new hand lettering, coloring animals and landscapes coming up in Anaheim in two weeks before the summer break! Come and color with me! Looking forward to it!

Have a GREAT Tuesday!

Wildflower Bouquet and Upcoming Copic Classes

FullSizeRender

I can’t believe that it is February, and I am already seeing friends here in the midwest share daffodil and spring flower photos. This is the craziest winter I remember for us here in Kansas. But, I’m not going to complain. I can’t wait for spring to really arrive, and I’ll take all the early peeks I can get!

This weekend, I colored Wildflower Bouquet with Copic Marker, thinking the whole time about sunshine and green grass! I love these sweet bouquet images from Taylored Expressions.

The Copic Marker colors I’ve used on this bouquet image are:

FullSizeRender_1

  • Brown-eyed Susans: Y32/Y35/Y38 and E25/E27 – with clear Spica glitter pen
  • Blues: B63/B66
  • Front Zinnia: R02/R05/R08
  • Back Zinnia: R32/R35/R37
  • Leaves: G40/G43/G46 – on top of the bouquet the leaves would be more saturated and vibrant than your stems (and this combo blends so smooth!)
  • Stems: YG61/YG63 – behind the glass you would expect the stems to be a  less vibrant – desaturated
  • Glass vase: BG10/BG11

Wildflowers Vase


One thing you’ll notice about the line art for the vase is that there is no vase bottom drawn in from the artist.


Wildflowers with Detail Lori Craig

For small style or personal preference tweaks like this, I often use a Copic Multiliner SP to doodle in whatever I feel like I’m missing. Here I’m using a .3 nib for lines that match the artist’s work in the stamp to draw in the back base of the glass mason jar. The ink in these pens is water and Copic tight, making it a great choice for your pre-coloring sketches.

Copic Multiliner SP

The Copic Multliner SP comes with 10 different nib options. And, in the event that your pen runs dry, it’s easy to slip in a refill cartridge from the back end of the pen.

FullSizeRender

For more Coloring Flowers tips and tricks, visit any of our instructors for a live in-person Coloring Flowers, Standard Copic Certification or Intermediate Copic Certification class. Certifications for 2017 will be ending soon, and we’ll move into our coloring and hand lettering workshops, so if you want learn more about basic blending, shadows, shading and how the Copic number system really works, we have classes coming up in:

  • Irving, Texas
  • St. Louis – with ME!
  • Anaheim
  • Indianapolis
  • Richmond, VA – with ME! 
  • Lyndhurst, NJ
  • Calgary
  • Saskatoon
  • Vancouver, BC – with ME! 
  • Orlando

All of the details and registration info can be found HERE. We would love to see you in any of our classes!

Craft Studio Tour

FullSizeRender (91)

I can’t believe that we moved into this house two years ago this month! I’d say it is past time to give you a craft studio tour, but it has taken a while for me to pull things together!

My studio is right off of our kitchen, so I spend a lot of time in here and I also feel very fortunate to have this room so close to the central hub of our home. When we moved into this house, I replaced many of our interior doors with old 5-panel doors that I brought from my last house. The doors had been in the attic of our 100 year old Victorian, and I sent them straight to the moving truck when we left. This windowed door came from my grandparents’ old farm house before it was torn down about 12 years ago.

dove-websave

In December I made a daytrip to the Pioneer Woman Mercantile with my friend Laurie Willison, and I feel in love with this felted rainbow garland.  I thought this would be perfect to drape over the inside of the window. The felted dove and fig leaf ornament find was icing on the ROYGBIV cake. (Genesis 8:11) So hard to photograph things resting on or through glass!)

door-view-websave

Come on in, and I will show you my space… It is definitely meant to be functional for me and that means I have a lot of my stuff visible so that I will use it, but I do try to keep things picked up and somewhat organized since it is open to our kitchen. This is also something that has come together over a long period of bargain hunting. 🙂

Continue reading

Rested, Refilled, Ready and a FREE class with me!

FullSizeRender

If you follow me on Facebook, you know my very first crafty act of 2017 was to clean and refill my entire classroom set of Copic Markers – 872 Sketch Markers… ready for awesome students…because all of my students are amazing! #truth

FullSizeRender_2

I did a short marker cleaning and refill video last month that you can find HERE. If you are wondering how long it took for me to get these babies whipped back into shape and ready for student hands, I was able to watch 2.75 seasons of Longmire on Netflix while I worked. I love that show… It’s the perfect blend of John Wayne meets modern day cultural issues. I’ve binged the entire series, and now await the 6th and final season. (sad face here)

FullSizeRender_1

So, now things are all ready to go, and right after CHA, I’m taking the show on the road. I’d love for you to come and take a Copic class with me soon! My upcoming locations are:

  • Portland, OR – February 17 and 18
  • St. Louis, MO – March 3 and 4
  • Richmond, VA – March 17 and 18
  • Vancouver, British Columbia – April 21 and 22
  • Orange, CA – May 5 and 6

tommy paint

Speaking of classes… if you live in the Portland, OR area, and would be intersted in taking a FREE class while I’m in Portland to learn about Tommy Paints – that I blogged about last week – please leave me a comment, and I’ll email the information to you.

tommy techniques

The class is in Vancouver, WA on Friday, February 17th from 5:00 – 8:00pm with instruction, product information and two fun projects! And, IT IS FREE! Hurry! Space is limited!

See you soon!

Beauty from Ashes – Pantone Color of the Year 2017

FullSizeRender_4

He gives beauty for ashes. ~ Isaiah 61:3

Sending a simple note of encouragement today, it doesn’t even matter who it is for… I don’t know many people right now who don’t need a smile and a friendly hello, a nod of assurance…let’s make a collective effort be the smile. be that nod.

It’s a new year and time to explore new trend, this month the Copic team was challenged to explore the Pantone Color of the Year 2017… And, the Copic match for this year’s color is the beautiful YG25!

I always find the color of the year inspirational, and apparently so do many other people because we will soon find it splashed everywhere!

pantone-color-of-the-year-lee-eiseman-quote


From the Pantone website, a little explanation to this year’s color selection… encouragement and reassurance. I like that!

And, I certainly like looking at this beautiful color palette in the dark days of winter!


FullSizeRender_1Here is how I made my card: After I had stamped my flower images from Beautiful Things set from Verve Stamps, I stamped a single flower on XPress It Mask It Film and trimmed. I use Staz-On to stamp on the film – only because my Copics will never touch the actual mask.


FullSizeRender_3

I apply the cut mask over the flowers stamped on my base layer of cardstock – XPress It Blending Card. The Mask It Film puts a tight seal around the edges of the stamped image, allowing me to get a crisp airbrush halo while keeping the flower itself clean.


FullSizeRender (90)

When finished airbrushing the background, lift the film and continue with your card. Personally, I color the flowers with Copic first, and airbrush last, but wanted to show you the white flowers so you can see the crisp, clean contrast.


FullSizeRenderAfter coloring and airbrushing, I applied my image panel to a black cardstock border and popped it up on Foam Mounting Squares – a fun new CHA product – to mount to the card front in apple green.


FullSizeRender_4

Give it a try… share some encouragement with the Color of the Year and link me here so I can see it! I know it will make me smile!

Thanks for stopping by! Have a great weekend!

Amazing *A* Decor with Tommy Art Paints

FullSizeRender (84)

Home from CHA today! It’s always wonderful to see new products and connect with so many crafty people. Crafty people are good people.

I also loved learning more about a new product from Imagination International – the Copic Marker people – called Tommy Art Paints. It’s a line of fluid Italian chalk paints that applies and dries so smoothly. And, it comes in over 30 rich colors!

I had made this ‘amazing a‘ to take with me as a classroom sample for our Copic Marker workshops, but I thought you might like to see it!

FullSizeRender (81)

I started with a bare wood accent letter from Hobby Lobby and seriously in less than 30 minutes had this cute accent for my daughter’s room! Here’s how I did it:

  1. With a clean 1″ brush, coat wooden letter with Cream Tommy Paint – allow about 5 minutes to dry.
  2. Rub a small amount of Neutral Wax over the edges of the letter with a brush or soft cloth. This allows for a buffer between the layers of paint without damaging your initial layer of cream paint.
  3. With the 1″ brush, coat letter with Vintage Green Tommy Paint – allow about 5 minutes to dry and repeat a second coat of Vintage Green – allow 5 minutes to dry.
  4. With green paint dry, sanding block (I used the same one I use on paper) and lightly brush edges of the wood letter to remove the green paint and expose cream paint below.
  5. Rub small amount of  Neutral Wax onto dry wood piece a soft cloth – allow to dry and buff to sheen with a clean, soft cloth.

FullSizeRender (82)

The felt flowers were cut from an assortment of florals dies – I had borrowed the dies from a friend, and I believe most of them are from MFT or Papertrey, though some may be retired. The felt is from Taylored Expressions – it’s beautiful quality and you can see how crisp and clean the cuts are on the felt. The dainty word ‘amazing’ is from  Amazing Adjective dies – Verve Stamps!

FullSizeRender (89)

This was a project that we completed at a marketing event last Thursday night at CHA. I started with two plain pieces of smooth MDF and created ALL of the texture and wood grain that you see with 4 colors of Tommy Paints, Neutral Wax, a piece of sand paper and the orange impression tool on the top right. I really like these products, and ordered more colors today so that I could show you a tutorial or two!

FullSizeRender_1

Here is my finished plaque – the “thankful” is a textured Volcano Paste that I put through a stencil with a palette knife – love the raised look and feel.  This project took about 25 minutes start to finish – even with the dry time.

FullSizeRender (84)

I am looking forward to painting all-of-the-things now that I know how beautifully these paints perform! I have aspirations for some furniture that’s in my basement, as well as some crafty gift items…. Given a free day, what would you like to paint?

Seasons Givings Blog Hop

seasons givings blog photo

Such a treat to be joining an incredible group of women for the 5th Annual Seasons Givings Blog Hop! So much thanks and appreciation to Latisha for putting this together each year and for inviting me to participate! It’s always fun for the bloggers and the hoppers, and it is especially fun to host a give away on each and every blog listed below… Just our way of saying thank you to each of our faithful readers and paper crafting community! So, thank you so very much for stopping by!

If we haven’t crossed paths before, my name is Lori Craig. I am very blessed to work with some amazing people in the papercrafting industry. Day-in-and-day-out, I am starting my tenth year as the advertising manager at Splitcoaststampers.com – the largest online resource for stamping and papercrafting with forums and the largest cardmaking gallery in the world.

I also have the pleasure of being a Copic Certification and Workshop Instructor for Imagination International – the North American distributor for Copic Marker! This will be my 8th year with Copic, and I love traveling around the country and spending my time with people who are just as crazy about color as I am! Maybe our paths have or will crossed soon! 🙂

Verve_May2016_Lori Craig_1370

Today I am sharing two one of my favorite projects from 2016… First, this is a card that I made as a guest designer for Verve Stamps back in the spring. The set for this card is called Beautiful Things. The flowers and the sentiments are just perfection. Orange (Copic YR04 – single color blend here!) is a favorite color, and I consider kraft cardstock to be the perfect backdrop for almost everything! 🙂

Copic Wide Roses Lori Craig

And, second favorite would probably be this one. I made these cards using a Copic Wide marker back in the spring to free-hand florals. (Original post and step-outs are HERE.)  I loved the richness of the red and the acrylic look that I got with my Copic Markers hand-drawing these flowers. I also loved the crisp black mats. Clean and simple.

Check out my giveaway! 

And here is a photo of my giveaway… I pulled out a few of my favorite things from Imagination International (the Copic Marker people!) because that is the one manufacturer I work with most frequently!

FullSizeRender (80)

  • an awesome grid paper journal – I personally love these… I shared about them HERE … 6×8 square grid Red Rubber SenseBook 
  • two Sepia Multiliners – for journaling or sketching – water and Copic safe
  • X-Press It foam mounting tape and double sided tape – for card making and papercrafting
  • PLUS $25 to spend at Imagination International Inc. for Copic Markers or any of the products in the III store! 

To enter my giveaway, just leave me a comment and let know what type of crafting or hobby you plan to enjoy through the new year…especially if you are exploring something new-to-you!  🙂 Edit to add: I’ll select a winner on January 8th. 

After you leave me a comment to enter my drawing, visit my dear friend, co-worker and Splitcoaststampers partner in crime: Lydia Fiedler!  

If you are jumping in mid-hop, the full list of participants is here: 

Thank you so much for stopping by and

have a wonderful, blessed New Year! 

Refilling Copic Marker with Help of a Small Scale

FullSizeRender (77)

I cannot believe it is the end of 2016… I just can’t believe the year went by so quickly, but it was a good year for me. I will trust that 2017 brings just the perfect plan for growth and joy.

Today I’m sharing this birthday card that I made for a special friend – a Christmas birthday! The digital Arranging Roses image is from Power Poppy and colored with Copic! I print my images with an HP LaserJet – mine is about 5 years old, but this is the current version.  The printer feeds card stock and the ink is Copic compatible. I do have another printer for color prints and photos, but this printer is my office workhorse. Very happy with it!

[youtube]https://www.youtube.com/watch?v=6rpy2VtXDsU?rel=0&showinfo=0[/youtube]

I am also sharing this video on refilling Copic Markers. Refilling markers is not something I enjoy, but I do appreciate that it can be done. Before finding Copic, I’d ran myself through several different sets of different kinds of markers. Way back then… almost 10 years ago… the ability to make even my coloring look good and the quality of the product was such an appeal. I enjoy my markers just as much today as I did back then!

Highlights from the video are that I use a jewelry scale to weigh my markers to help determine ink fullness. This is the scale that I’ve used for 3-4 years – it’s $7 and I don’t think I have ever even changed the batteries.

A few quick links from the video:

And here are just a few resources from Copic for refilling… also, I’m here if you have questions! I do love talking about color! 🙂

copic refill chart

I haven’t shown the booster method here, but I find it very helpful if you have shaky hands – the needle insert helps steady your hand-to-hand contact with the ink bottle and the marker.

ink refill graphic

And just a quick graphic that lets you see how many refills you could expect from one bottle of Various Ink. WOW, right!? That is a lot of coloring!


FullSizeRender (79)

Just a few more details about my card… If you peek at the original digital image, you’ll see it is a full vase image, but I’ve sized the image and situated the buds to take center stage. I do love that about digital stamps!

IMG_2734I used a handful of Copic Markers on this image, literally. Here’s a snapshot so you can see color selection.


FullSizeRender (78)

The sparkly silver paper was cut with an MFT Scalloped Rectangle frame – the paper is from Stampin’ Up! And, the dotted lattice embossing folder in the background is from Taylored Expressions.

And, one more bit of information, our new year of Copic class locations is up for your planning purposes… Check out our schedule, and I hope you can join me fore more tips like this in 2017! 

I hope this has been informative for you! I’ve loved putting it together. I have another post with a very special group of blogging friends tonight at midnight, so please check back… lots of prizes… 

Stay warm and safe over this holiday weekend and have a happy New Year!