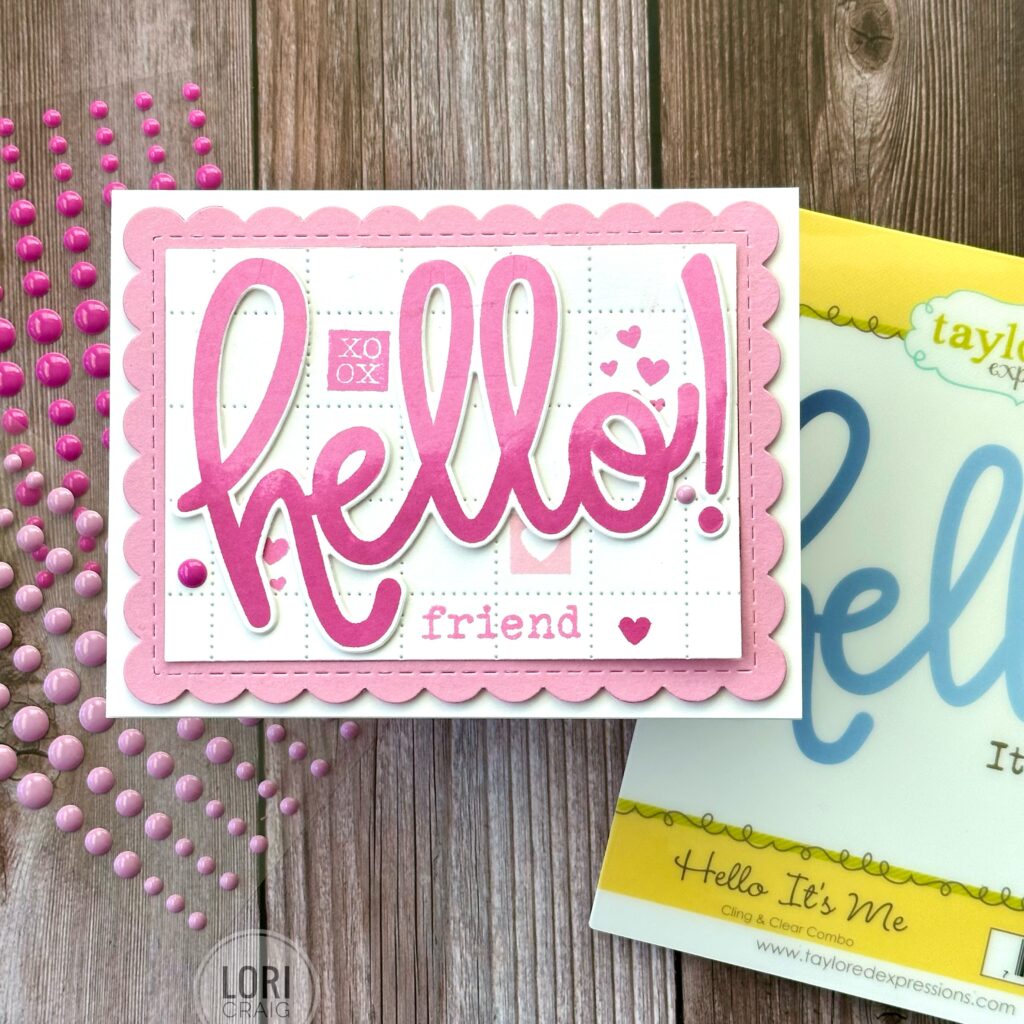
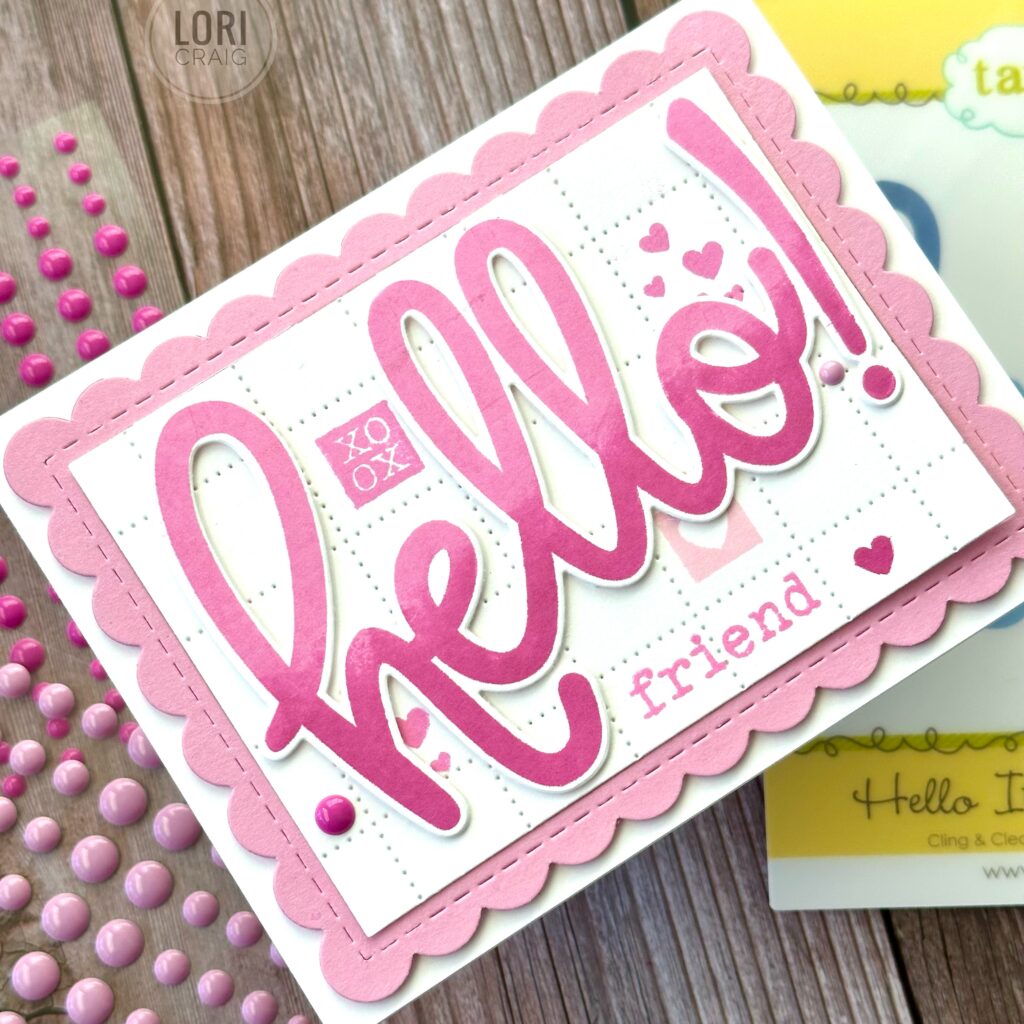
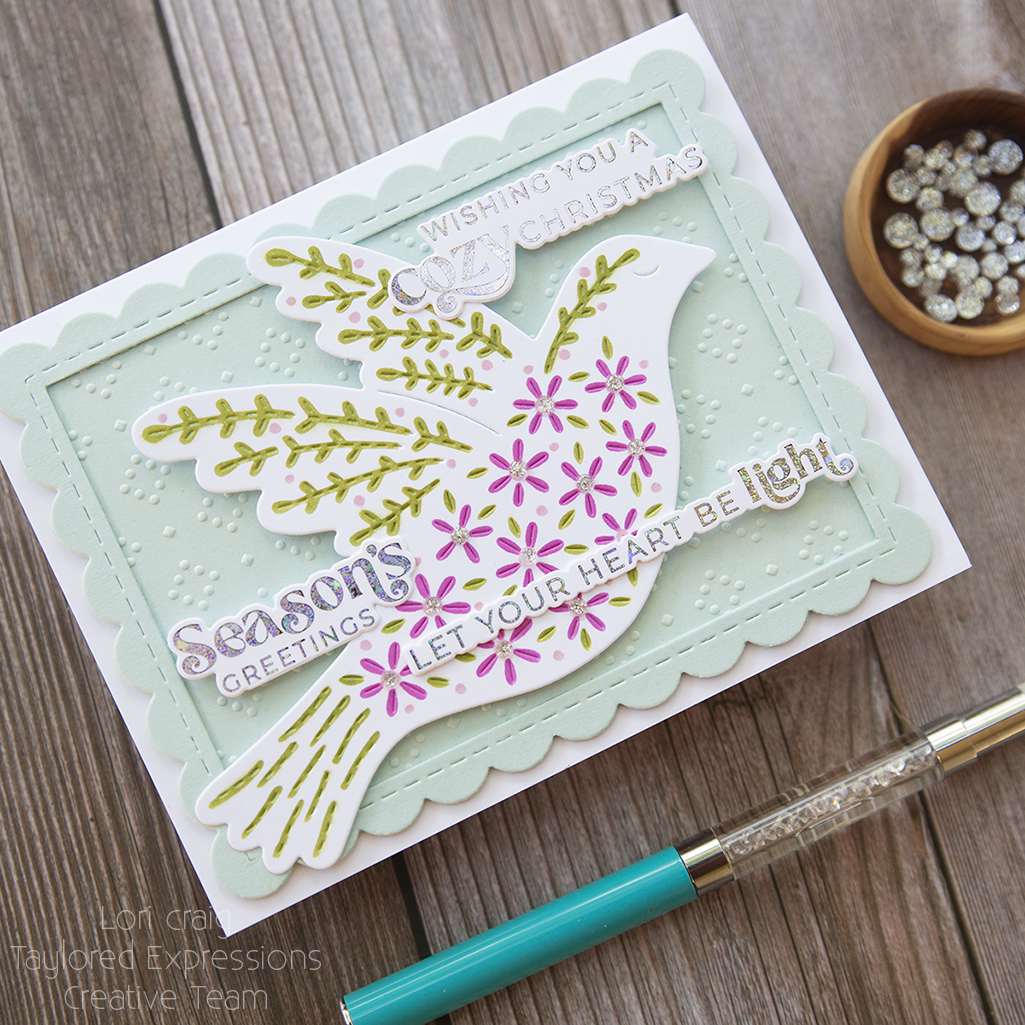
I am sharing two posts today because my projects cover two different topics with very different feels. This is a cute Hello card that’s pretty in pink and long on fun with new products from Taylored Expressions.
I used the Hello, It’s Me! large word stamp to create the Hello and “friend” in a combo of Strawberry Milkshake and Lollipop inks. The new quilted square background plate creates a fast grid where I’ve added accents from the Love Letters set. LOVE that this little set can be used to accent special cards all through the year – it’s not just for Valentine’s Day!
I finished the panel with a big scallop layer from the Frame-in-Frame die set and added a few enamel dots for punches of color. This one is ready to stick in the mailbox for a special friend, just because. I think just because is my favorite kind of card!
Hello, It’s Me is part of the release today at Taylored Expressions! Lots of fun products that were previously available as a gift-with-purchase, now to come home and live with you! Links to each of the products are below and available under What’s New at Taylored Expressions.
Lots of fun things being cooked up this week, so I’ll be back soon!
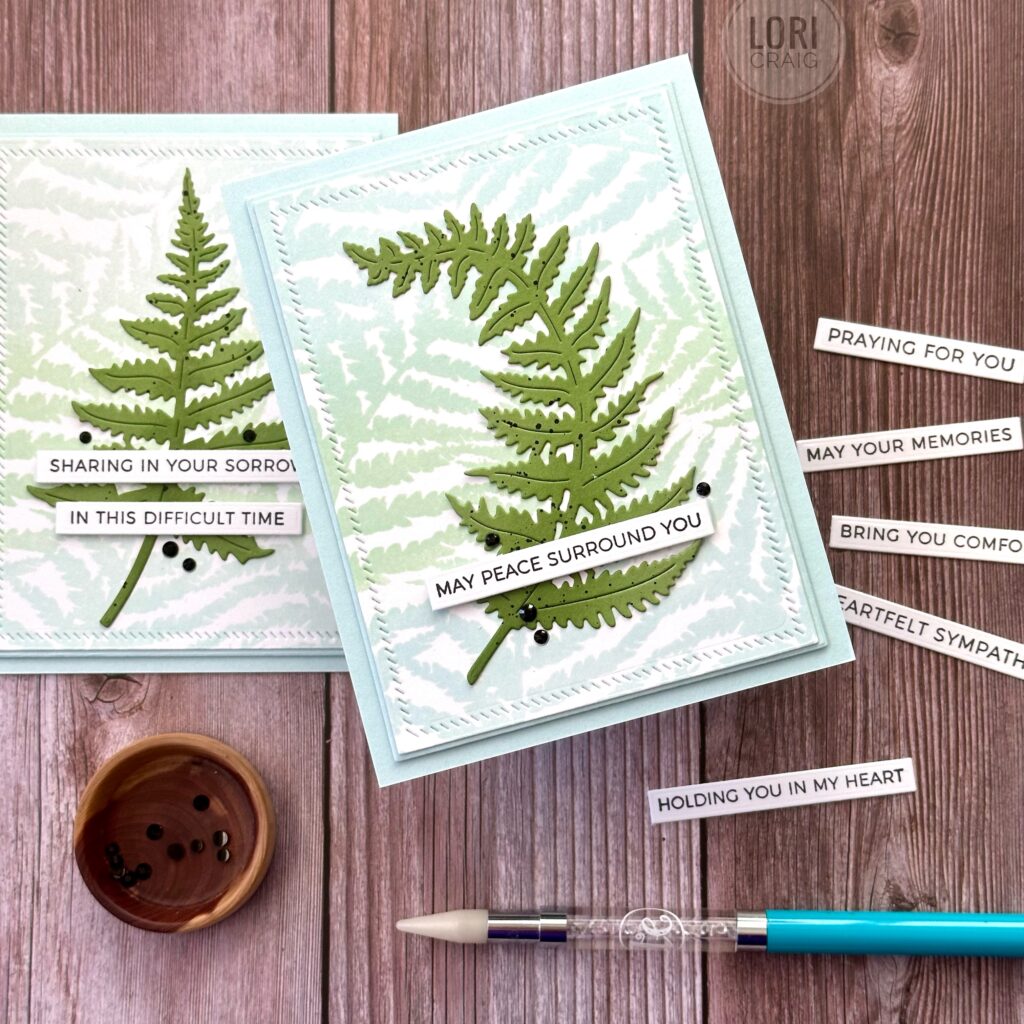
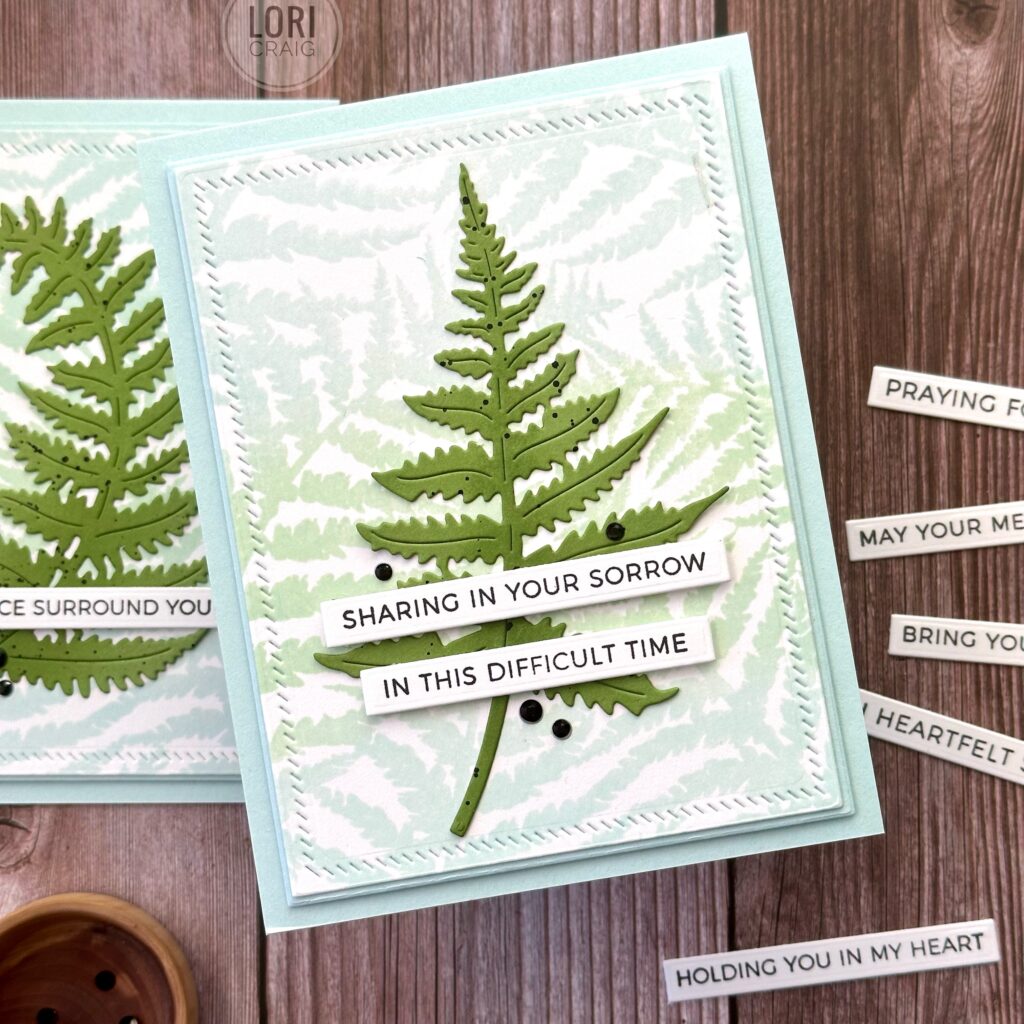
Hello, Stamping Friends – I am sharing two sympathy cards today created with new Woodland Ferns dies and the Ferns Forever Background stamp from Taylored Expressions.
These two sprig dies cut beautifully detailed ferns that are perfect as the focal image. Here, I have cut them from Peapod cardstock, blended a little Peapod ink for depth over the leaves and splattered with black acrylic paint. I’ve nested them on a soft palette of Salt Water Taffy, Mint Julep, and Confetti Cake ink blended over the Ferns Forever Background stamp.
The panel was cut with A2 Stacklet Rectangles and accented with the Diagonal Stripe impression border before adding sentiments from the new Mini Strips – Sympathy stamp set. These sentiments are perfect for thoughtful thinking of you during a difficult time.
Sympathy cards are never easy to send, but with thoughtful products and a soft color palette they can be an easy piece to pull together and mail.
Many beautiful new products today are being released at Taylored Expressions. I have a second Happy card that I’ll share here soon. You can find all of the new products with the links below or HERE.
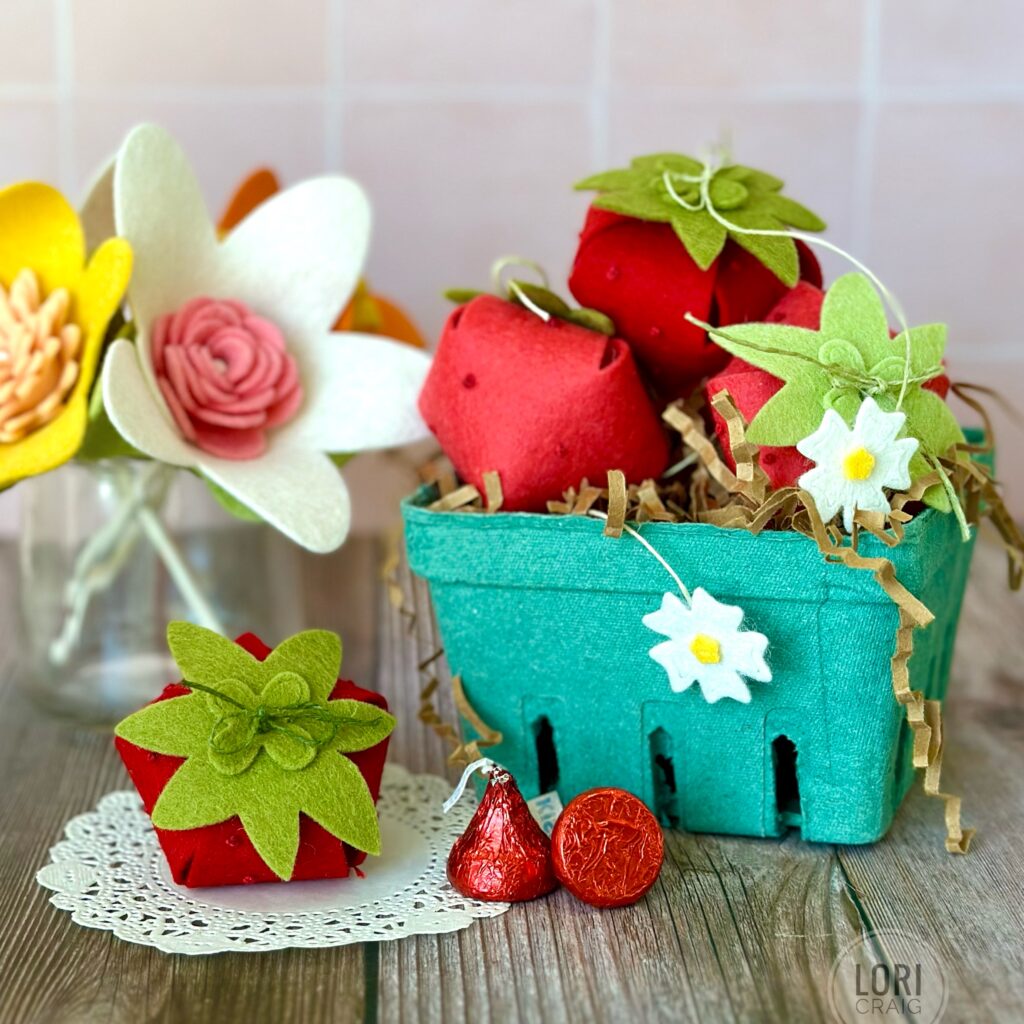
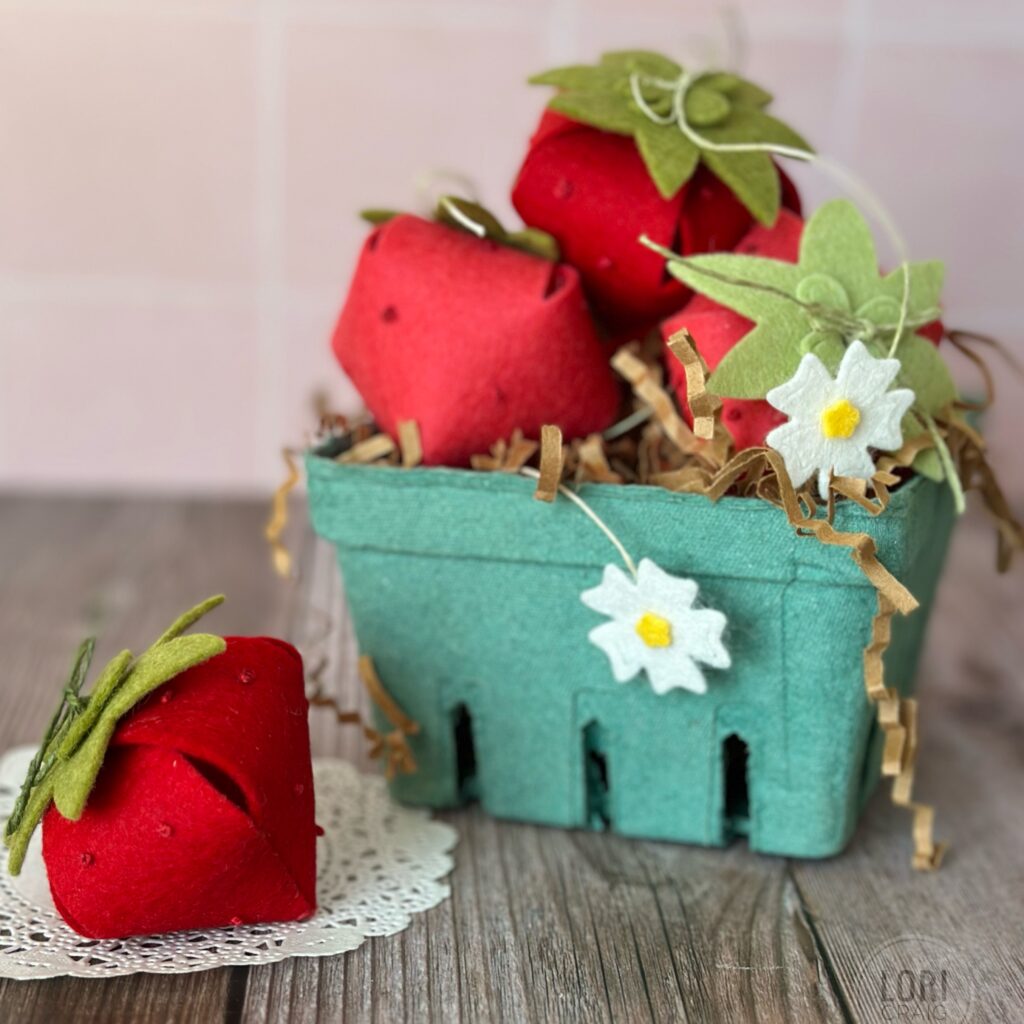
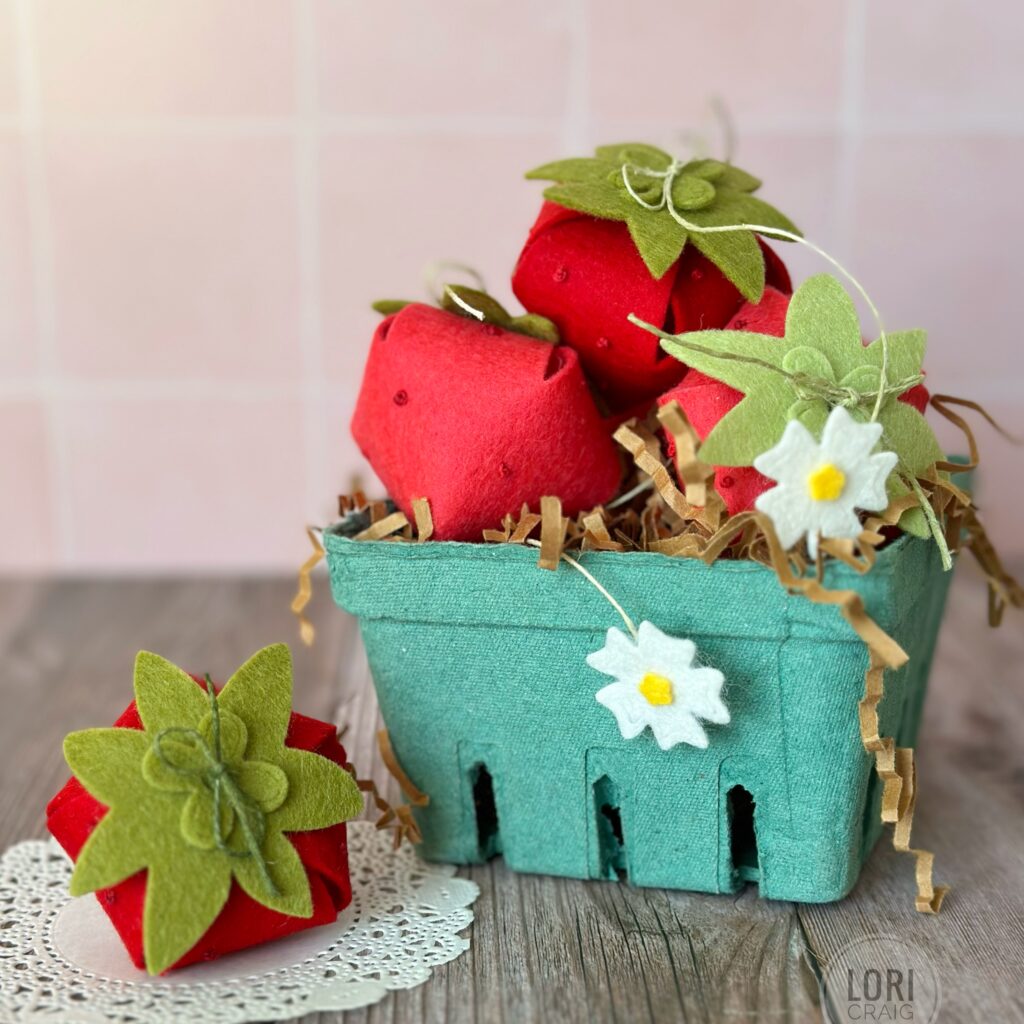
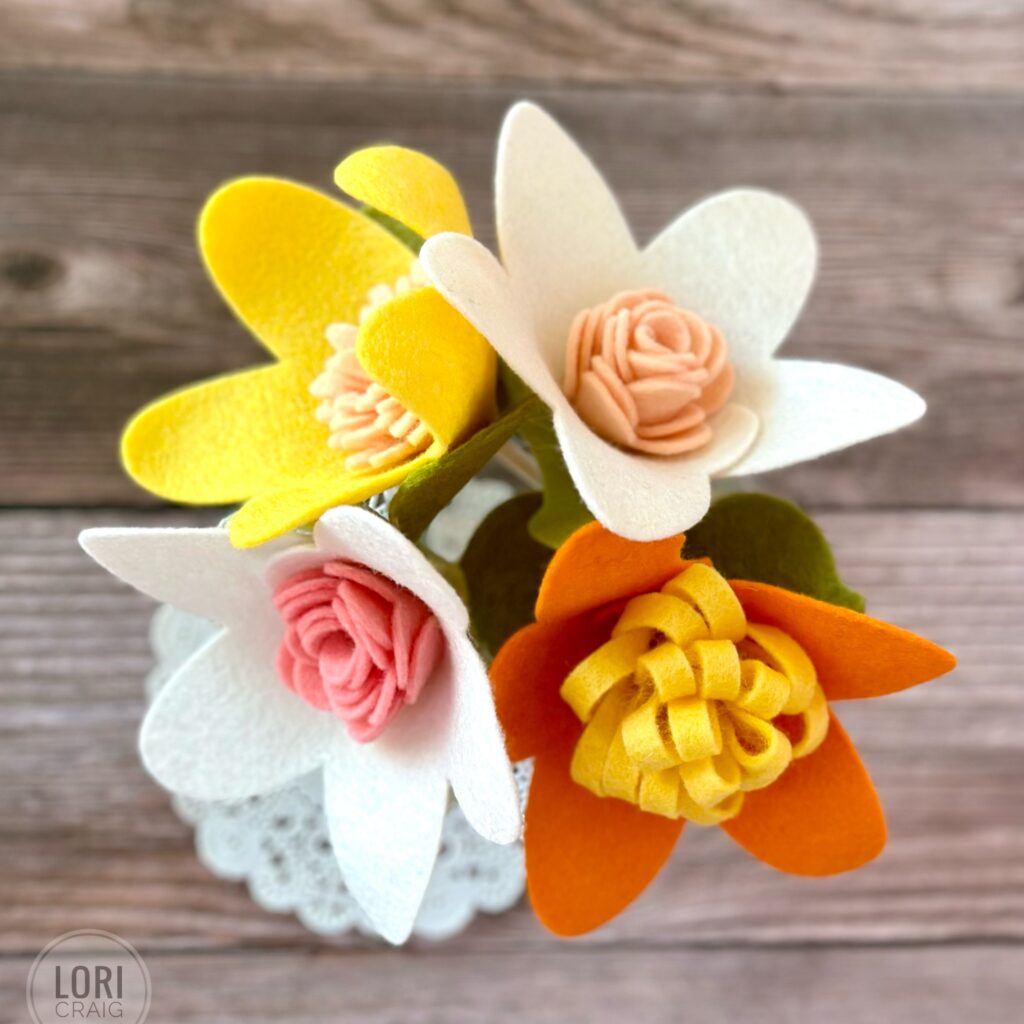
Taylored Expressions has the sweetest release today! Several fun kits designed to help kids celebrate Valentine’s with sweet treats. I’ve peeked through the designer library, and they had some super fun and easy ideas to create Valentines with the kids in your life, but I gave the strawberry and flower blooms a glow-up with felt and French Knots for the sweetest addition to my little splashes of Valentine decor.
The dies to create these strawberries are just two easy pieces: the large berry and the stem topper. You simply cut the berry body, fold the flaps, stuff a little candy or trinket inside, and secure with twine. I added French Knots with coordinating floss to insinuate seeds on my berries before I rolled them up.
Then, I pulled out Garden Variety dies to add a little extra leaf sprig to the Strawberry tops and some blossoms that dangle on a vine of twine colored with OLO YG8.5.
Also new today, Taylor created I’m a Sucker dies to wrap lollipops and sweet treats. I used mine to add some extra volume to my Roll With It flowers for bigger blooms. I used a little hot glue to attach the rolled flowers to new, sucker/candy sticks made by Wilton from the candy-making aisle in Walmart. They make a quick and easy bouquet.
I will be adding these collections to my seasonal tray on my kitchen island, and I’ll be making more for some simple girlfriend gifts. I love seeing the little handmade touches when I am working in my kitchen.
Happy New Year! I hope you had beautiful holidays!
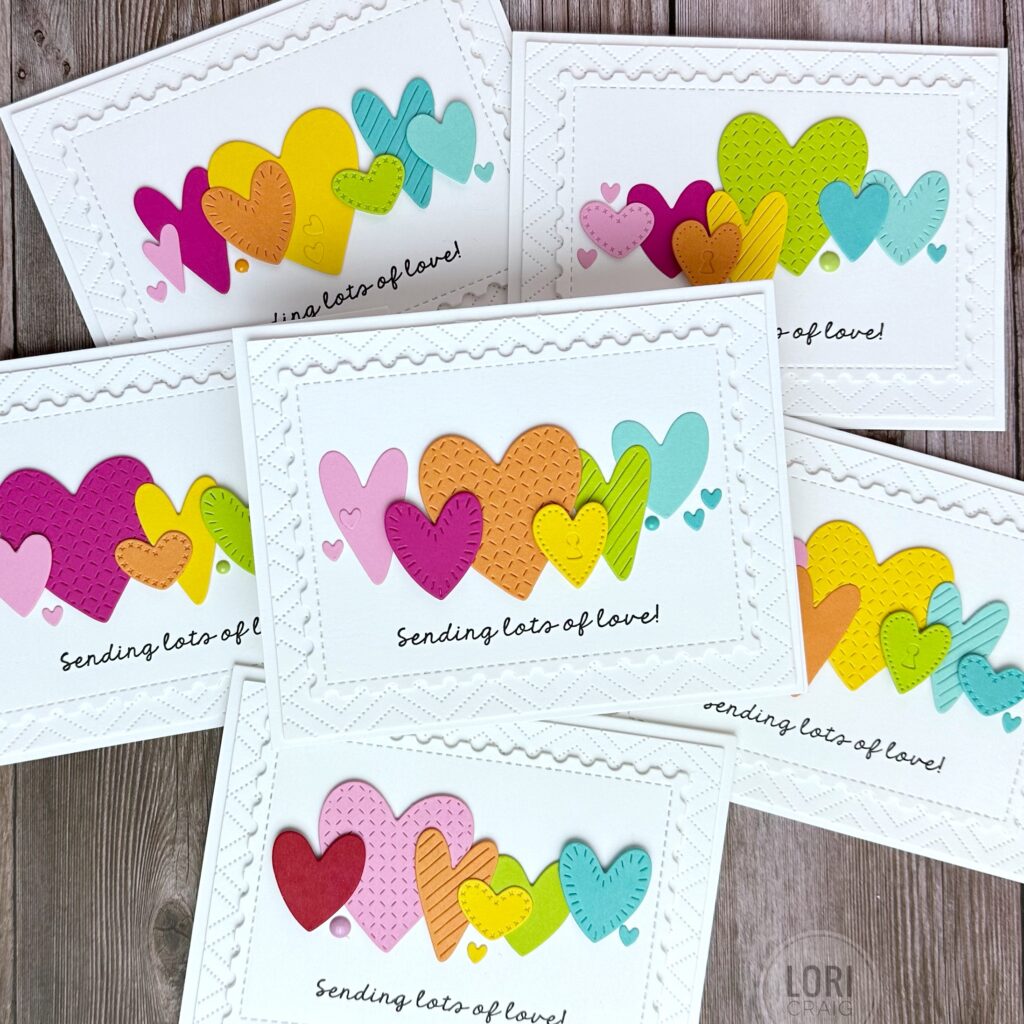
I’m sending lots of love today in celebration of Taylored Expression’s Valentine Release! And, I mean LOTS because I had a blast creating with these new products!
I made a million (really it was just 16!) cards for today’s release. So many cute things. I had vacation time to just piddle in my studio – did anyone else’s grandma use the word piddle? LOL It was heavenly!
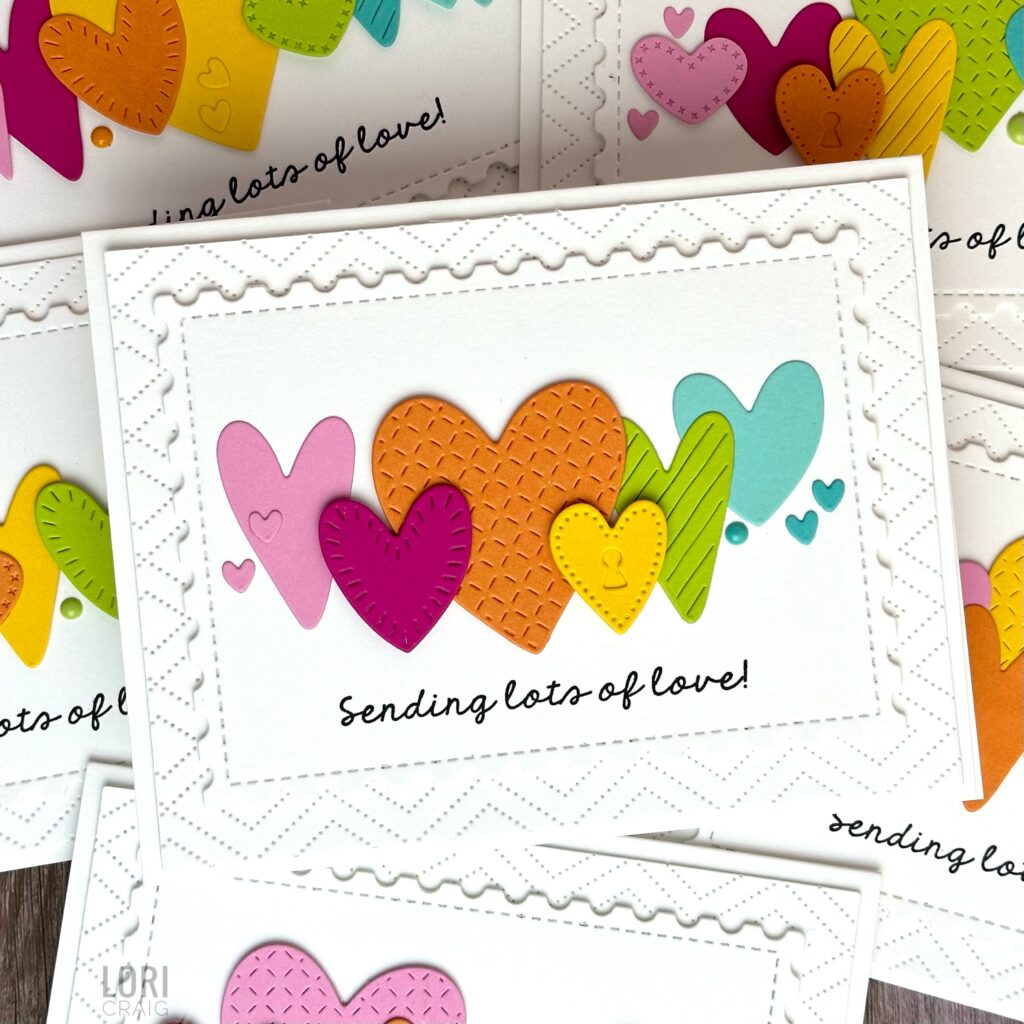
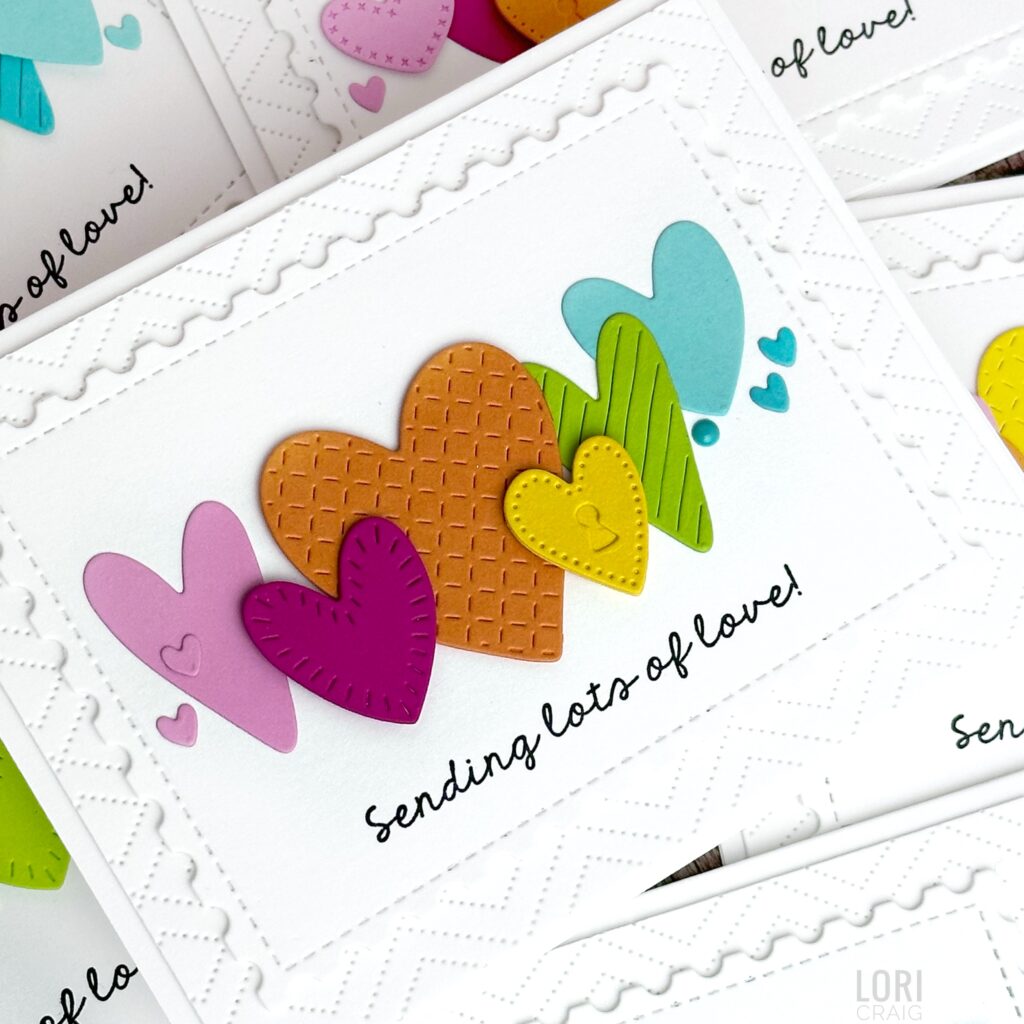
These cards feature the Hang On Hearts with the A2 Postage Stacklet dies and a whole rainbow of color. My colors here are Strawberry Milkshake, Lollipop, Candy Corn, Mango, Kiwi, Confetti Cake and Cookie Monster. The sentiment is from the stamp set, Hang on Hearts, and the stamp layer is set on a backdrop cut from the Diamonds Cutting Plate.
Once the hearts are cut, you have dozens of pieces to easily create multiple cards – more to love!
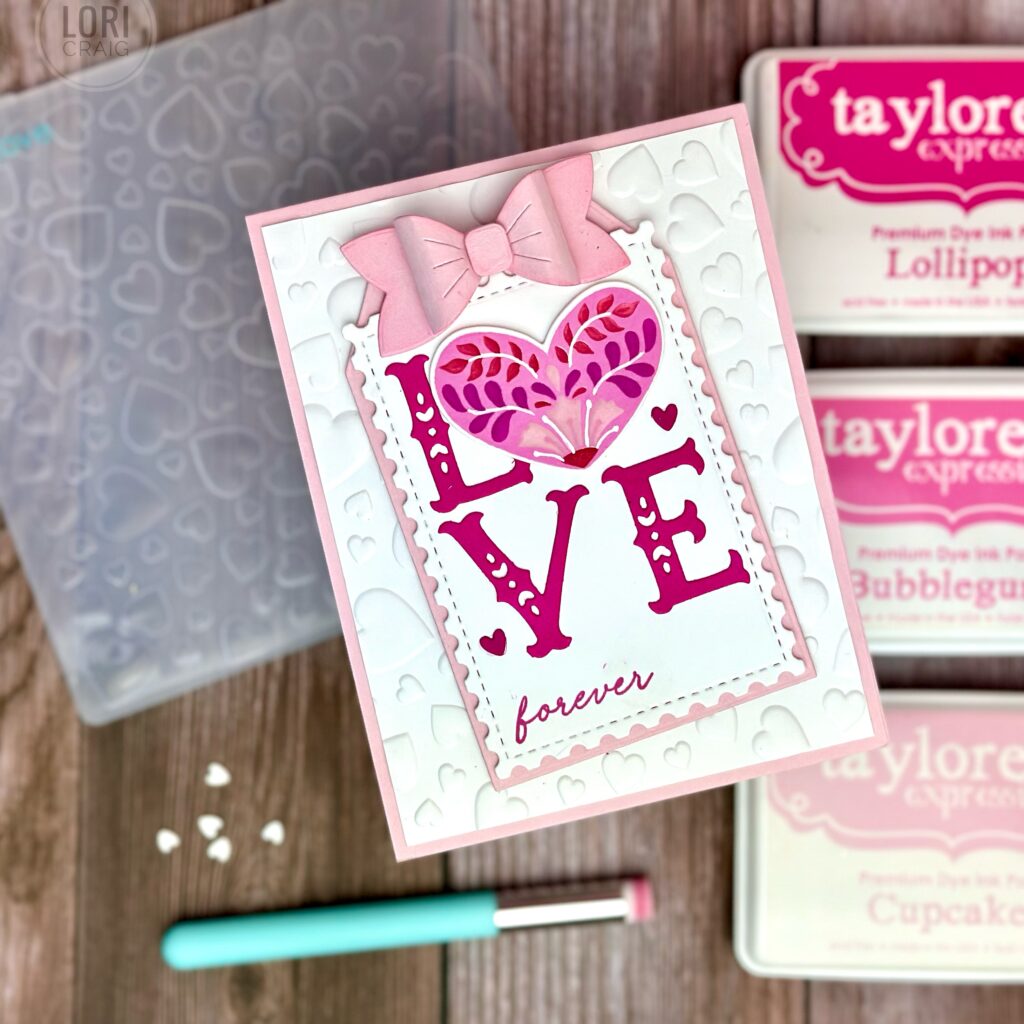
Next up, I used the Folk Love and Folk Hearts collection to create some tags with the A2 Postage Stacklet dies (so happy to have these layering dies back in my collection!)
The LVE is cut from Lollipop cardstock. The Folk Heart was blended with the coordinating stencils. Correction to the colors shown in the photo: Cupcake, STRAWBERRY MILKSHAKE, and Lollipop. I did not use Bubblebum in this pairing. Sorry for the swap in the photo.
My tag is layered on a sugar cube panel embossed with the Lots of Love 3D embossing folder. The forever came from the set Fronds Forever, also being released by TE today.
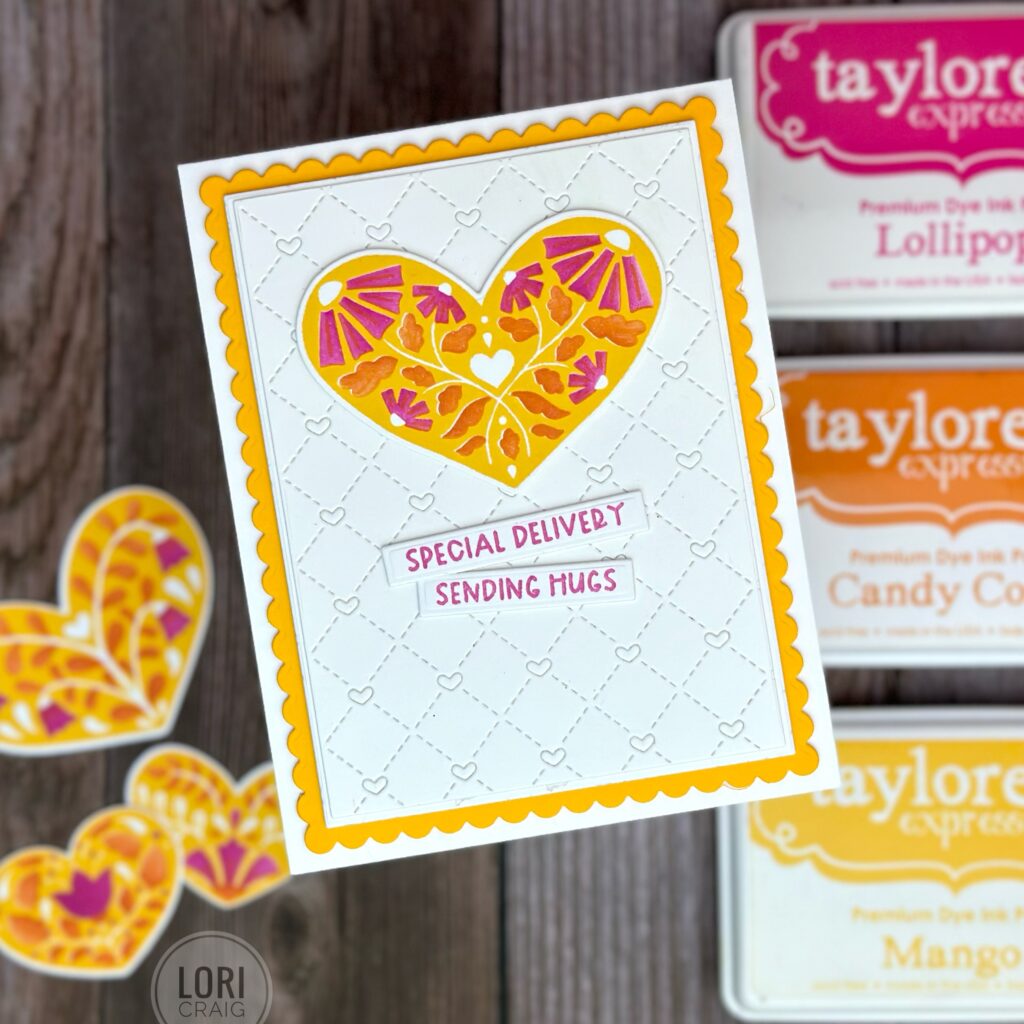
My second card with Folk Love uses Lollipop, Candy Corn, and Mango inks. I had a stack of hearts on my desk, and they look great over the Stitched with Love Cutting Plate. The sentiment was cut from the Mini Strips – Sending Love.
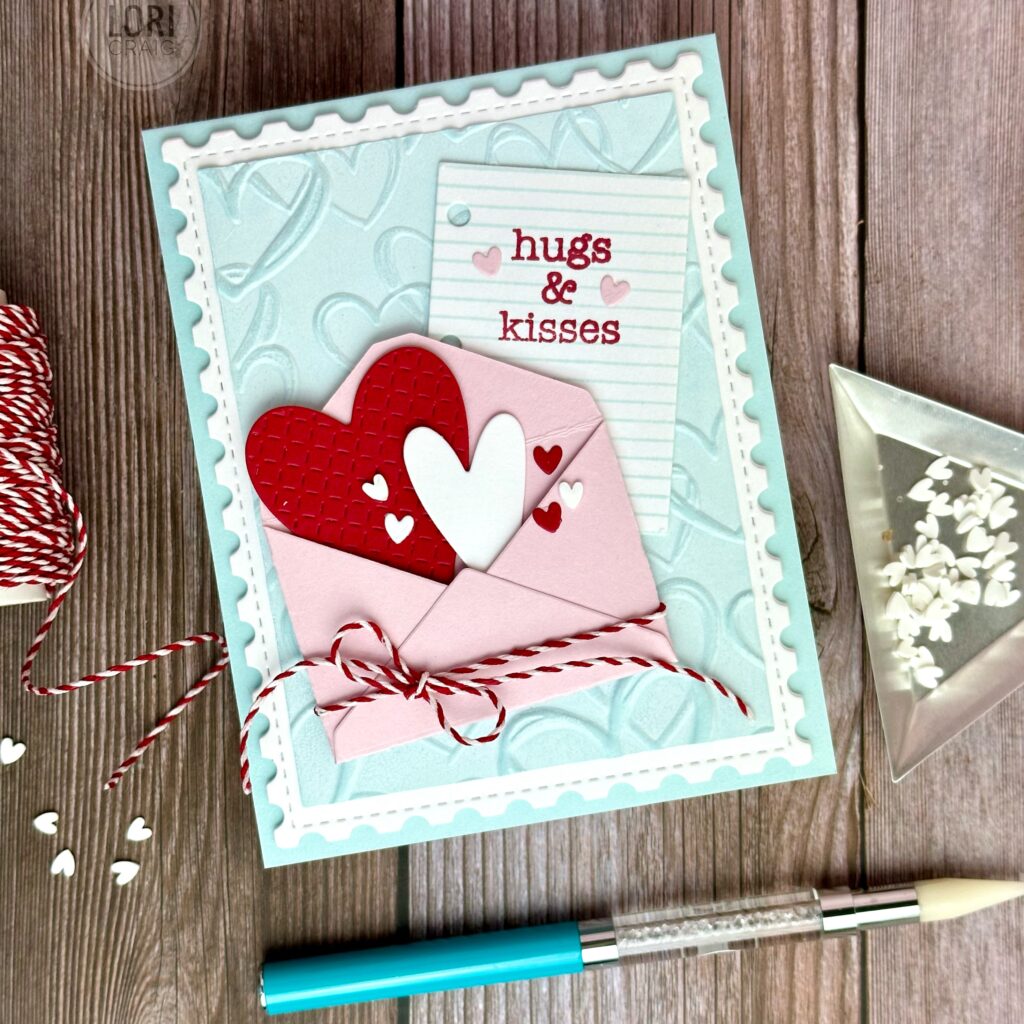
One of my favorites from this release features Love Letters and the Mini Envelopes. I paired this collection on a backdrop created with the Sketched Hearts 3D Embossing Folder to create a little envelope bursting with hugs & kisses!
Here is a 2nd look at Sketched Hearts with the coordinating dies and a sentiment from the new set with love. I cut the hearts with the coordinating heart dies, pressed them into my Versamark pad to coat with clear embossing ink, and then sprinkled Lollipop Embossing Powder over the top to create sparkly hearts. The sentiment is from the new set With Love, stamped and embossed on vellum.
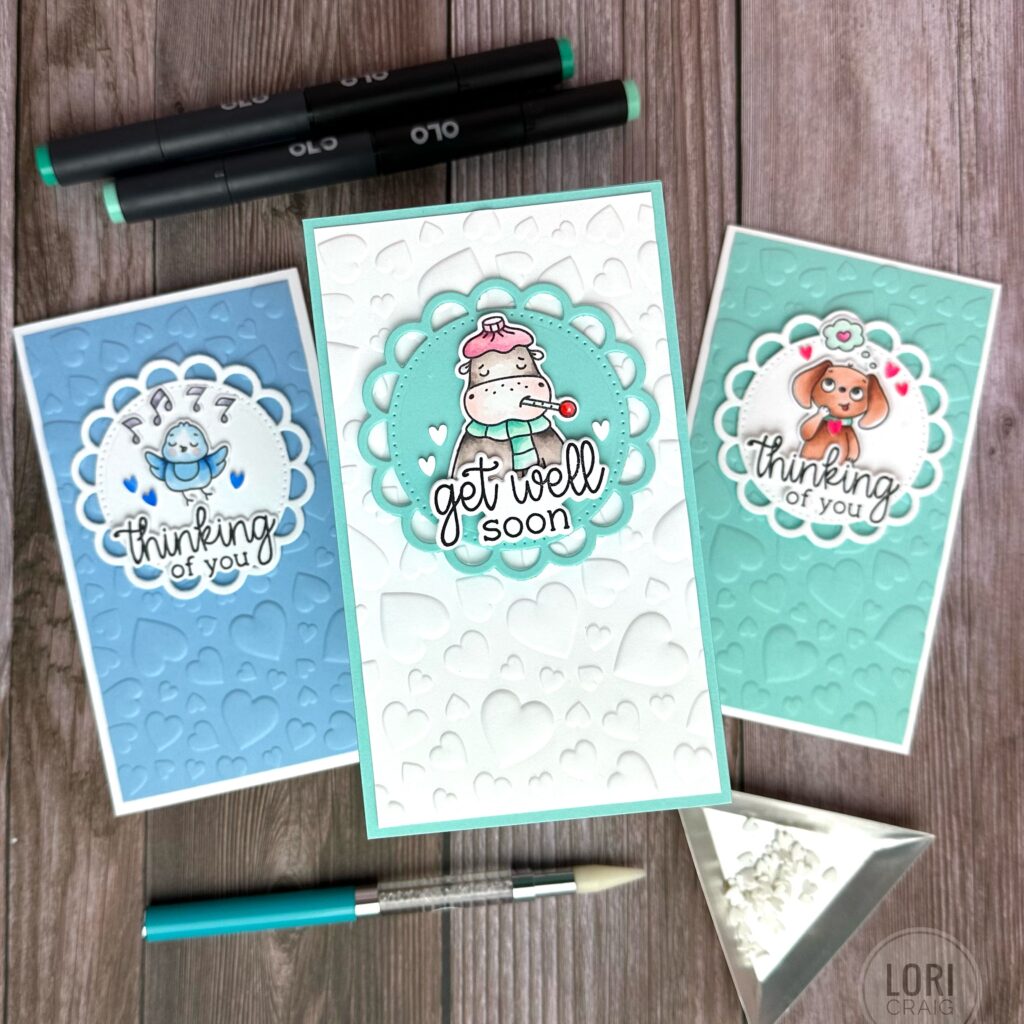
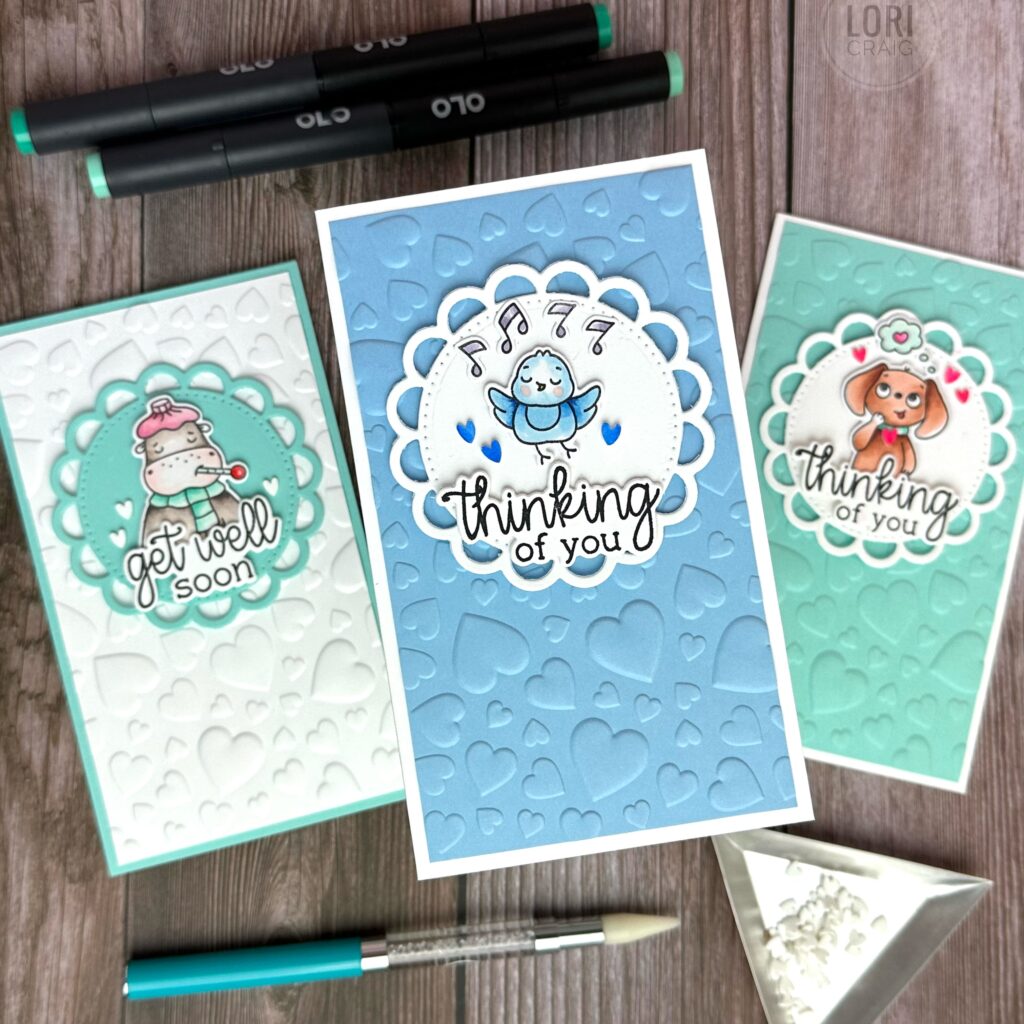
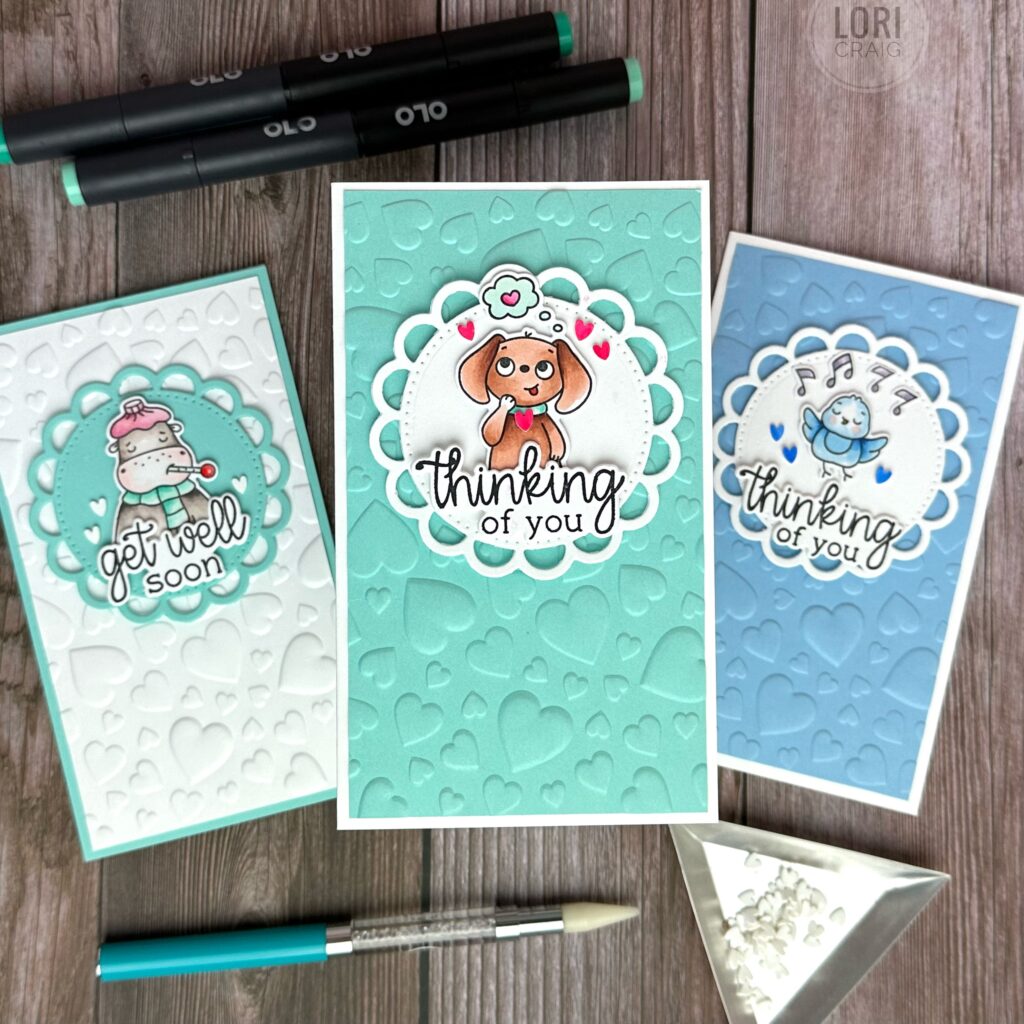
A year or two ago, there was a crazy popular TE stamping kit called Occasional Critters. I love the proportion of these cuties and the font of the coordinating sentiment set. I’m thrilled they are back and available for purchase. It means they can come out of my stash and see some love more regularly.
Each of my critters are colored with OLO marker and die cut. These they are set on a open scalloped circle and a coordinating backdrop cut from the Lots of Love 3D embossing folder. The folder is sized to work with A2 and mini slim sized cards (mini slim shown here).
Accent with hearts, as deemed appropriate. There can never be too many! LOL
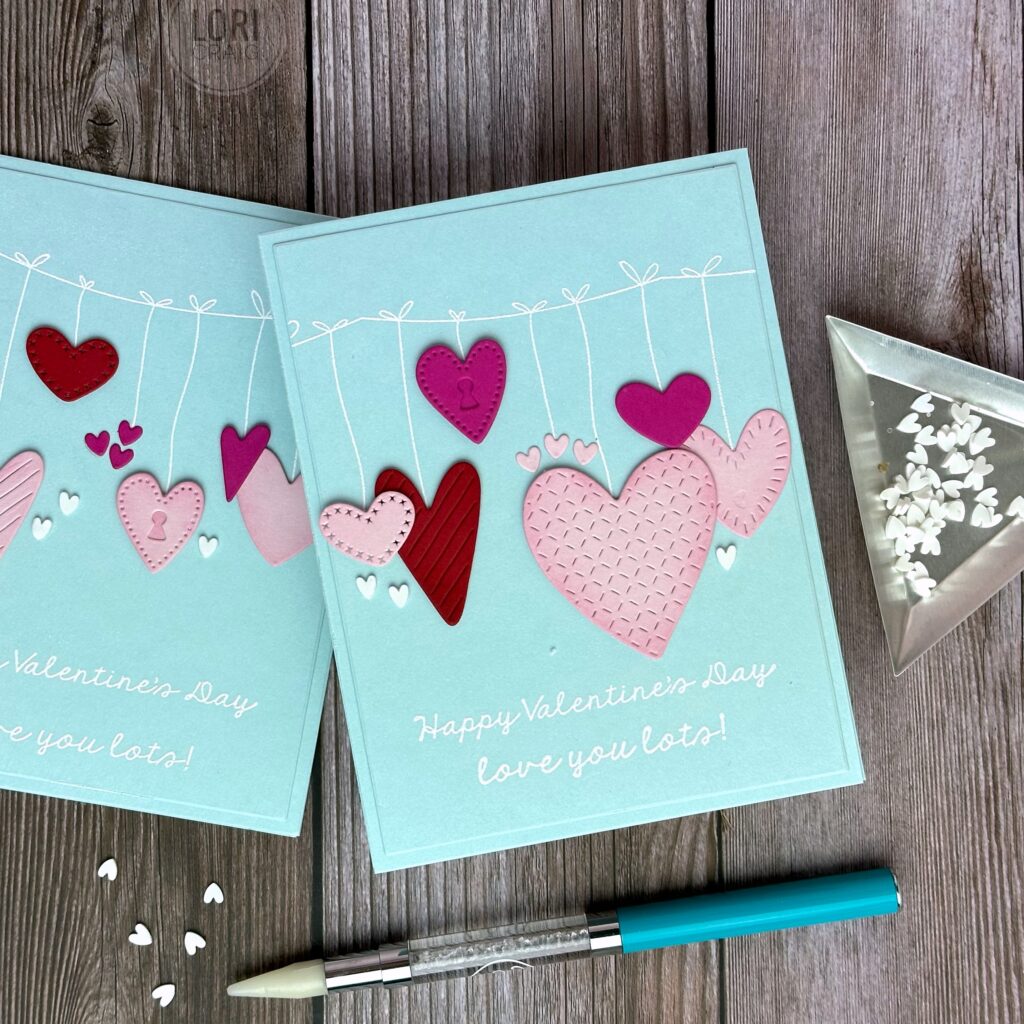
My last cards feature Hang on Hearts dies and coordinating sentiments. So fun and appropriate for almost anyone on your Valentine list. The edges of my diecut hearts are brushed with a little ink for depth, but otherwise very simple design. Again, the Hang on Hearts die makes it easy to create multiples. I love that versatility for productivity.
I hope I’ve shared some ideas that will help you get creative for our next cardmaking season. I sure had fun creating!
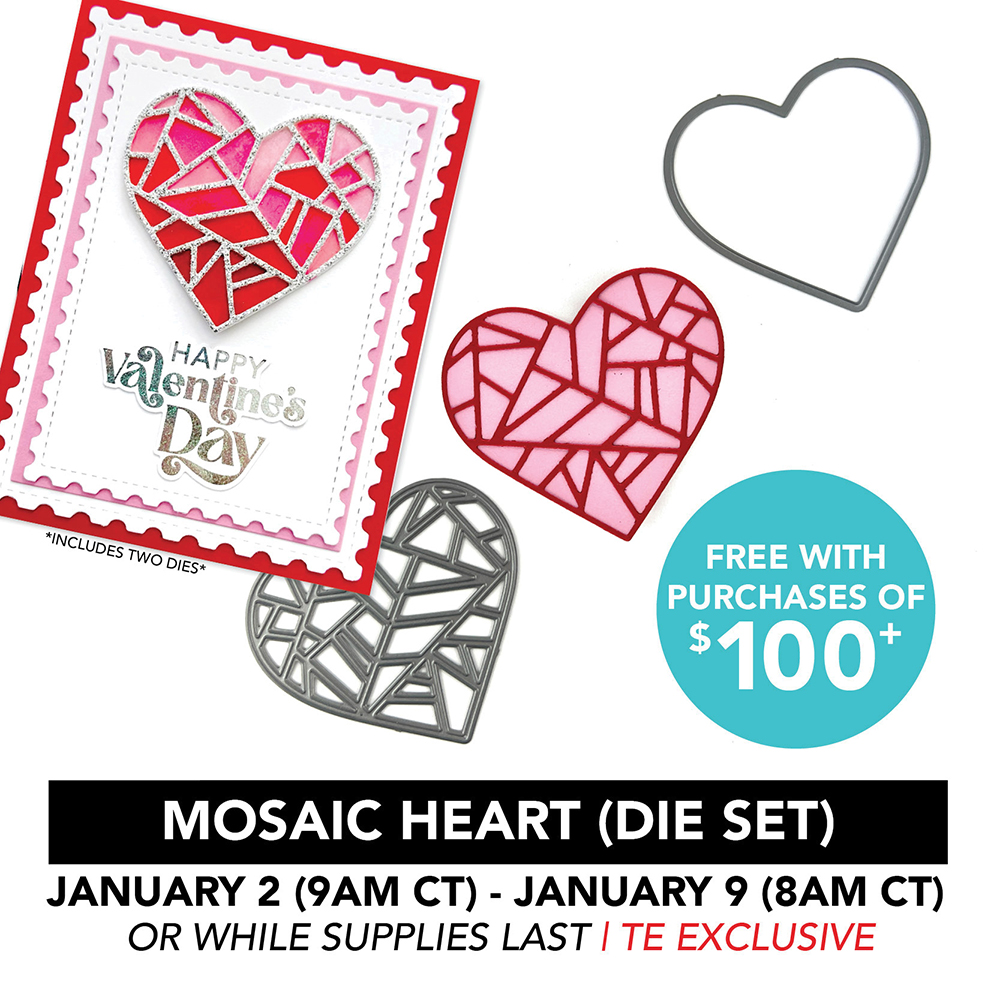
Right now through 8AM Central on Tuesday, January 9th, or while supplies last, when you place an order of $100+ you will receive the Mosaic Heart die collection FREE. Add depth and dimension to the Valentine or love themed projects that you create! The heart can be watercolored, paper-pieced, or blended to look like a mosaic heart. The set includes 2 dies: a solid heart backer & a detailed mosaic overlay. This set replaces our usual $100+ Gift With Purchase for January during the Valentine release. Offer valid while supplies last.
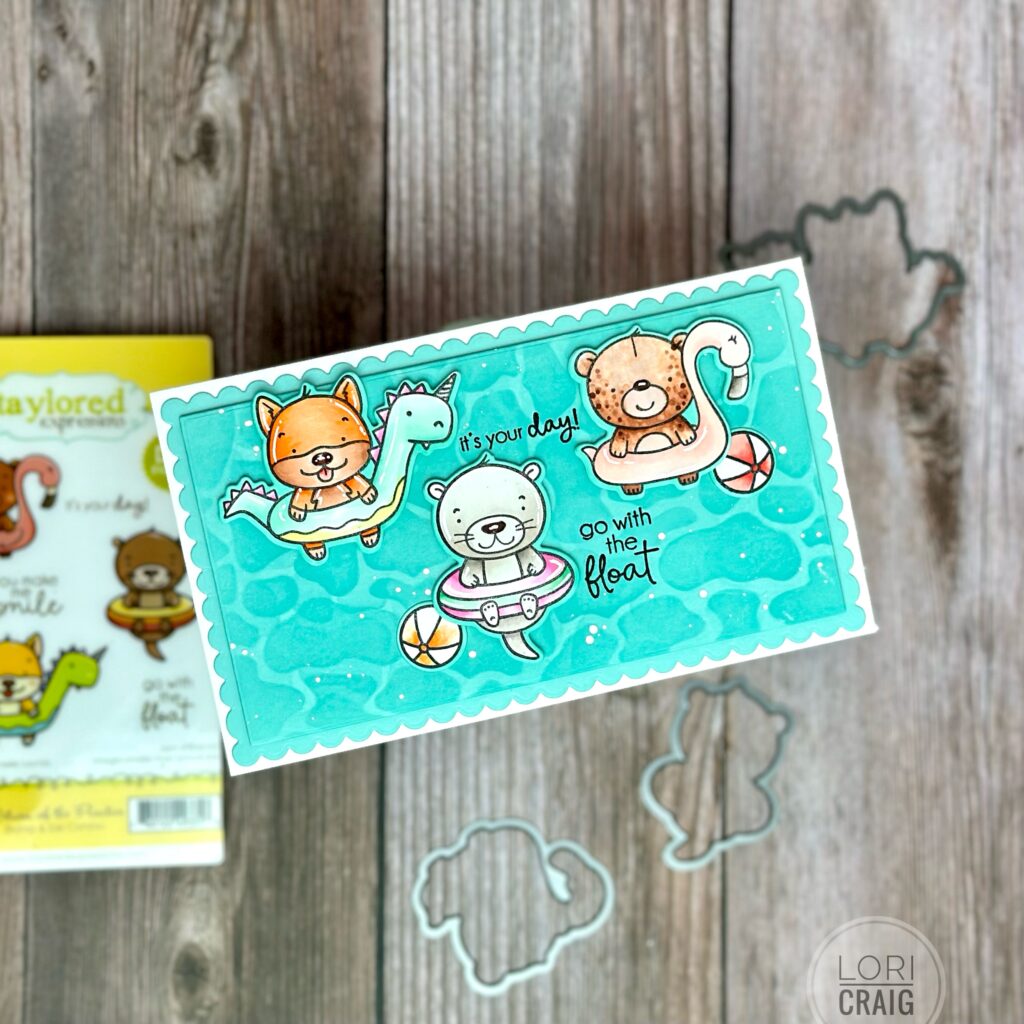
It’s time for perfect pairs from Taylored Expressions. Fantastic images and fun sentiments in sweet small sets that come with the die for easy creating! I had a lot of fun creating for this release!
My first card features Go with the Float. These adorable little critters were colored with OLO Marker for smooth blends and vibrant pops of color. They are are nestled onto a mini slim card that’s been blended with the Pool Party die to create waves!
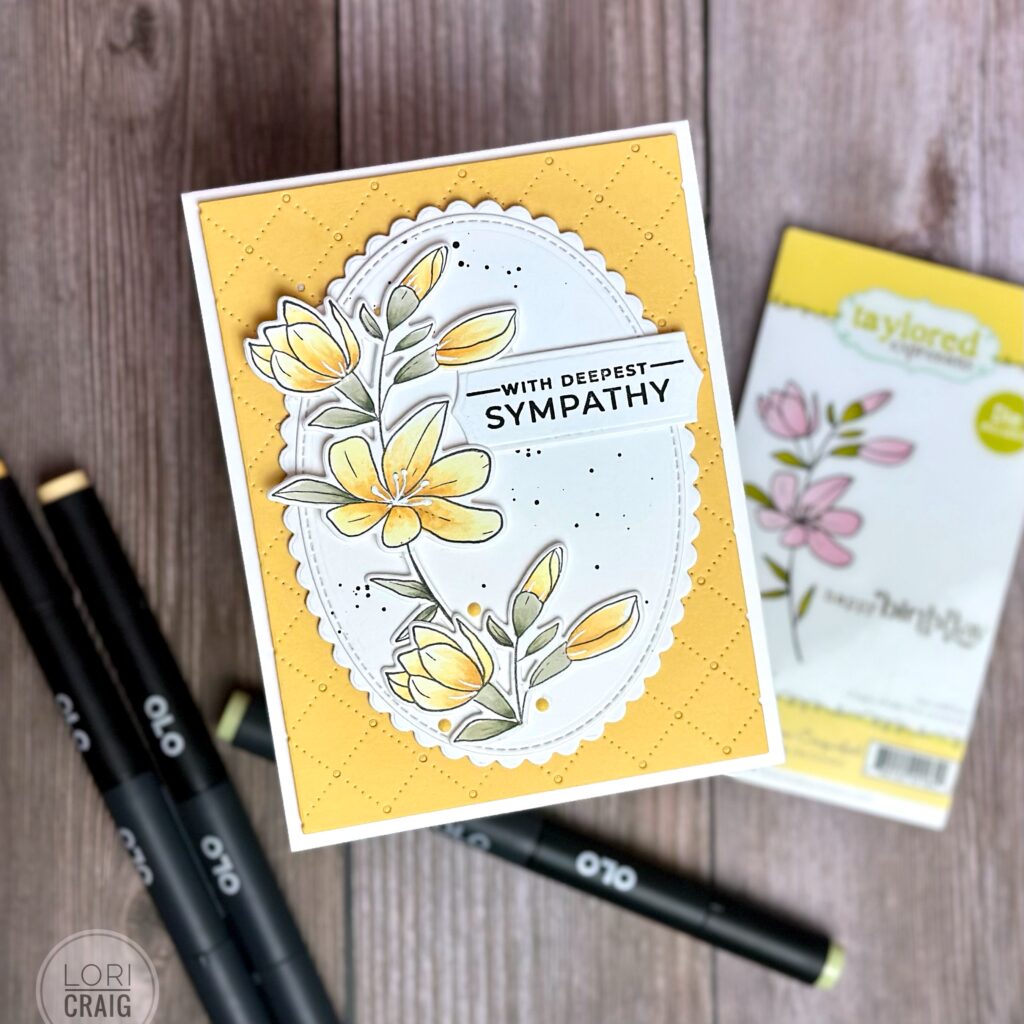
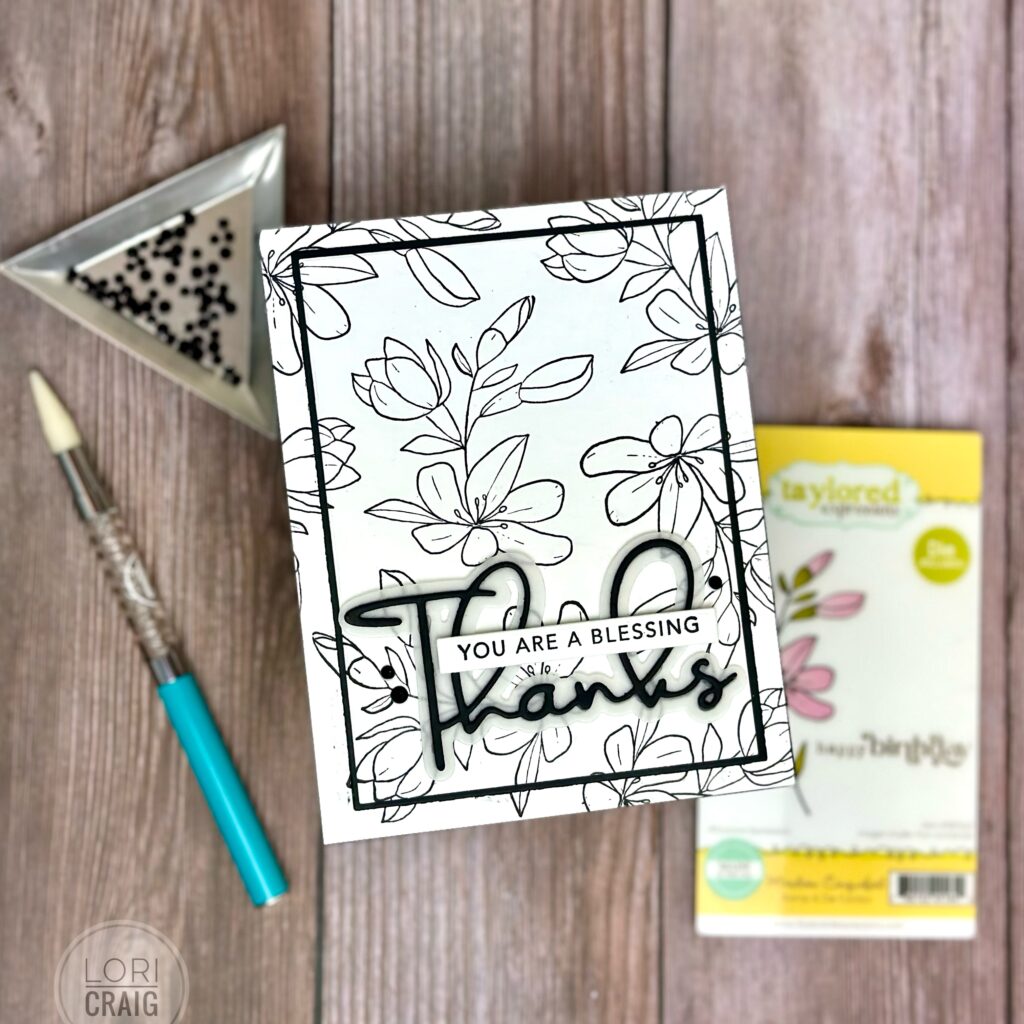
Next up, I created a sympathy card using the new Meadow Cinquefoil stamp. The blooms are proportioned perfectly to cradle into the scalloped oval background with a simple sentiment and splatters. The focal image rests on a piece of Pineapple cardstock cut with the Pierced Lattice cutting plate. My blooms are colored with OLO marker for swift work of a card that’s often needed, greatly appreciated, and never easy to send.
A second sample with the Meadow Cinquefoil shows the flower image stamped with a simple Oreo outline and a diecut Thanks from the Thanks Script die and backer (cut from vellum). I omitted the bottom portion of the stem when stamping so I could nestle the blooms closer together. This classic look is easy to duplicate for a stamp session when you are looking to replenish your stash.
Here is a third sample with the Meadow Cinquefoil that uses the included Happy Birthday sentiment. This time, I’ve stamped a tone-on-tone background with the floral image, and embossed the stem with gold embossing powder on white. The flowers are color with OLO marker. A series of tone-on-tone layers cut from Cupcake cardstock create a great backdrop. One of the panels is cut with the pierced diagonals cutting plate for a little extra texture.
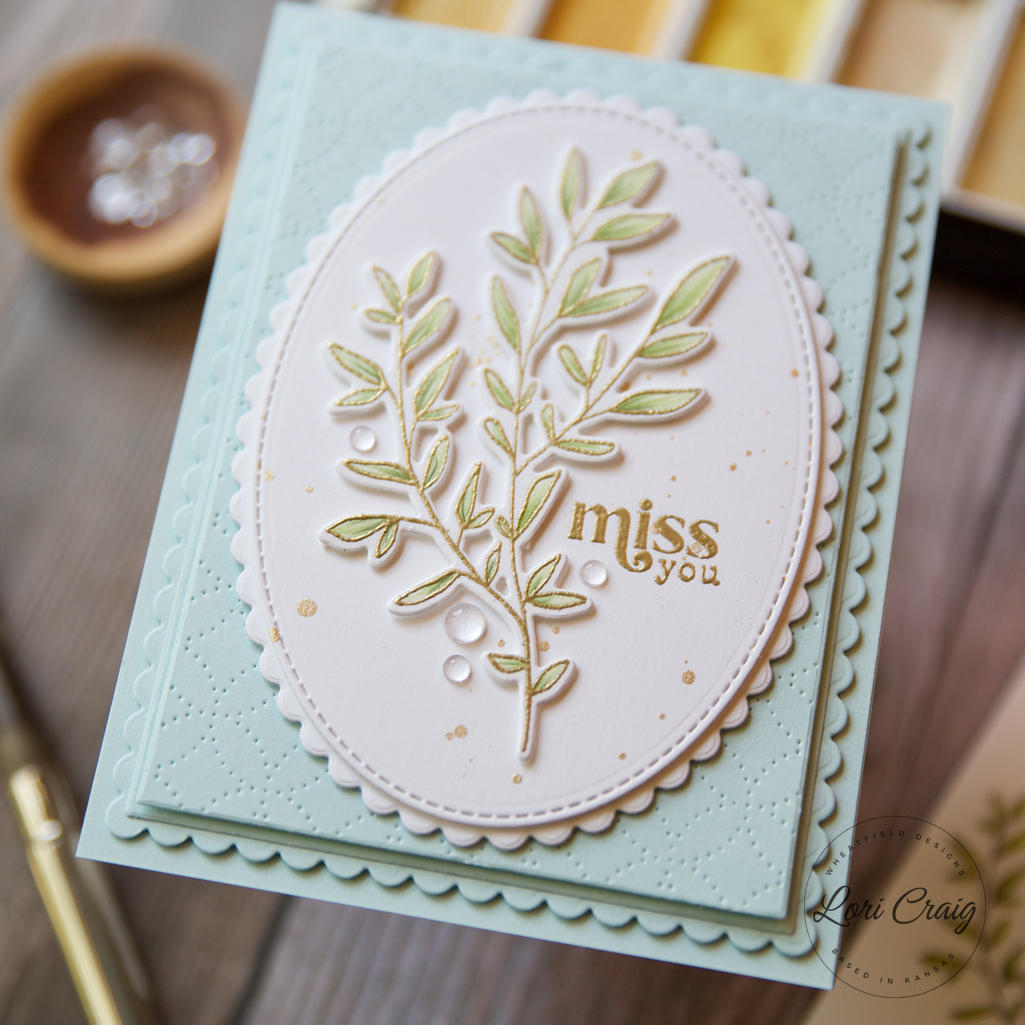
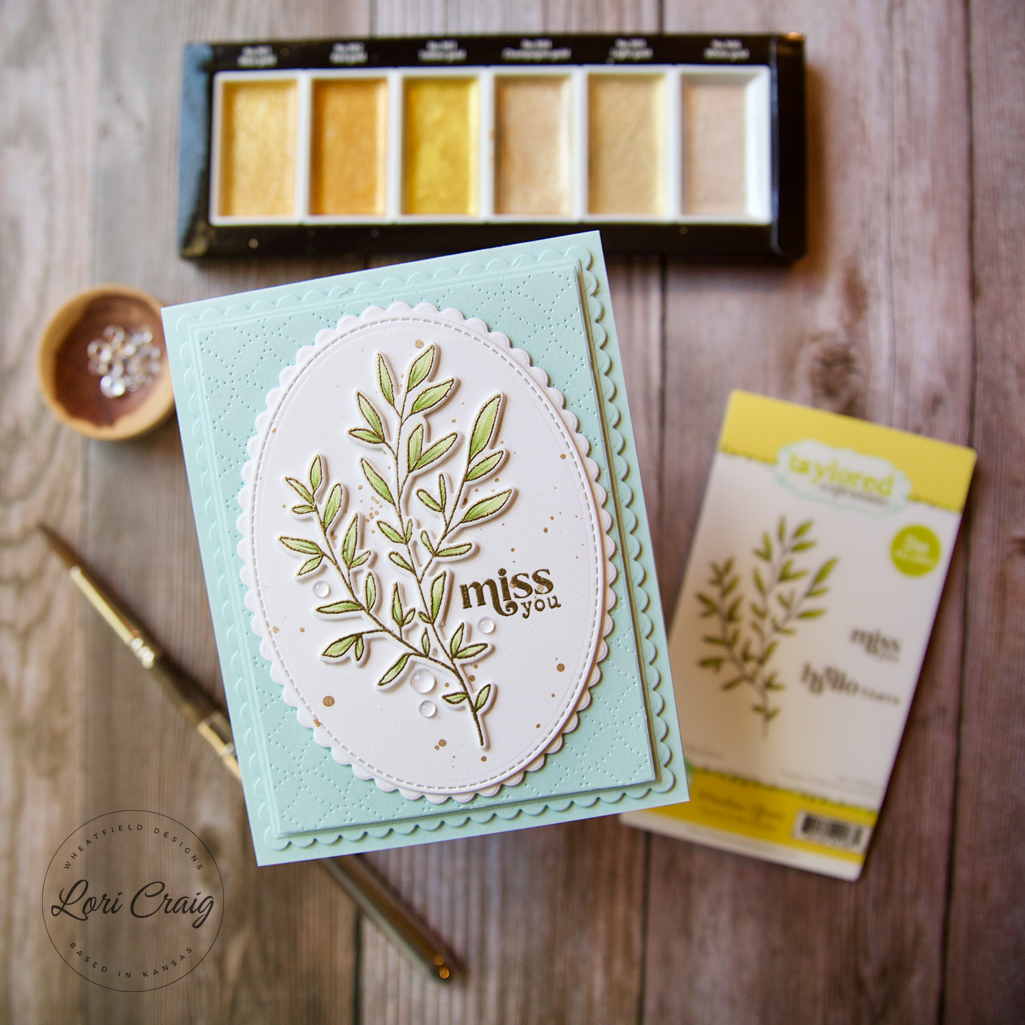
The final set I’m sampling today is the Meadow Grass stamp and sentiments. I’ve used the same tricks to build up cardstock layers for an extra richness that frames the gold embossed image, colored with OLO marker. The Pierced Circle cutting plate gives a soft swirl to the background.
I finished the Meadow Grass image with gold watercolor splatter and clear drip drops on the Sugar Cube oval dies.
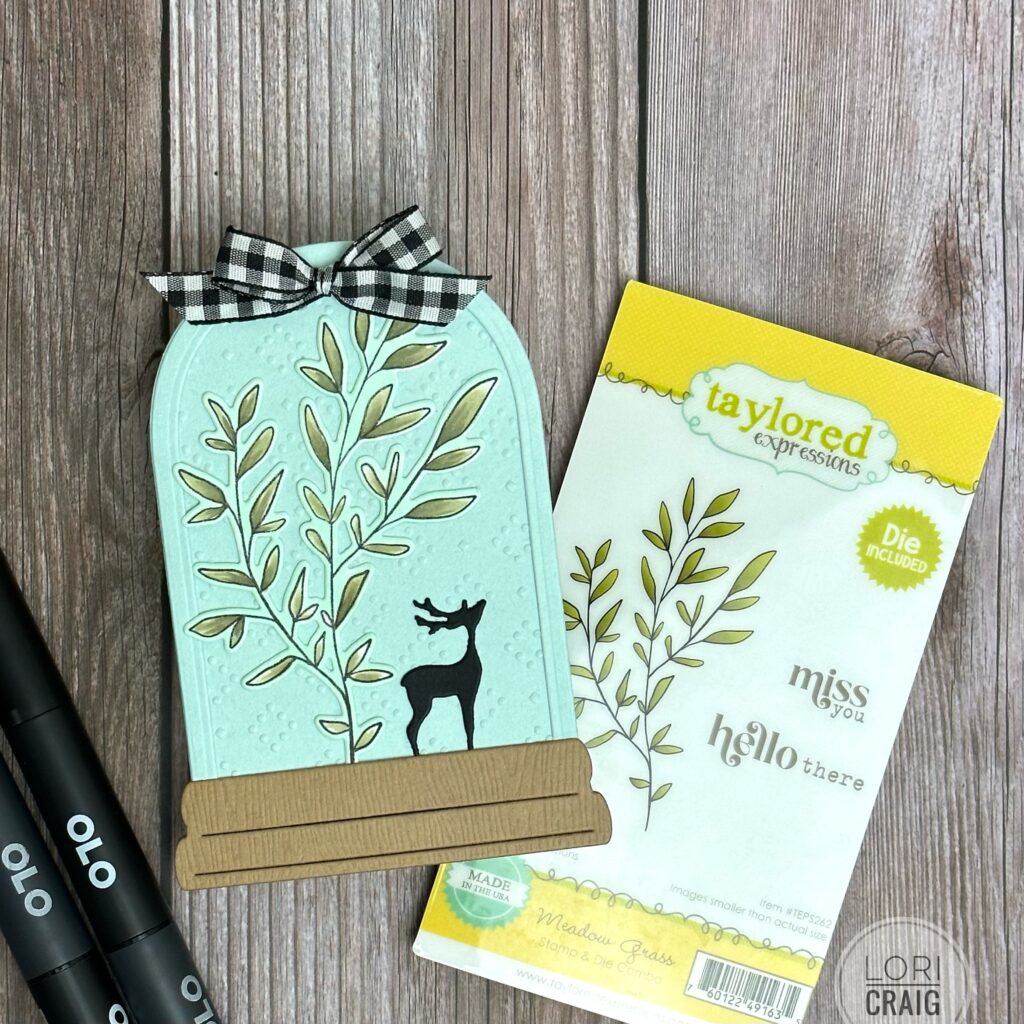
Finally, I made a quick snowglobe shaped card with the Arched Stacklet dies, Snow Globe base dies, and the deer from Tiny Town. A trick I learned from my friend Kavya on the colored Meadow Grass sprig is to color on Sugar Cube cardstock, but color the white die cut edge to match your cardstock for a seamless look.
If any of these pique your interest, now through Sunday, December 17th, you’ll get 15% off when you purchase 4 or more of the NEW Perfect Pairings Stamp & Die Combo sets! It’s the perfect time to grab all of your favorites and these cute sets are the perfect gift for your favorite crafty friends! Offer valid while supplies last.
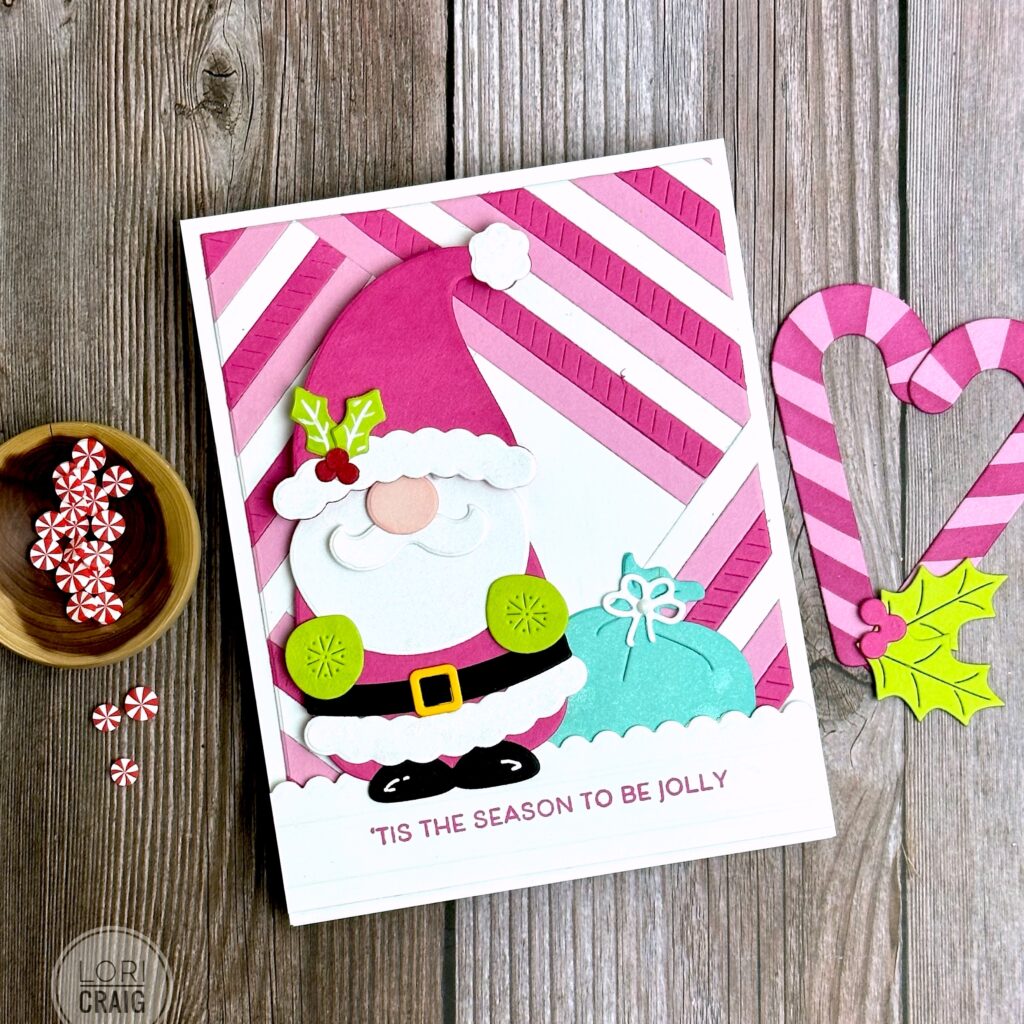
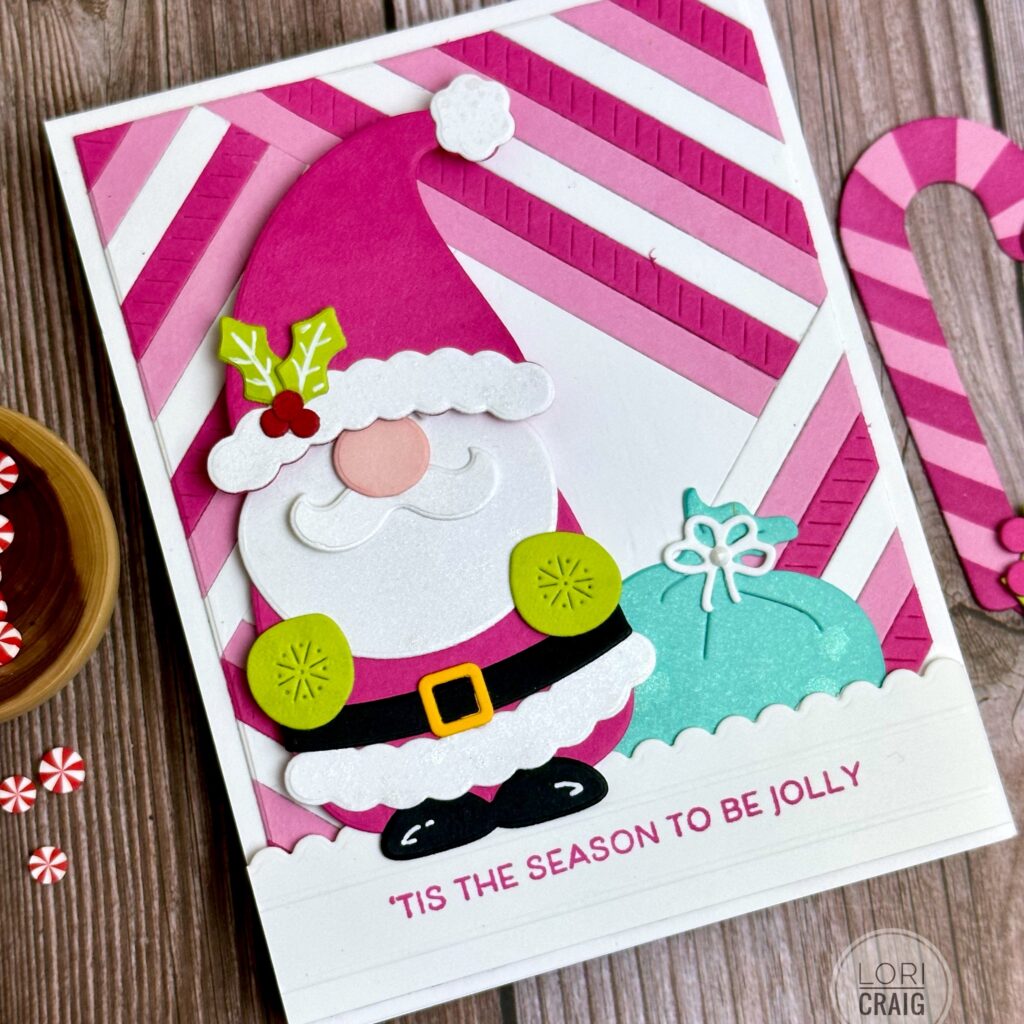
What a fun day! I love fun, cute, functional tools and storage, and today is a BIG release day for those at Taylored Expressions! But, let’s start with this adorable Santa!
I started with the new Easy Strips Map Vol. 3 and the 1/4″ Easy Strips. I used the new Easy Strips Patters 1/4″ to add a little texture every third strip, and I kept the colors clean with pinks and white for a candy cane look.
After filling in according to the map, I cut the map layer down with an A2 stacklet to give it a white mat around the focal layer. Then, I added a Gnome Alone Santa cut from coordinating colors. I added some shading to the Santa hat and coat with the small, new detailed blending brushes. In addition to being super cute in a oui yogurt jar on my desk… priorities! LOL, they feel great in my hand and add just the right amount of ink on small spaces.
The white beard and fluffy white fur are accented with Unicorn Mist spray, as is the toy tote sack. They are super sparkly without being messy or grunge. I love the clean lines and bright pops of pink with the gnome die critters.
I cut a scalloped strip of Sugar Cube using the largest rectangle, added some score lines for a little visual interest and stamped Tis the Season to be Jolly from Little Critters Christmas stamp set. This made a little grounding of snow for Santa to stand.
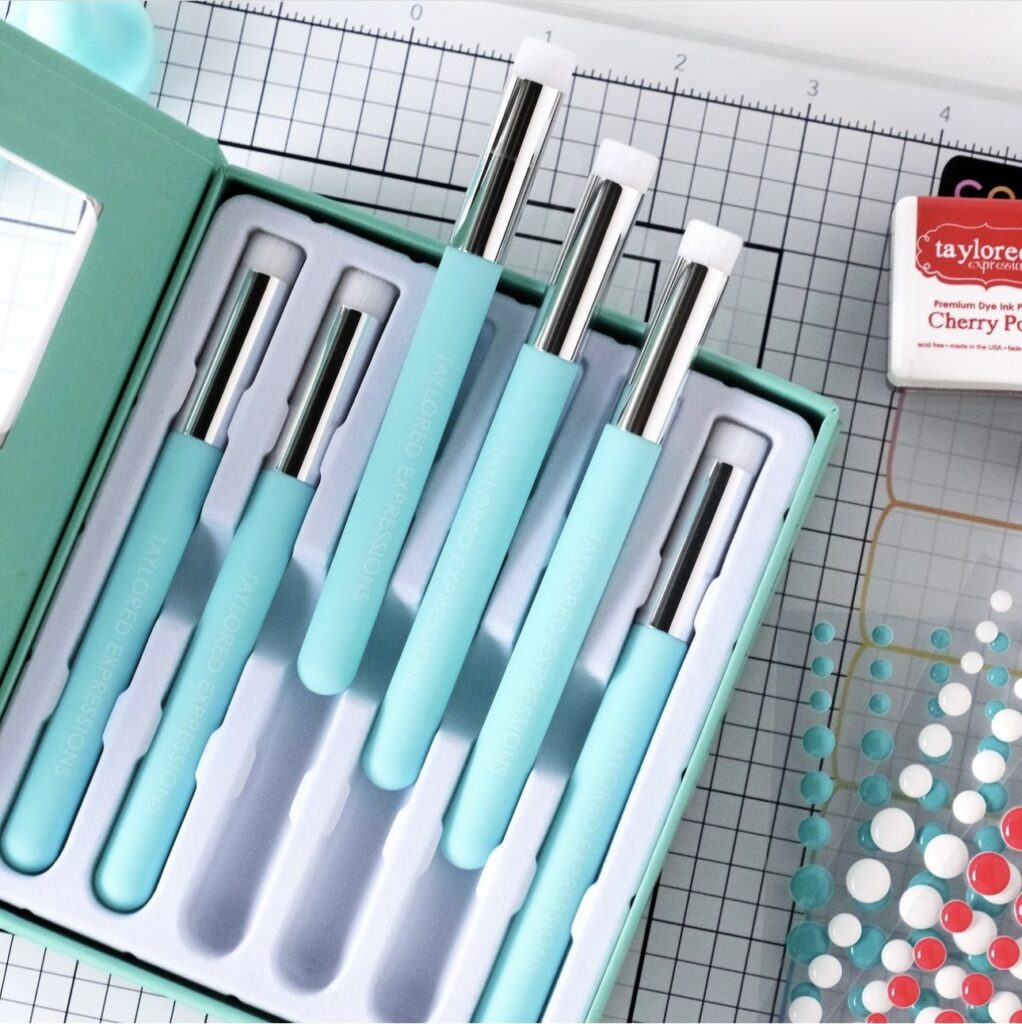
I love the clean aesthetic of the new-today Detailed Blending Brushes. They are perfect for adding ink details to smaller die-cut pieces. They feel nice in my hand and add just the right mini-swooshes of ink over cardstock. Very, very glad to have these in my arsenal!
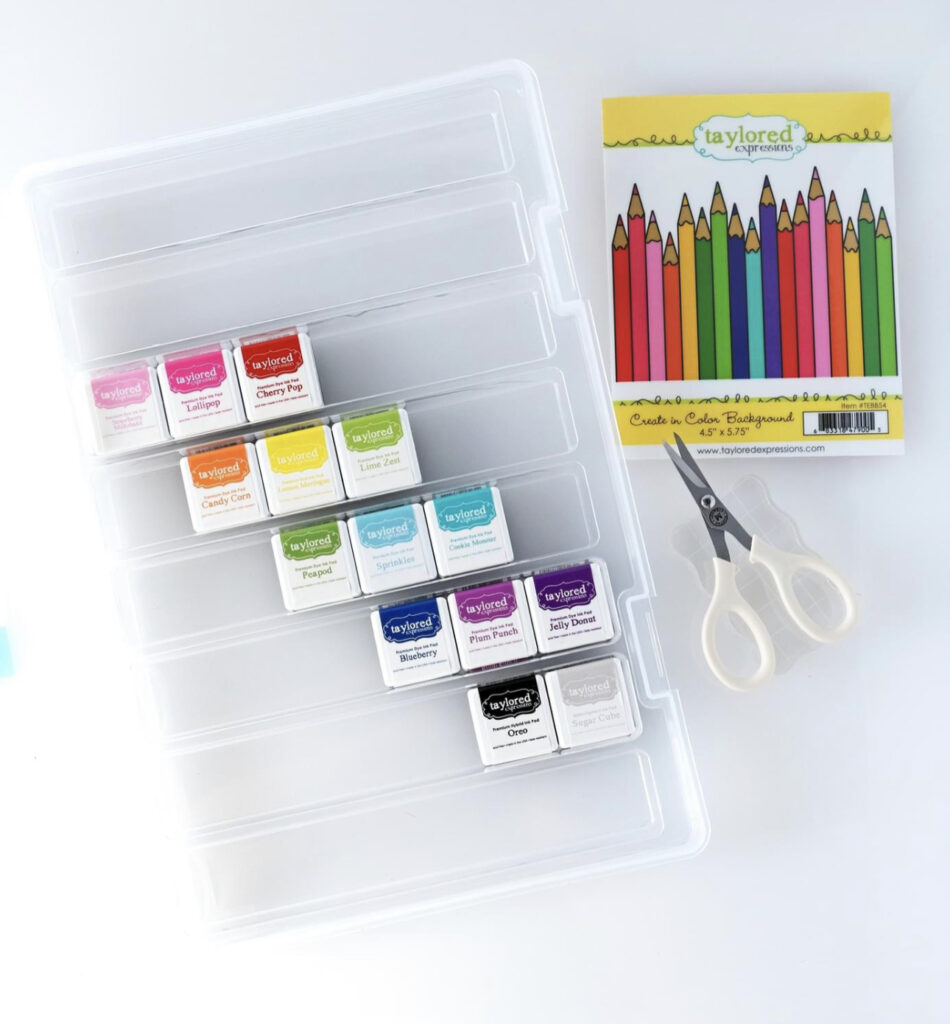
The other addition coming today that I cannot wait to order for myself is the storage tote! The totes are available as an open tote with a snap lid, as well as in a Simple Strips format where the channels hold compact rows of ink cubes. My calculation is 8 rows of 6 ink cubes for a total of 48 per tote. I’m ordering two and will have room for a few rows of small tools (detailed blender brushes!) and growth.
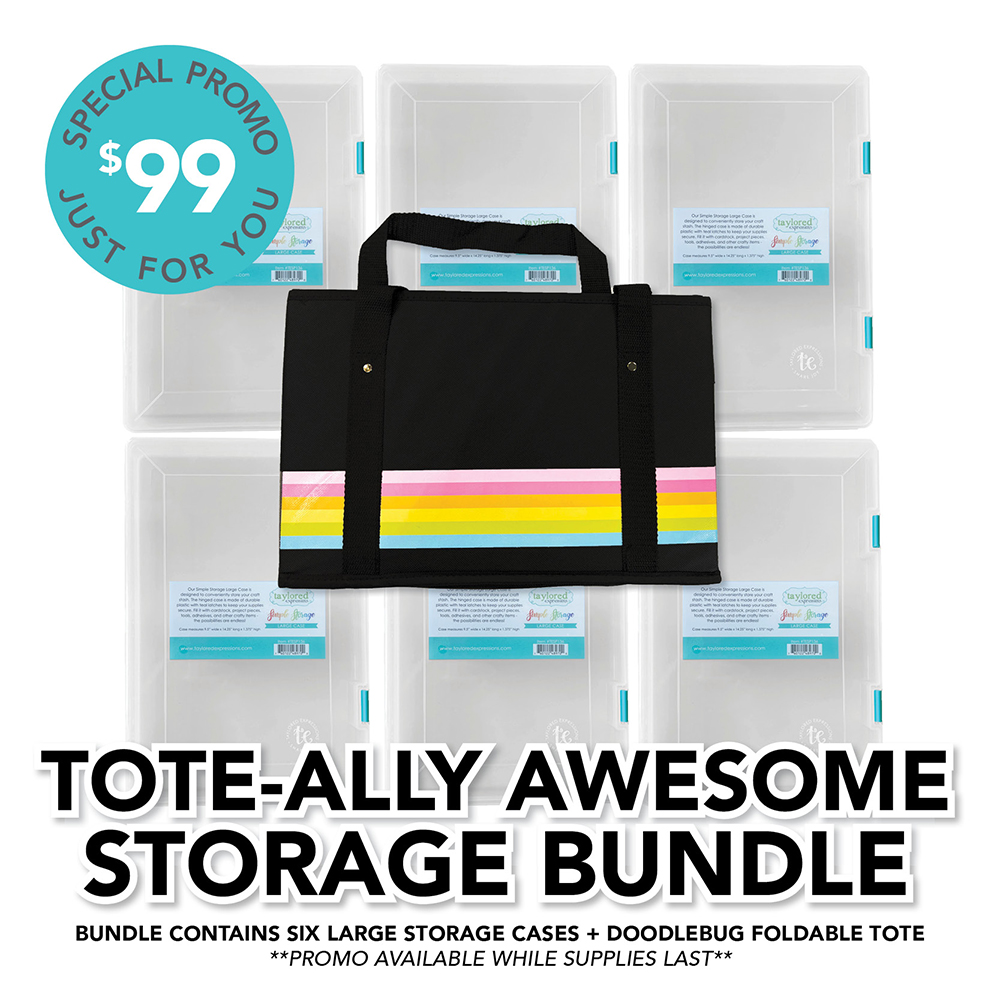
So, one more fun surprise for today! While supplies last, you can get the Tote-ally Awesome Storage Bundle for $99 which includes 6 of the new Simple Storage – Large Case along with a Doodlebug Foldable tote. Keep all of your projects and supplies organized and ready to go in style for your next crafty get-together!
So, Merry Christmas to me! LOL Which is your favorite new product from Taylored Expressions today?
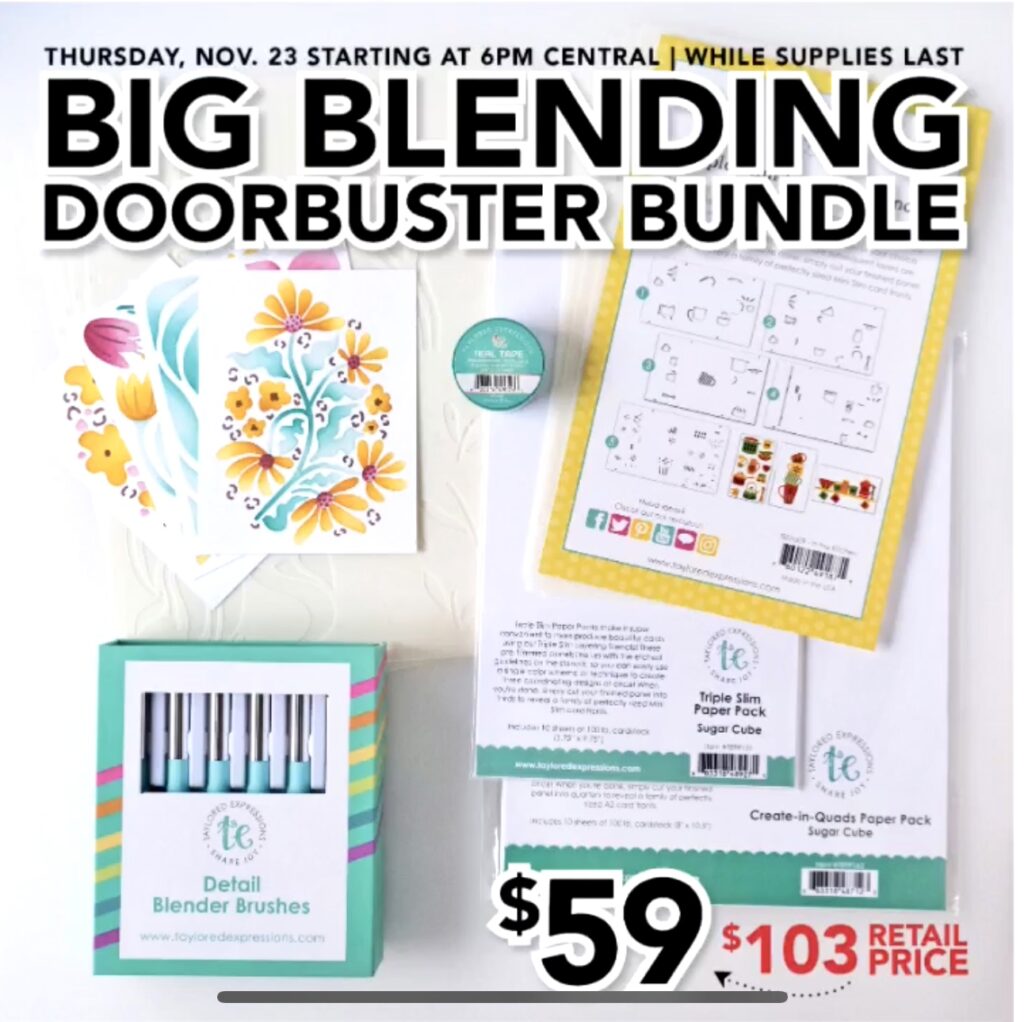
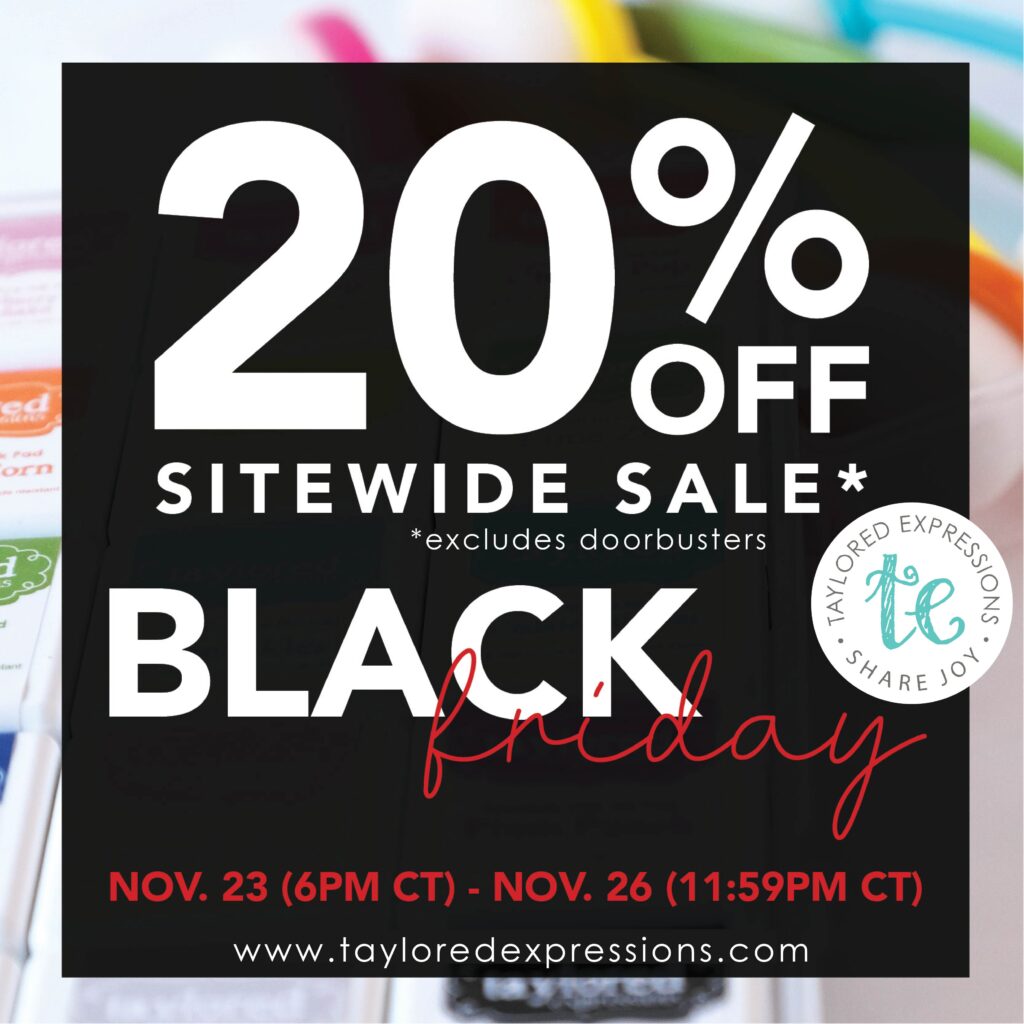
Who is up for the armchair Taylored Expressions shopping extravaganza this Thanksgiving? I gave up the 4am alarm, cart shoving, and mediocre coffee many years ago, but doorbusters for the craft room from the craft room? I am here for it!
From 6pm Central on Thursday, November 23, while supplies last, Taylored Expressions is offering an incredible discount on a blending bundle that includes the newest itty-bitty detail blender brushes!!, the Create-in-Quad featured here called Poster Prints and an adorable Triple Slim called In the Kitchen.
I’m loving the versatility of Poster Prints. I blended up several color combos, so I’ll be making more birthday, sympathy, get-well, or thinking-of-you cards on-demand this season.
One of my favorite things to do with Create-in-Quad stencils is add texture with cutting plates or embossing folders after I have blended. Here I used the Floral Vine Embossing Folder over the top of the blended panel. The Ever More sentiment is embossed on vellum. I hide the adhesive on the vellum by using the TE Sticky Sheet between the two layers. The sticky sheet is transparent, so it works beautifully.
Using a combination of ink colors gives you depth and variation in the larger blooms . The detailed blender brushes are perfect for this.
After blending, I splattered all of my panels with the Gansai Tambi Metallic Pearl watercolor. Love the shimmer!
Let’s talk about the Doorbuster BUNDLE! Releasing on Thursday at 6pm Central, this bundle includes:
Create-in-Quads Poster Prints*
Create-in-Quads Paper Pack – Sugar Cube
Teal Tape
Detail Blending Brushes*
Triple Slim – In the Kitchen*
Triple Slim Paper Pack – Sugar Cube
This represents about a 40% discount and includes the stencils and detail blender brushes that are exclusive to the bundles in their TE introduction. Yes – 40% discount! You read it correctly!
In addition to doorbusters, (there is another doorbuster on Saturday morning at 9am, and let me just say: RAINBOW) there is a 20% sitewide discount all weekend through the evening of the 26th.
I hope you have a beautiful holiday weekend of gratitude with those you love. Happy Thanksgiving!
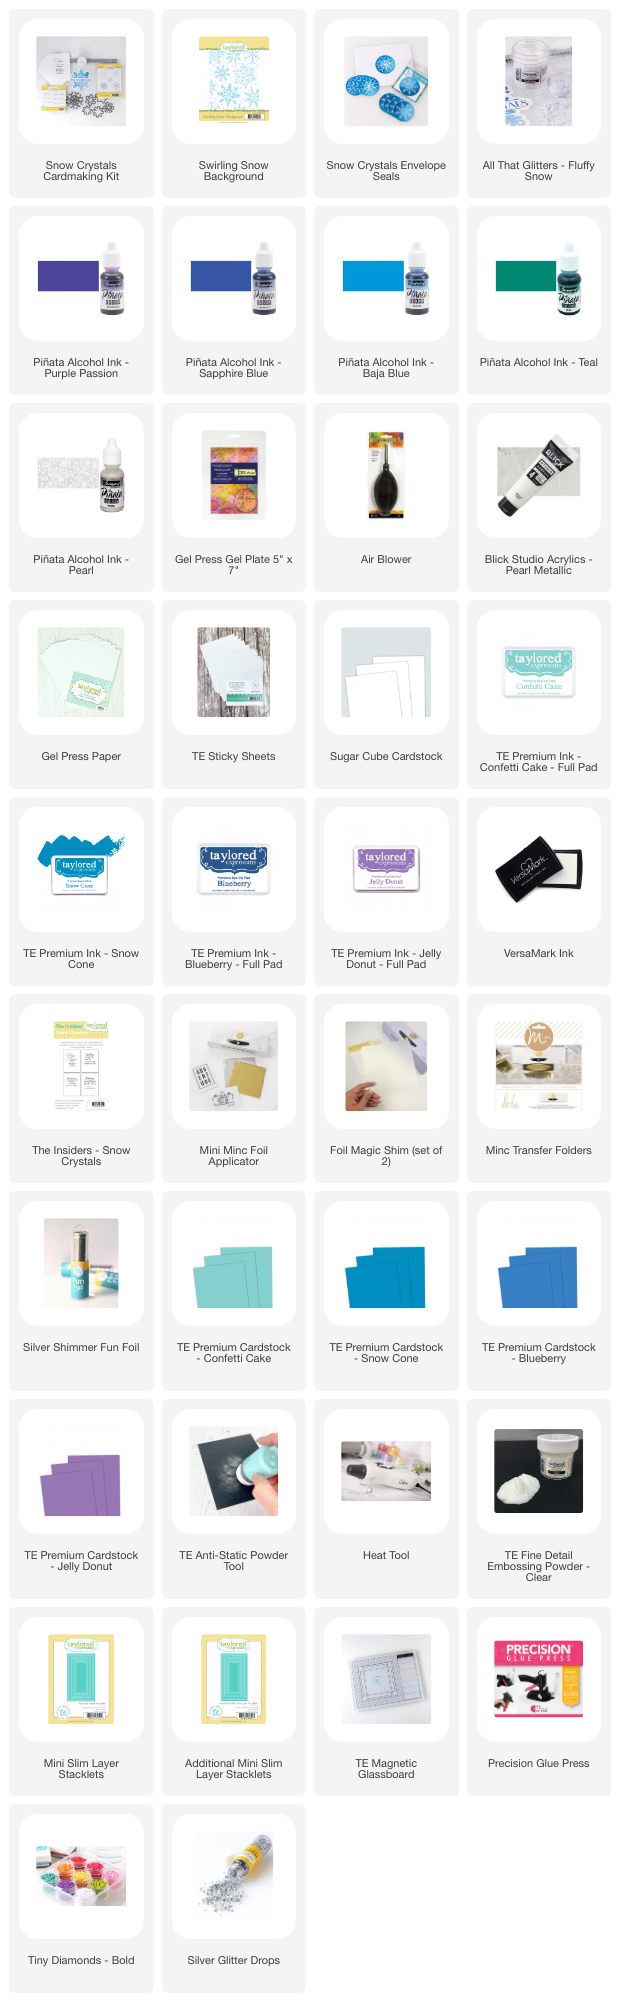
It’s time for a Taylored Expressions Kit, and they knocked it out of the park this month with a beautiful snow-themed collection of goodness! The kit is called Snow Crystal and it’s perfect for holiday and winter cards. All of the products I’ve used are linked below. Let’s take a peek at the cards I made for this release!
I had the best time working with the included background stamp and my gel press to create these gorgeous panels with Pinata alcohol inks. Everything you see in white on this panel is actually alcohol-lift from the stamp. I used the Pinata Alcohol Inks and my Gel Press to create these panels. It was so fun and so stunning, I created a pile of prints in every color! Step-by-step below!
This really is an easy process. There are just a few tricks to get crisp, clean prints with the Pinata Alcohol Inks and a Gel Press. My tricks are in bold!
Pinata Alcohol Inks
Gel Press
Brayer
Pearl White Paint
Puffer Tool
TE Gel Press Paper
TE Sticky Sheet
TE Sugar Cube Cardstock
Squirt several drops of alcohol ink on Gel Press. Brayer over the color to spread evenly over the surface. After spreading smoothly with the brayer, ALLOW THE ALCOHOL INK TO DRY on the surface of the plate. If I’m in a hurry, I will use the puffer tool to speed this up, but it does happen fairly fast.
When alcohol is dry, press background stamp into the plate. Drop the stamp straight down, do not rock it onto the surface or you will get movement in the fine lines. Lift the stamp straight up.
Apply 1-2 drops of Pearl WhiteAcrylic Paint to the gel plate and use the brayer to spread it evenly across the surface. You do not need much. This should be a very thin layer of paint. If it is thick, run some of the excess off on scrap paper with the brayer.
When the white paint layer is thin, lay the TE Gel Press Paper over the Gel Press, cover with a scrap piece of paper and rub with your hand evenly over the entire surface.
Peel the scrap paper up.
Gently lift the TE Gel Press Paper to reveal the design. Set aside to dry.
Apply TE Sticky Sheet to the back of the pressed design. Apply both layers (print and sticky sheet) to a piece of TE Sugar Cube cardstock for thickness.
Trim and create your card.
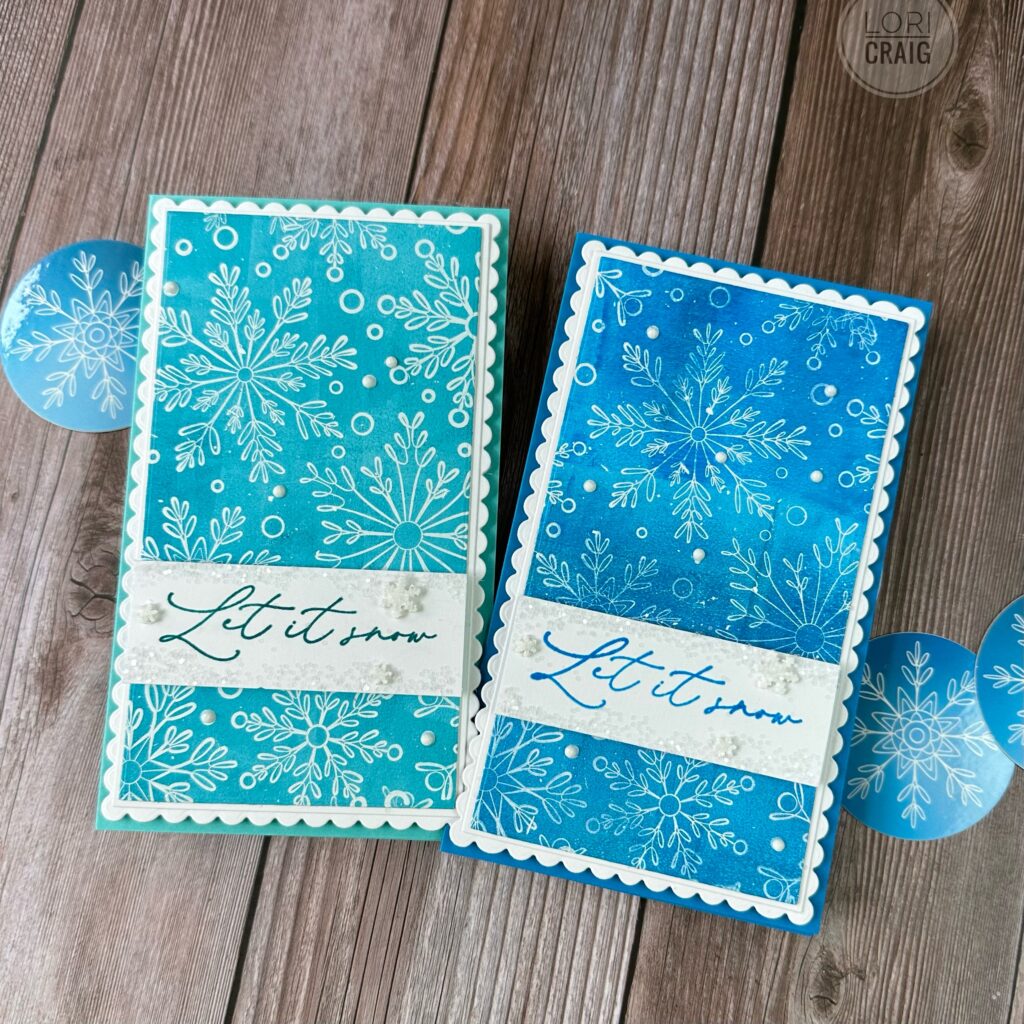
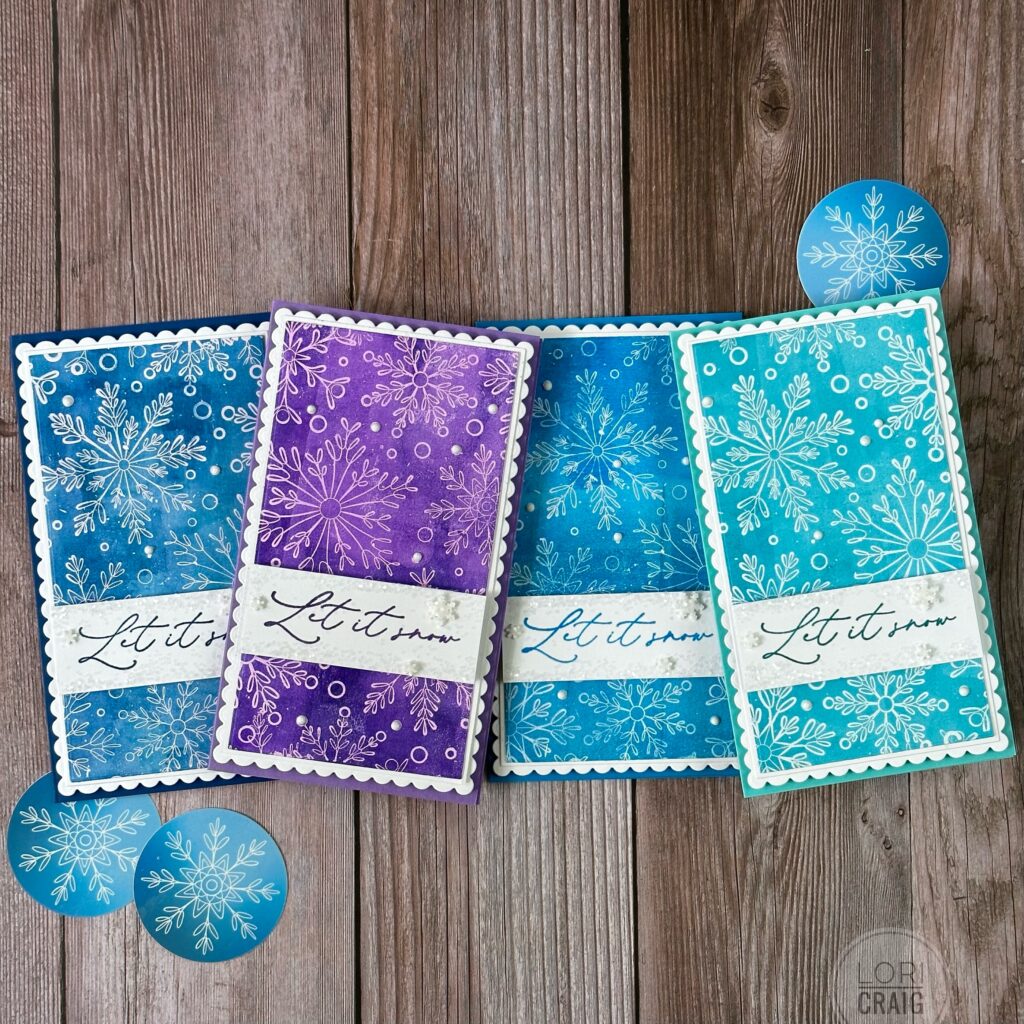
The colors I used here are (left to right) Blueberry, Jelly Donut, Snow Cone, and Confetti Cake. Trimmed out with the Mini Slim Stacklets and Mini Slim Scallop Rectangle dies, they are a blizzard of beauty on my desk. I finished the cards off with a sentiment from the kit – stamped first in coordinating ink color, overstamped with Versamark and heat embossed with fine detail clear embossing powder. I added All That Glitters Fluffy Snow.
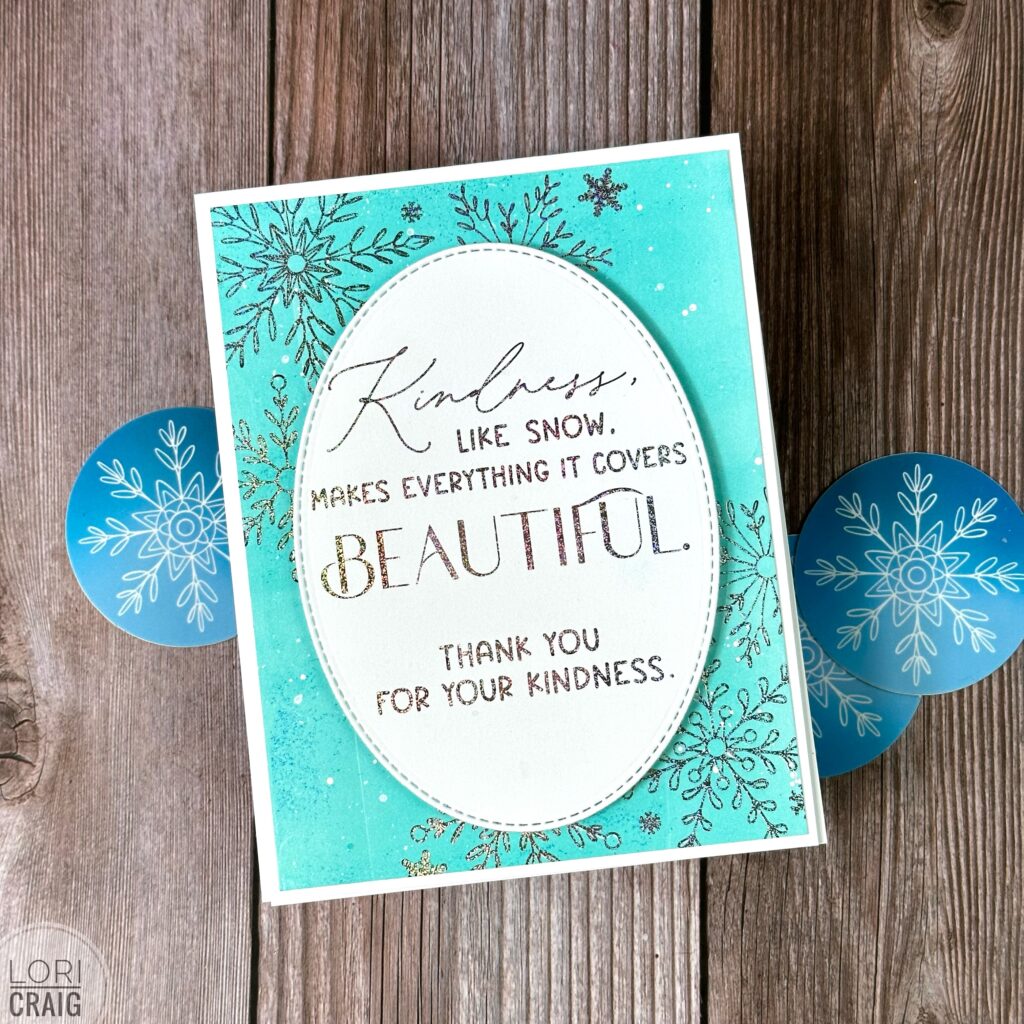
For my next card, I used the coordinating Foil Its to the Snow Crystal kit and foiled them with Silver Sparkle foil for an iridescent shimmer. The confetti cake background panel was 1) foiled and 2) brayered over with Confetti Cake TE Premium Dye Ink for a soft wisp of color in the background. The panel was splattered with pH Martins white for swirling flakes.
I love how this foil shimmers like a rainbow! So pretty!
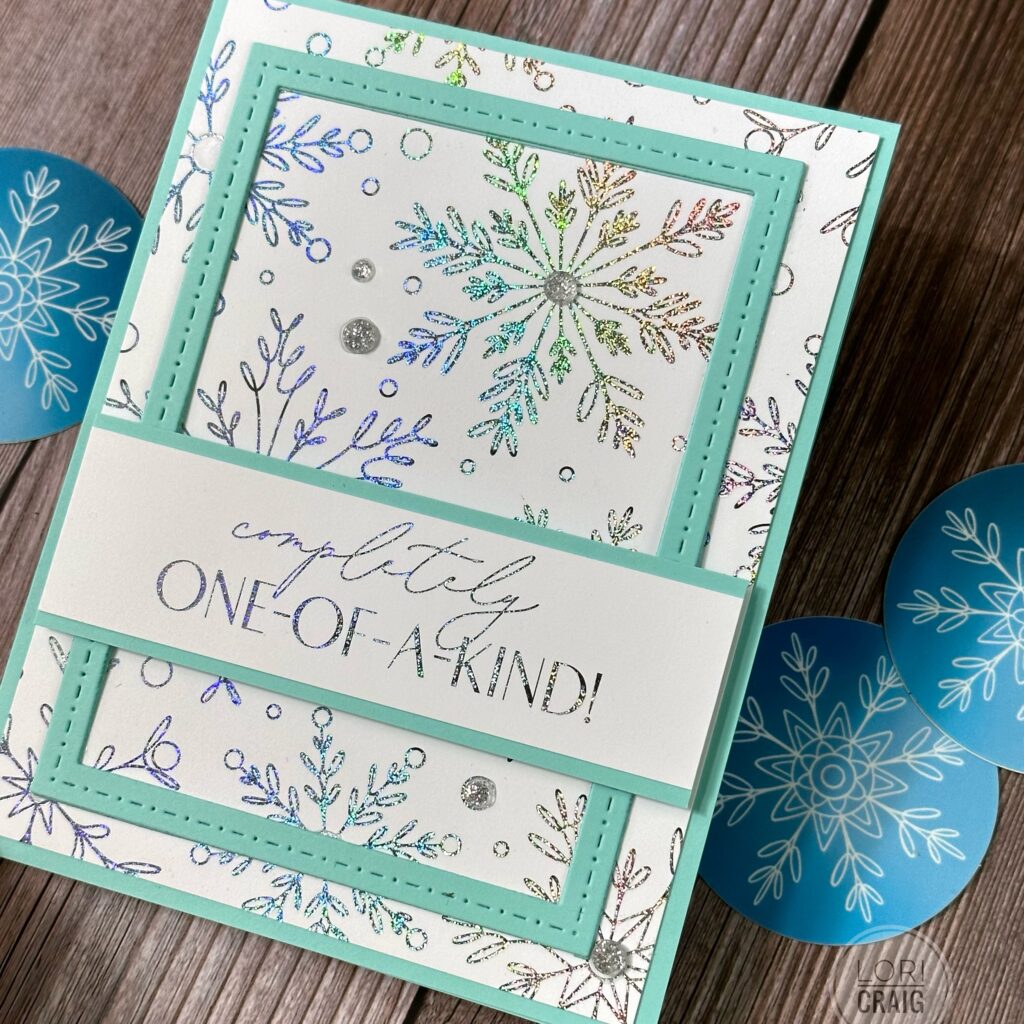
MY last card shares another option with the Foil It panels. This collection is wonderful for detailed, gorgeous cards that come together quickly. For this one, I simply added a frame accent foiled sentiment.
I hope you’ve enjoyed this blizzard of color with the Snow Crystal Kit from TE. The kit is available while supplies last. I expect the sell-out will be faster than normal. It’s just so versatile and perfect for winter! Bundle up, friends! It’s officially winter card-making season! Thanks for stopping by!
This is a relatively fast card to pull together, and it would be easy to mass-produce. Hmmm, I may need to set up the workshop and put my husband on task. LOL I’ll let you know how that goes!
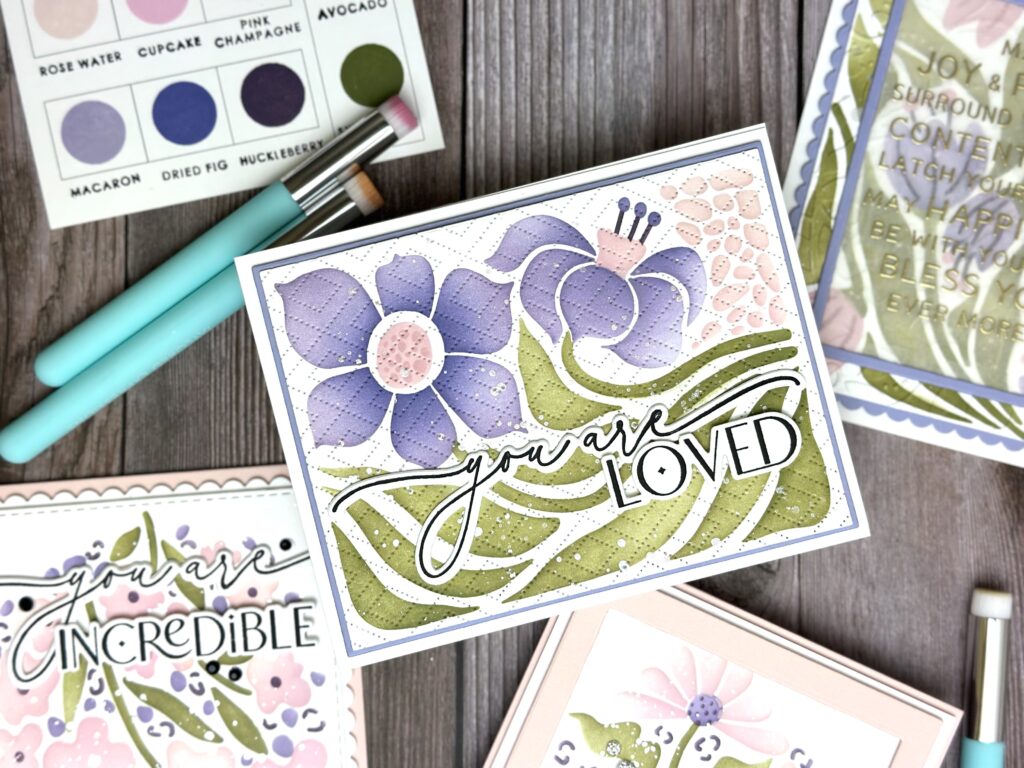
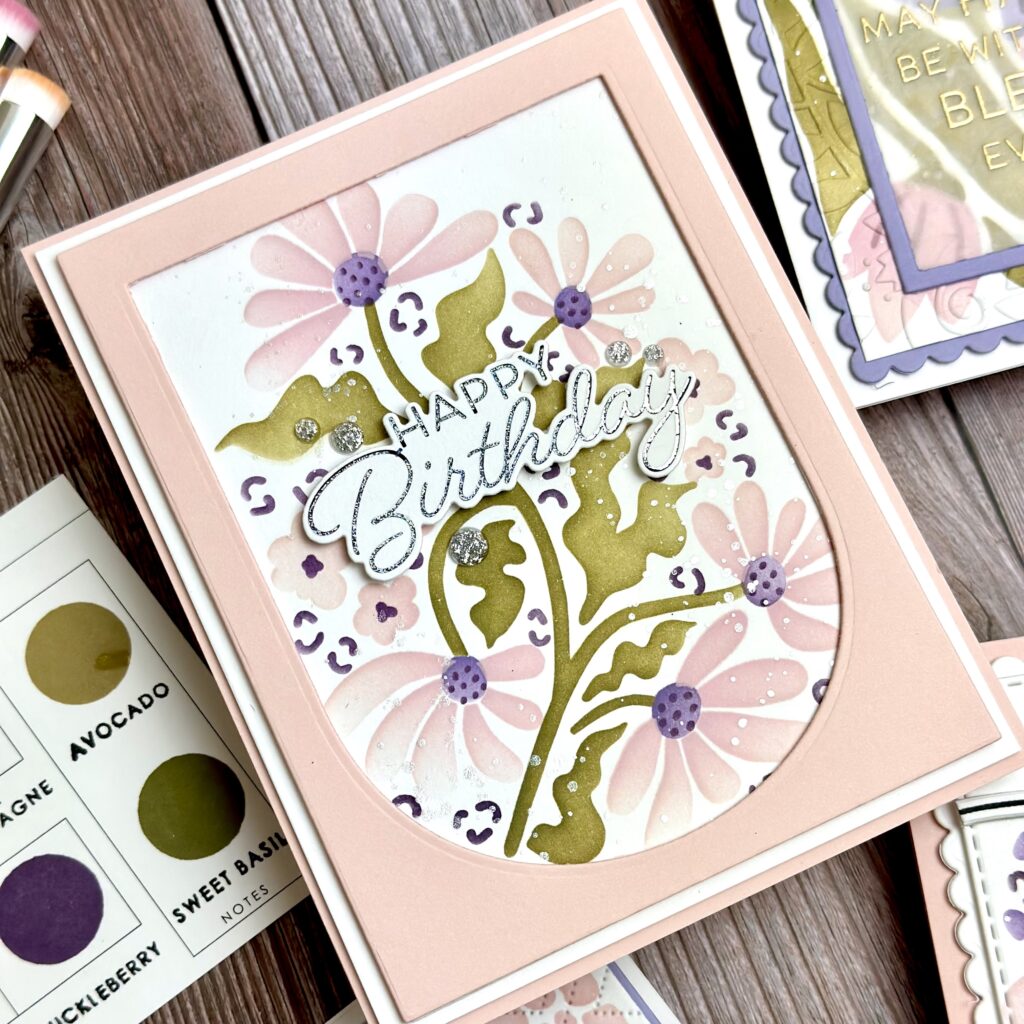
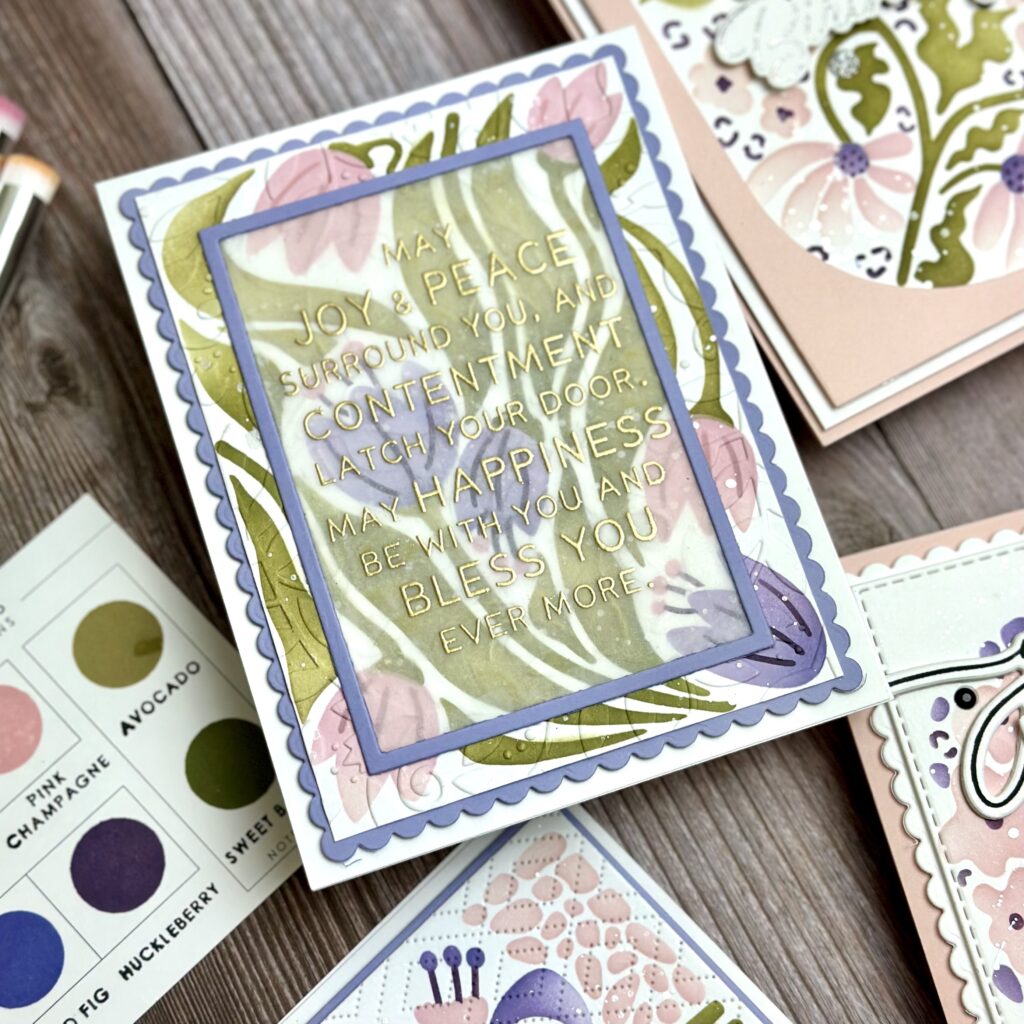
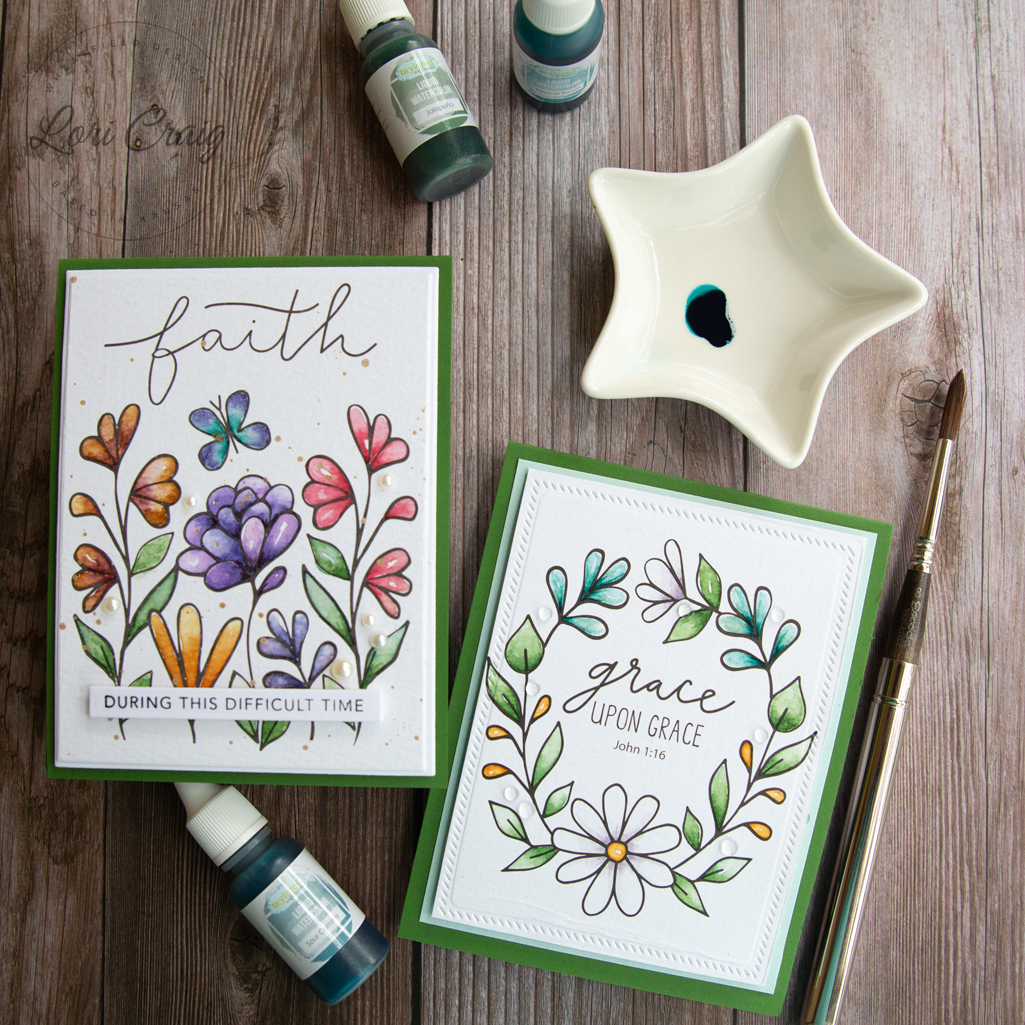
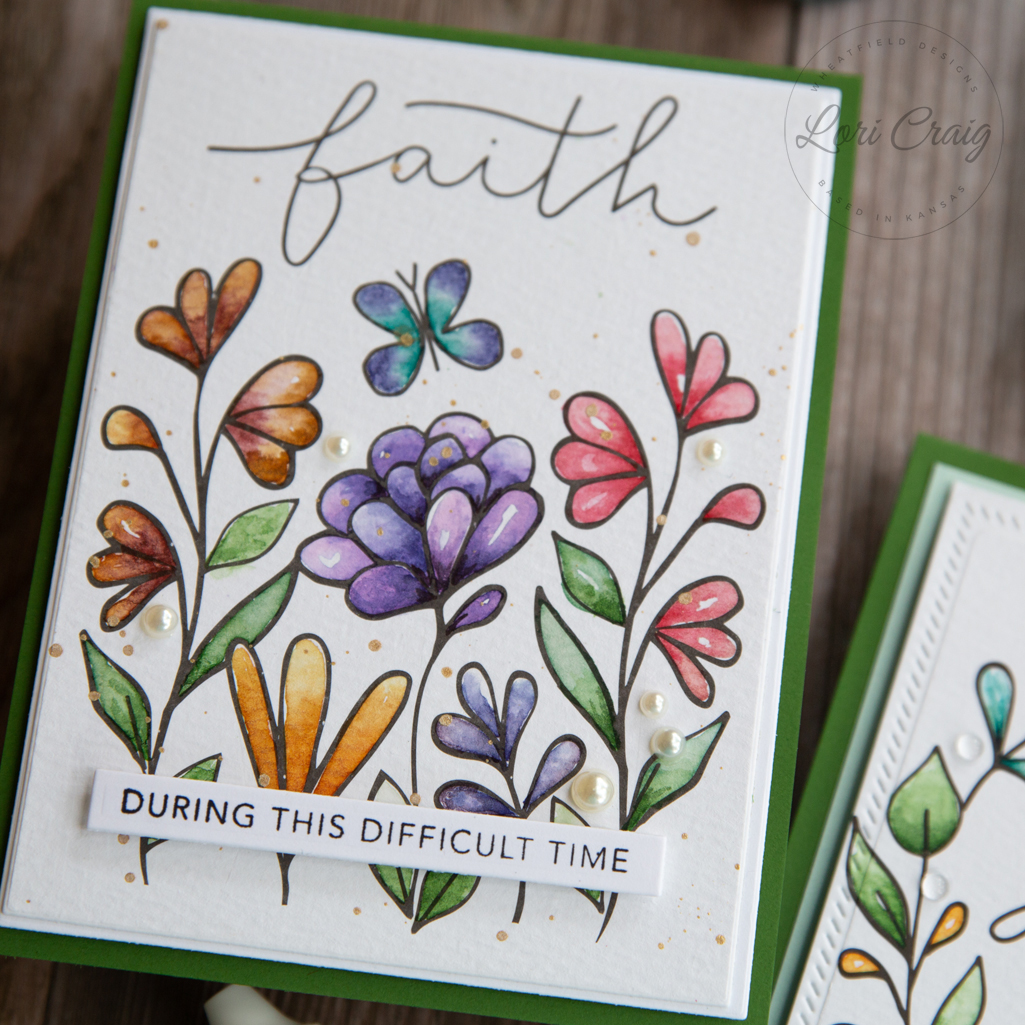
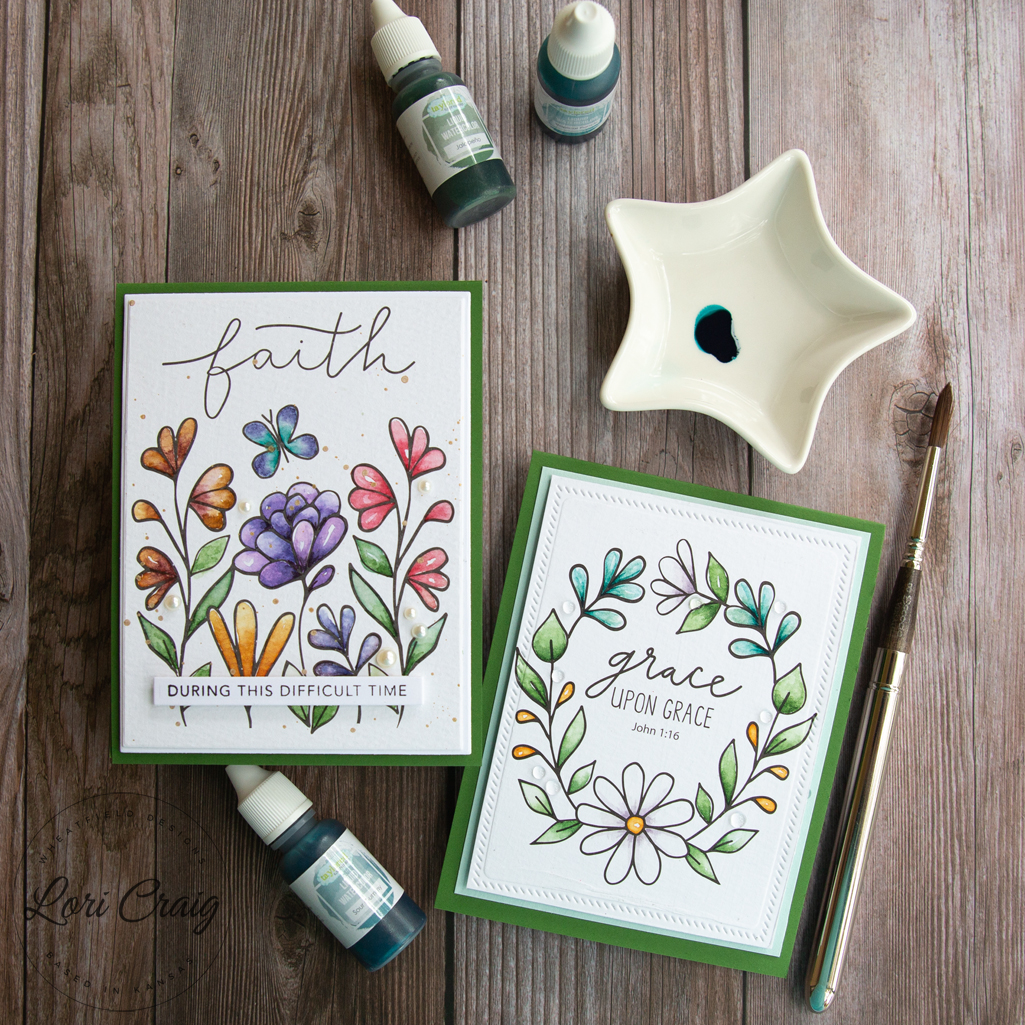
In love with this week’s release at Taylored Expressions. From the Heart is the vibe. A beautiful collection of stamps, stencils, and die products along with gorgeous new liquid watercolors for cardmaking helps you put it into action.
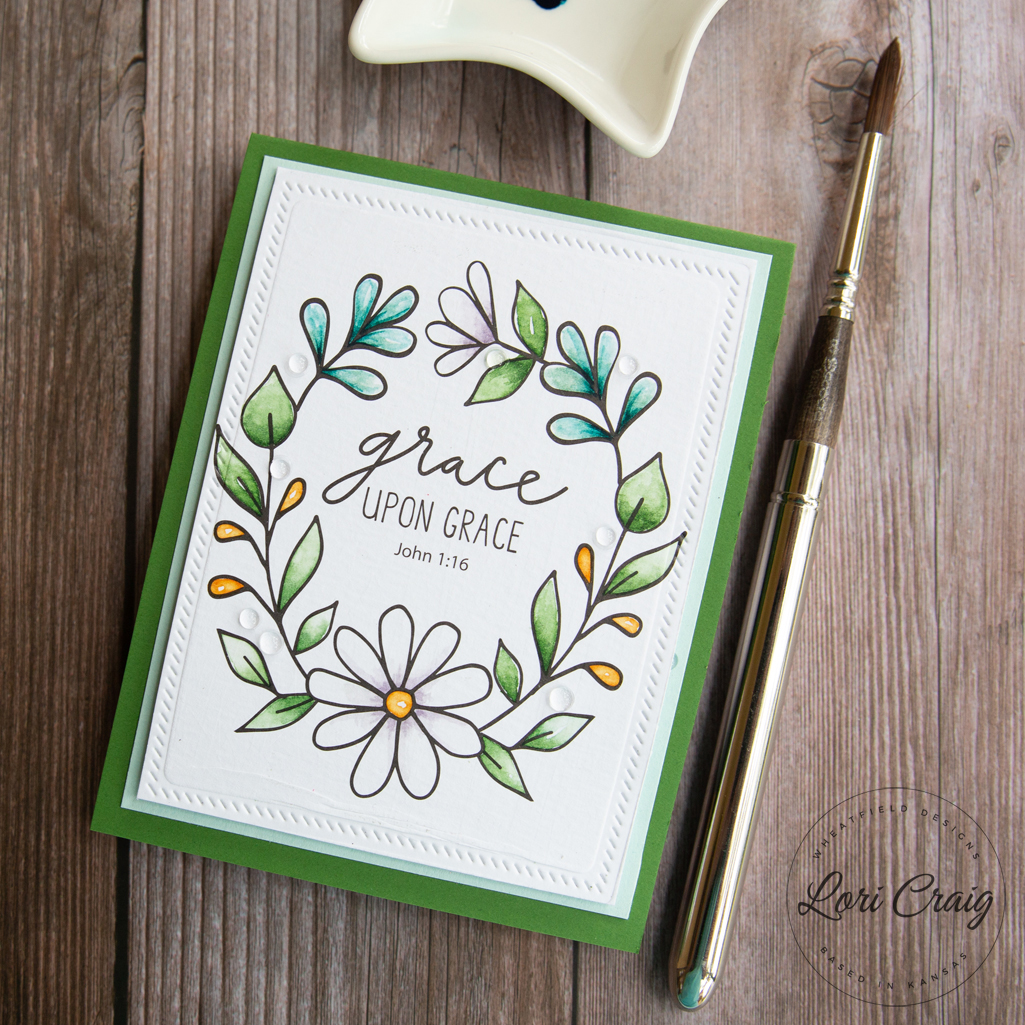
My favorite new product is this collection of Faithful Flowers Watercolor Panels. The series includes beautiful, easy-to-color florals with thoughtful sentiments to say thinking of you or take care. I use the TE Liquid Watercolors with a cup of clean water and paintbrush. I squirt the watercolors onto a simple palette (paint palette, piece of acetate, a plate – any non-porous surface works!) and let the water and color work magic.
Sometimes these are the hardest messages to send, and this collection makes it easy to focus on the thoughts behind the creating. The panels stand alone with simple accents.
I’ve added a few embossed frames with Diagonal Stitch Rectangles and pearl and clear drip drops. You do not need a lot of bells and whistles to send a thoughtful message.
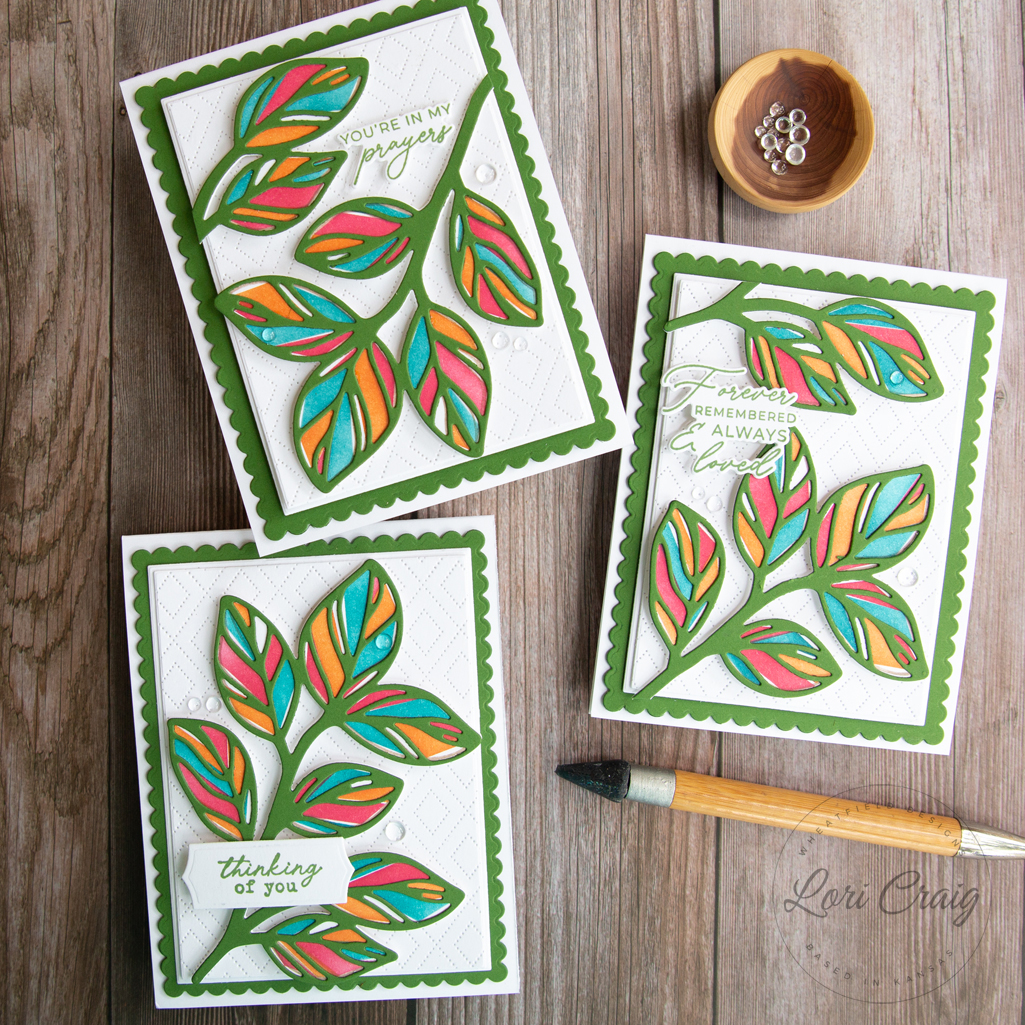
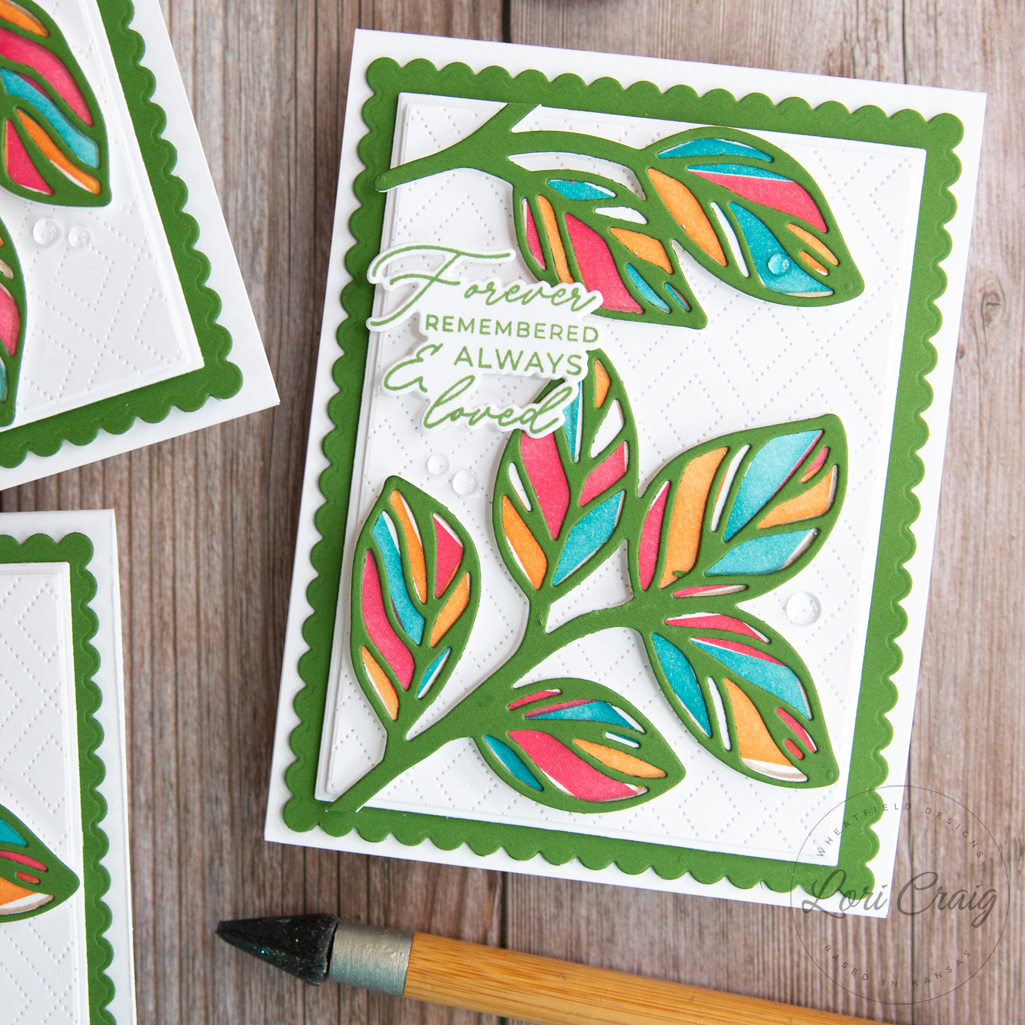
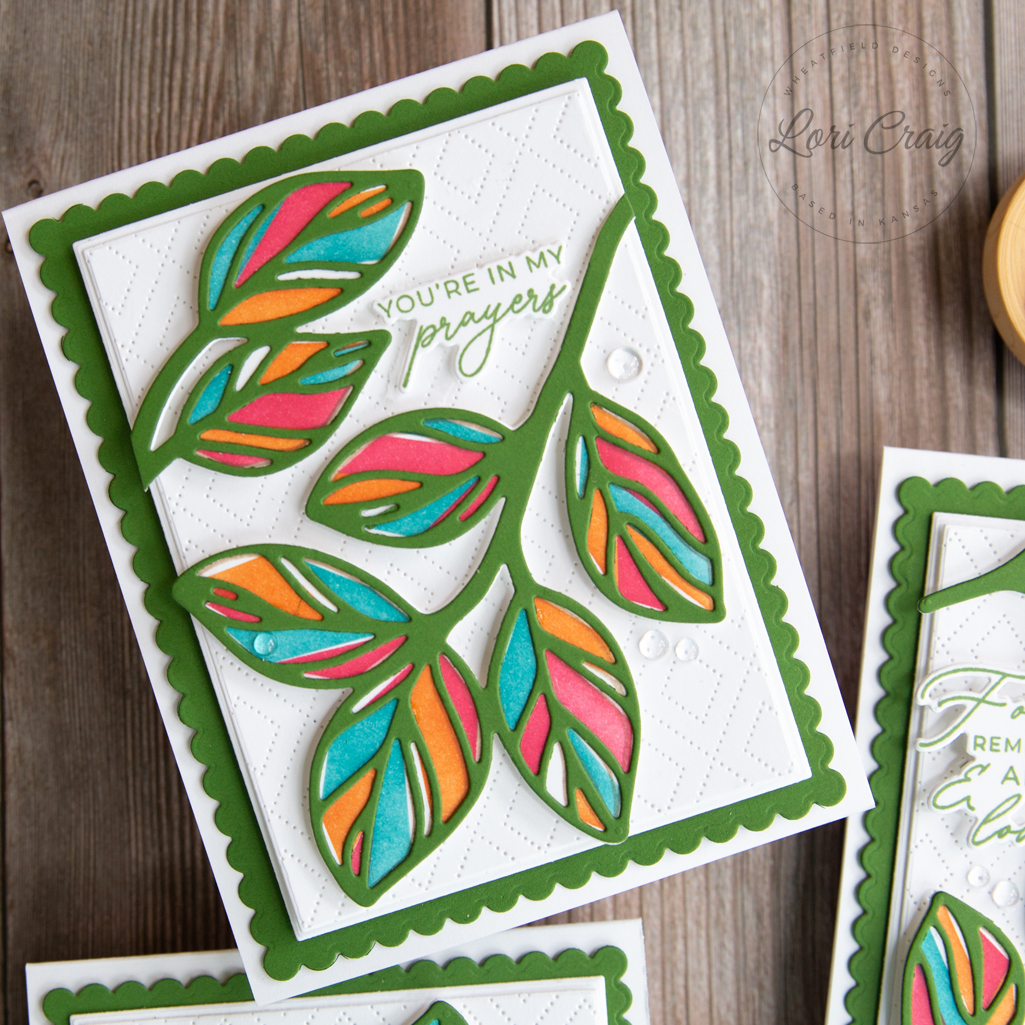
Next up, the newest Artistic Branch suite is beautiful. The collection includes the top layer die that you see here cut in Cilantro cardstock, Artistic Branch Coordinating die that creates a base for the Stamp & Stencil combo. The stencils allow for fast color that peeks out from under the Cilantro veins.
I chose a color combo of Tropical Punch, Guava, and Candy Corn to use with the stencil to add color under the Cilantro die cut layer veining. I also love that the stencils do not cover 100% of the leaves and allow a pop of white to peek through.
With the fluid movement of the leaves, I wanted the branches to rest on something more angular, and the Diamonds Pierced Plate cut in white creates a softened backdrop without visual clutter.
The Artistic Branch is beautiful as-is, but I loved cutting it up to create different patterns with the pieces and parts.
I love how the different layers, textures, and style all play well together in this release. You’ll love how effortlessly your cards will come together and be ready to send as a comfort and thinking of you. Everything is linked below, but you can find all of the newest product HERE at Taylored Expression.
I'm Lori, and I've been stamping for 20 years. I can't believe the joy and friendships that some rubber, ink and pieces of paper have brought into my life.
I have been a papercraft educator and have taught card making in many venues around the country over the past decade.
I do participate in affiliate programs through Amazon and a other retailers. Occasionally, I receive a small compensation from purchases made via my links, never at an additional cost to my readers.
Thanks for stopping by. Here's hoping your life is full of small joys that make a difference.
E-mail Me